Introduction
A one click sync operation that will sync each of your invoices to your accounting package. Initially, the process will require you to establish nominal codes and linked customers.
For this example, 'QuickBooks' has been used, the process is similar for other accounting software titles, differences will be highlighted where required within the narrative.
To open the 'Sync Page'. From the main Diary Page, within the LH menu, click the 'Sync Accounts API' tab. (Permissions are required to navigate to this page. If the button is missing, you will need to speak with your Administrator to enable this)
On opening the sync page, there will be a simple menu to the left and a centre dialogue. The menu will allow you to choose which type of sync to perform;
Connect to your accounting package by clicking 'Connect to Quickbooks'. Depending on the accounting package you use, the process will involve a series of prompts from your accounting software provider requesting that you log into your accounting software. Follow these in the usual way that is expected when you log into your accounting software user portal.
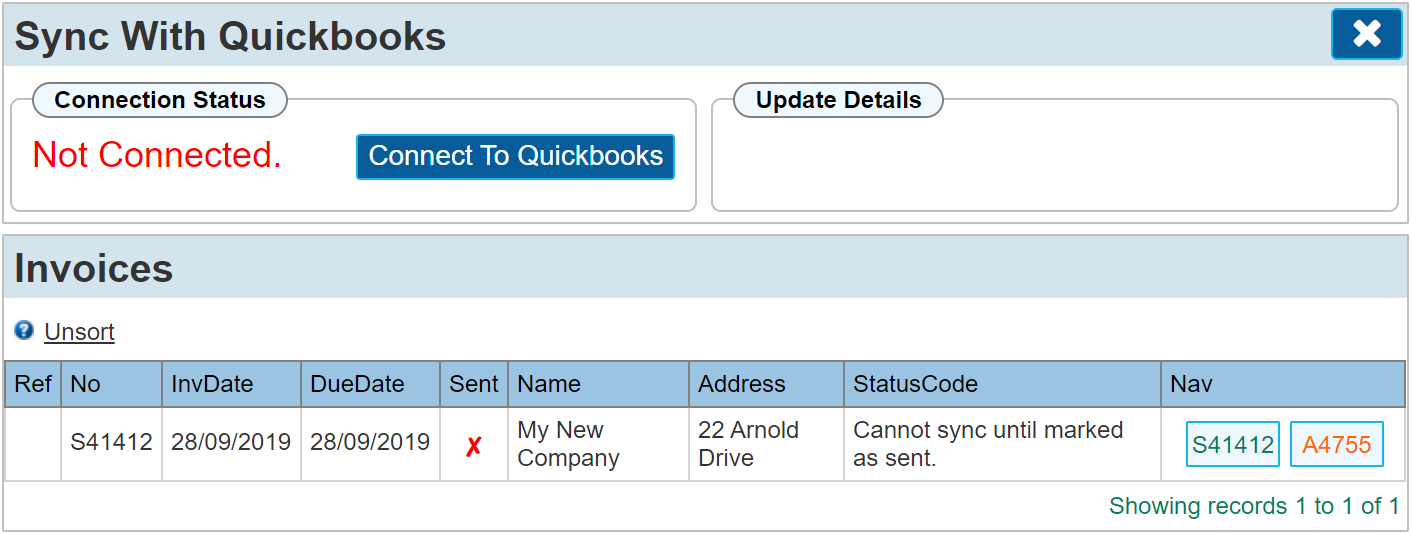
Once connected, the connection status will change from red to green, stating 'Connected', and the name of your accounting software will be shown.
Once you are connected to your accounting software, you have 6 options available to you.
- Disconnect from your accounting software by clicking 'Disconnect'.
- Sync: this prompts AutoVu to attempt 'Sync' for the first 5 listed documents. (Sync attempts to sync in batches of 5)
- Auto Sync: As above but continually syncs for up to 20 minutes. (batches of 5 at a time)
- Open the 'Accounts Sync (Actions) popup by clicking anywhere within the grid lines for any document (Except the 'Nav' panel)
- Within the 'Nav' panel, click the green 'S' number to navigate directly to the document in question.
- Within the 'Nav' panel, click the orange 'A' number to navigate directly to the client account for the given document.
|
Auto Sync is only useful once a common customer base has been established between Workforce Manager and your accounting package.
|
In this instance, we will click the 'Sync' button to attempt 'Sync'
There are a number of check stages to overcome before a financial document is allowed to sync. These are listed below and must be satisfied between each title before the sync will occur.
|
The 'StatusCode' column will indicate why the invoice has not synced.
|
- Invoices only: Check that the invoice has been marked as 'Sent' I.E. email, post etc.
- Check for matching Accounts ID.
- If used, check for matching ‘Care of ID, this option is not available with some accounting software titles.
- Confirm the document number being used does not already exist. (I.E. duplicate invoice numbers)
- Check each line of the invoice has a matching nominal code within your accounting software.
- Where applicable, make sure the nominal has an associated tax value. (This depends on the accounting software used)
- Confirm that each financial document detail line has text. (I.E. no blank lines allowed)
Once these points are all satisfied, the document will sync from AutoVu to your accounting software.
|
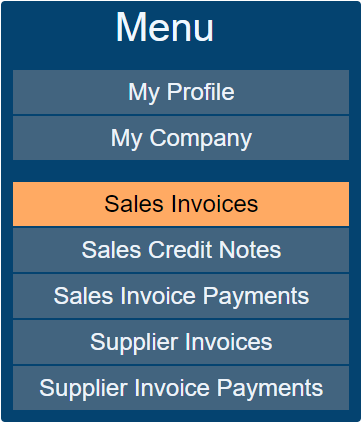
A common status code error: 'Cannot sync until marked as sent.'
Within the invoice 'Print Dialogue', the sent toggle is automatically set if you email the invoice, If you simply print this instead of emailing, you will be required to manually indicate to the system that you have sent the document by toggling the switch 'Sent' to 'Yes'
|
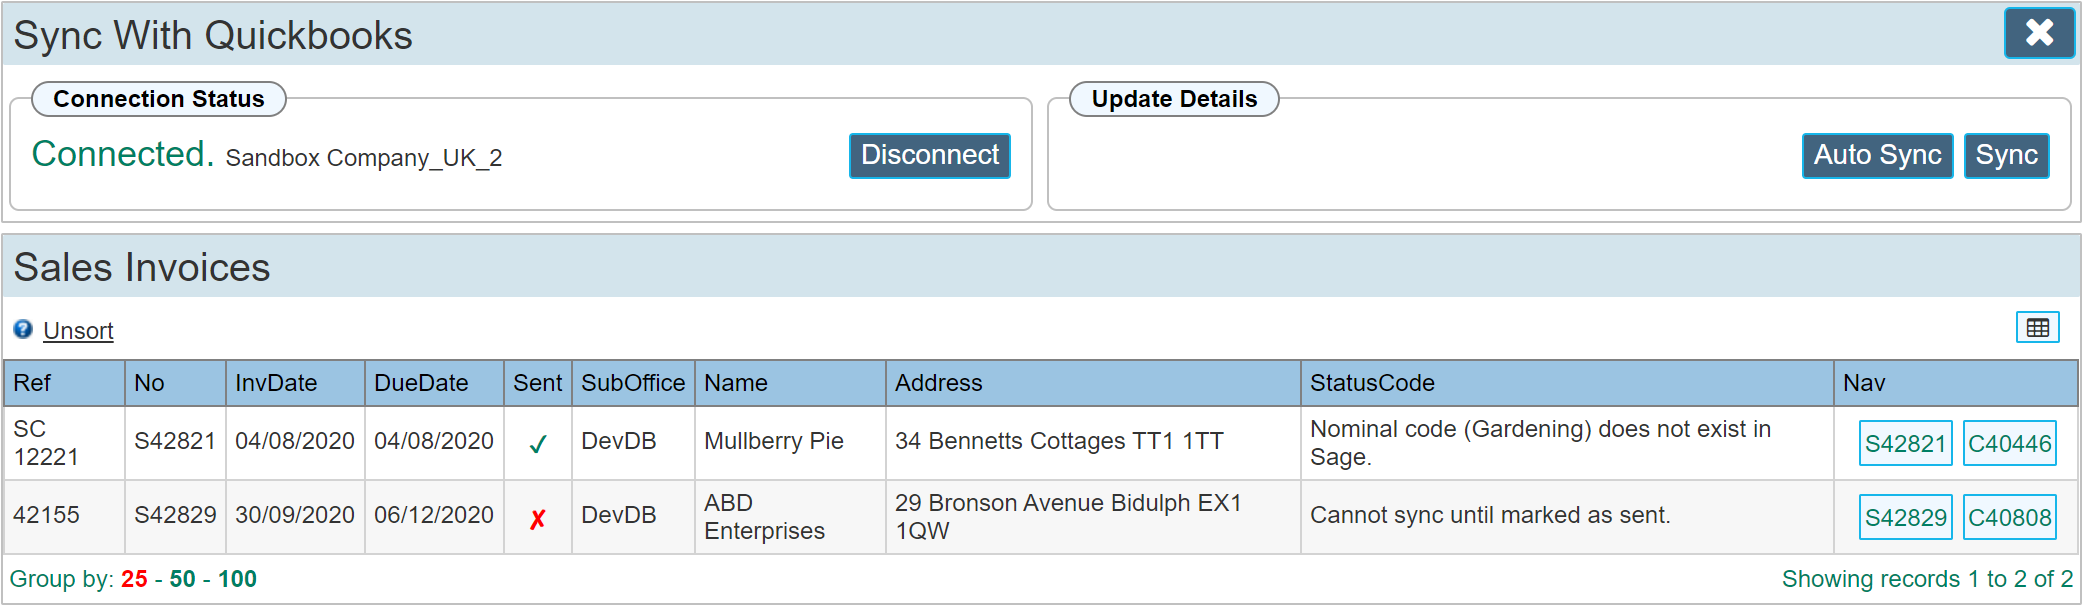
Using the above example screen, we can see within the 'StatusCode' column that the Customer Account' does not exist in our accounting software. We can open the 'Accounts Sync (Actions) popup by clicking anywhere within the grid to perform actions.
This example shows us that the account we are trying to sync has a similar named account within our accounting software as shown in the 'Suggestions' panel. If no match had been found, this panel would be empty. We can link this matching account by clicking 'Link This'
Should we wish to simply create a new account within our accounting software, we can click 'Create New' This will automatically create the contact within your financials package.
If you have an existing contact (account) within your accounting software that you want to link that has not been listed as a suggestion, we can enter the 'AccountID' from our accounting software directly into the 'AccsID' field on the Account Sync (Actions) dialogue. Please Note: The AccountsID number is provided by your financials software provider, usually within the URL while in the account record.
Each account within your accounting software has its own ‘Unique’ customer code. This can be seen in the URL bar when entering a customer account for edit.
For our QuickBooks example, the URL for our demo company would be; https://c51.sandbox.qbo.intuit.com/app/customerdetail?nameId=129
We would enter 129 in the AccsID field if we were to use that option.
For clarity, we would use only 'Create New' or 'Link This' under normal circumstances. The direct entry of 'AccsID' is considered a relatively rare option to use.
|
PLEASE NOTE: The link via 'AccsID' is not available with 'Sage' integrations. Sage does not support this option.
|
Changing an Incorrect AccountsID (AccsID)
|
You may be prompted with a warning similar to below;
AccountsID (xxxxxx) is not correct, QuickBooks (Xero etc) requires xxxxx
|
If you enter, and save an incorrect number in the Accounts Sync (Actions) dialogue (Shown earlier in this guide where new accounts are created), it will be recorded within the Company or Site Record, once set, the record will not be able to sync invoices if the number / code you entered is incorrect, this will require you to manually remove the incorrect number. To remove the incorrect number, navigate to the Company or Site Record and click the address edit button to open the address edit dialogue.
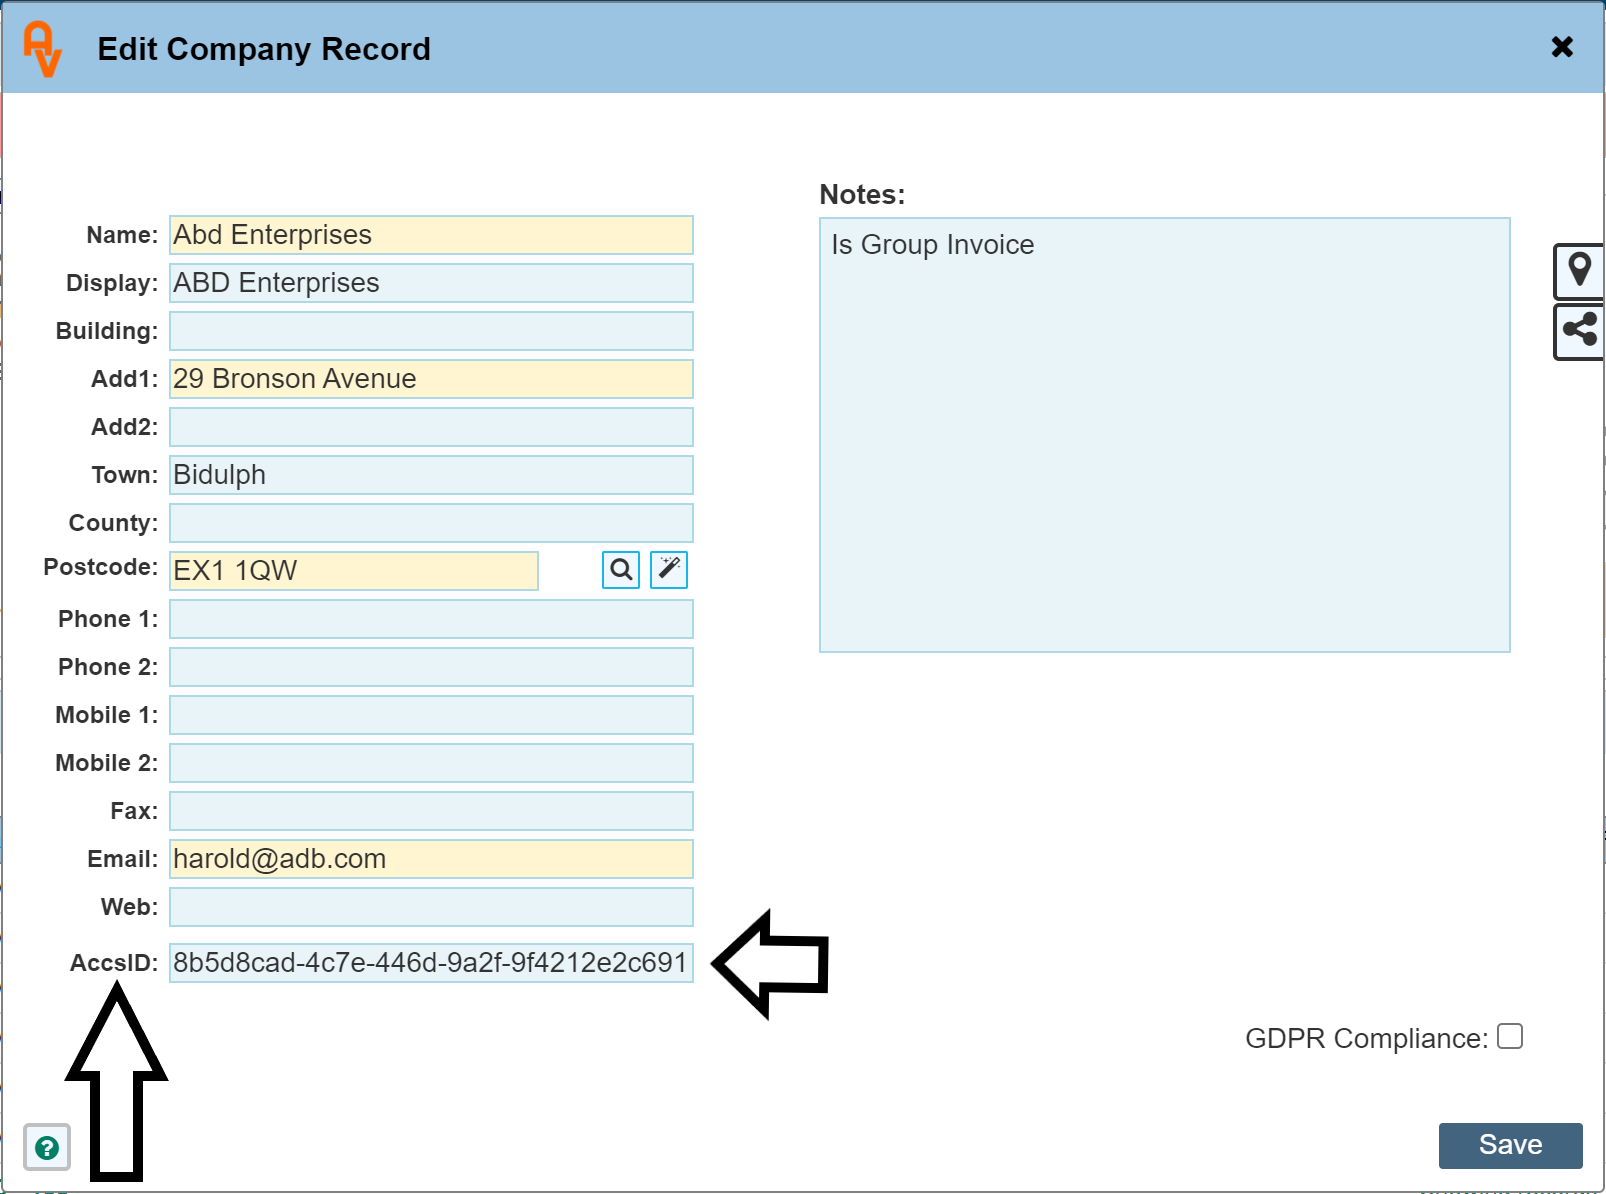
The AccsID field is where the AccountsID is stored from your accounting package. The field is not immediately editable to prevent accidental change of the value. Double click the 'AccsID' label as indicated in the example above, this will allow you to edit the value. In most instances, simply remove the value completely and let the sync dialogue pick up the record where the names match, alternatively, obtain the correct AccountsID from your financials package.
Link This
If the 'Link This' button appears, this means that there is an account within QuickBooks with exactly the same name as the one in Workforce Manager. Click 'Link This' to create the link between Workforce Manager and QuickBooks. Once a link has been established, you will no longer be required to link the customer records again.
|
The customer account name must be exactly the same in both titles for the 'Link This' button to show.
|
General Information
|
IMPORTANT !
Once you begin using Workforce Manager to create and sync invoices, it is advisable to make sure all invoices are created through Workforce Manager to avoid potential problems with duplicate invoice numbers.
|
To get to the Sync Page, from the main diary click ‘Sync Accounts API’ from the menu on the left. (For users with permission, while in the Invoice page, there is also a ‘Go to Sync’ button in the integration panel once a document has been marked for sync.
Initially, the connection between AutoVu and your accounting software will not exist. This will be identified in the Connection Status panel with the label stating Not Connected. To connect, click the ‘Connect to QuickBooks’ button. This will re-route you to QuickBooks for authentication.
Depending on whether you are already logged into QuickBooks via your browser, you will either be asked to confirm the current connection, or you will be asked to provide your login credentials and then connect. Once connected, the Name of the currently connected account will be shown in the connection status box of AutoVu. To disconnect, simply press the ‘Disconnect’ button. To swap between two different accounts on QuickBooks, it may be necessary to log out of the online session to QuickBooks if you already have it open in another tab on your browser.
The connection between QuickBooks and AutoVu will persist even if you navigate away from this page. This means that it is not required to keep login into QuickBooks each time you visit the page. The connection will maintain for approx 20 mins then will auto disconnect unless you click the disconnect button which breaks the connection immediately.
Once connected, a list of all Invoices / Credit Notes or Supplier Invoices that have been marked for sync will be listed. To sync these to QuickBooks, simply press the ‘Update’ button.
If sync is successful, the invoice will be removed from the list and will appear on QuickBooks (you may need to refresh the QuickBooks browser to see this)
If sync was not successful, the reason will be shown in the StatusCode column of the invoice list.
If the customer does not exist, clicking the entry within the list will allow you to either Create a brand new customer account on QuickBooks, OR link an existing account if one was found in QuickBooks showing the same account name.
If you are given the option to ‘Create New’ and you already have a number of accounts within QuickBooks and are not sure if the account exists or not, it is advisable to confirm this by viewing your customer accounts on QuickBooks to confirm. If an account does exist, you will be required to manually enter the AccsID into AutoVu.
|
PLEASE NOTE: The link via 'AccsID' is not available with 'Sage' integrations. Sage does not support this option.
|
If you are given the option to Link an existing account, this means that AutoVu found a customer account within Quickbooks that has the same account name as that shown in AutoVu. Clicking the ‘Link This’ button will automatically link the account to AutoVu.
Once the accounts are linked, further attempts to sync on this account will be successful. I.E. it is only necessary to link an account once.
After re-submitting the invoice for sync, there may be further problems to rectify. This would often be regarding Nominal Codes if they are not correctly duplicated between each software title.
Once all accounts are linked, and all nominals exist between QuickBooks and AutoVu, subsequent sync attempts will become seamless.
Once invoices are created via WorkForce Manager, it is important to only use WorkForce Manager to create all subsequent invoices. This is to prevent invoice number duplication. E.G. if you have created invoice number S1234 on Workforce Manager, your accounting software will naturally be expecting S1235 as the next invoice number. If your accounting package is used to create the next invoice instead of using Workforce Manager then S1235 will be created, however, Workforce Manager will not know this and also create S1235 as the next invoice number. Upon attempting to sync, the sync will fail due to the duplication.