To view 'My Profile', navigate to the main diary page, then in the LH menu, click 'My Profile' If you do not have the 'My Profile' button, it may have been hidden from view by your account administrator.
The options available to you depend on your account type / subscription level. Some or all of the options shown here may be available to you. All menu items can be switched on or off per logged on user. I.E. you can set who can see the various buttons. Contact us via 'Support' to tailor these settings.
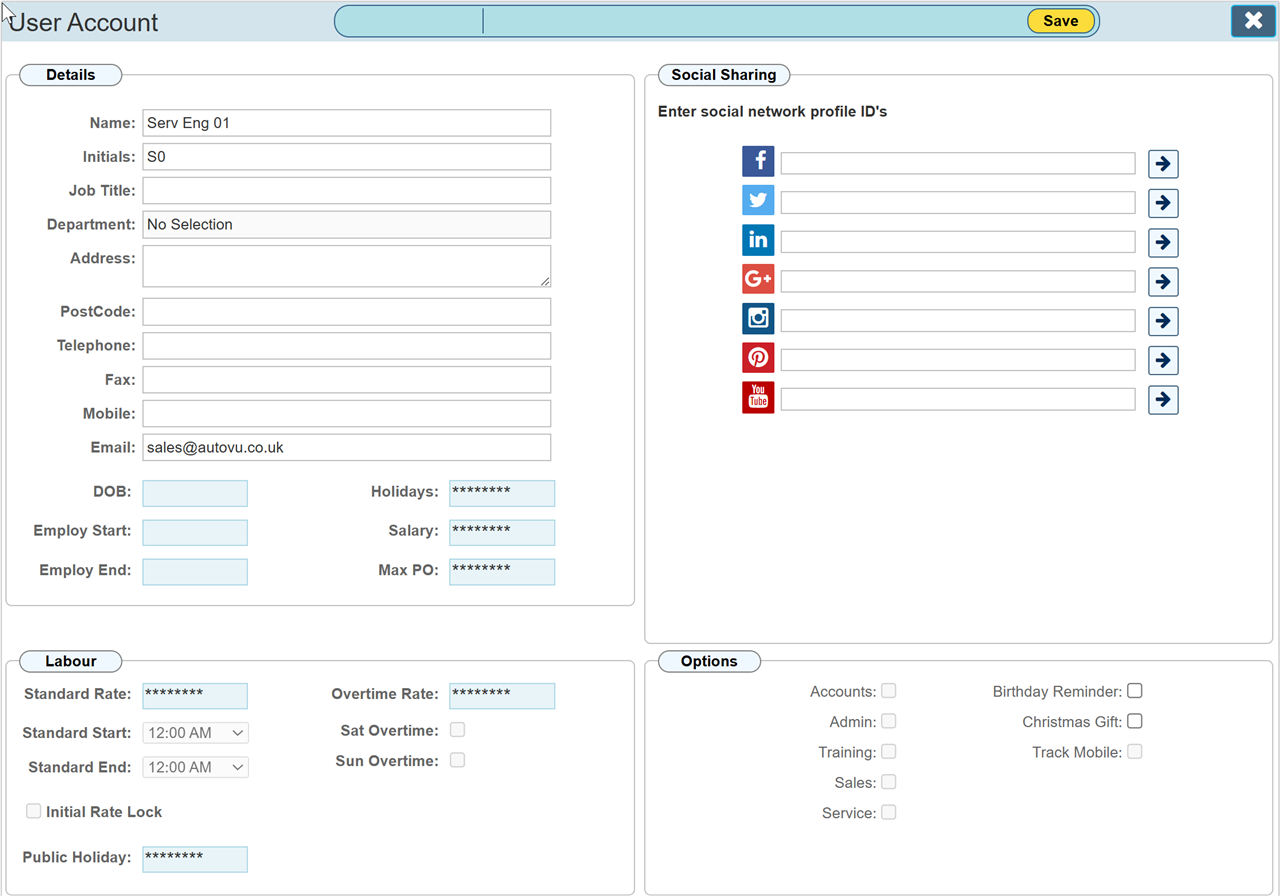
Standard users will see their profile as shown below;
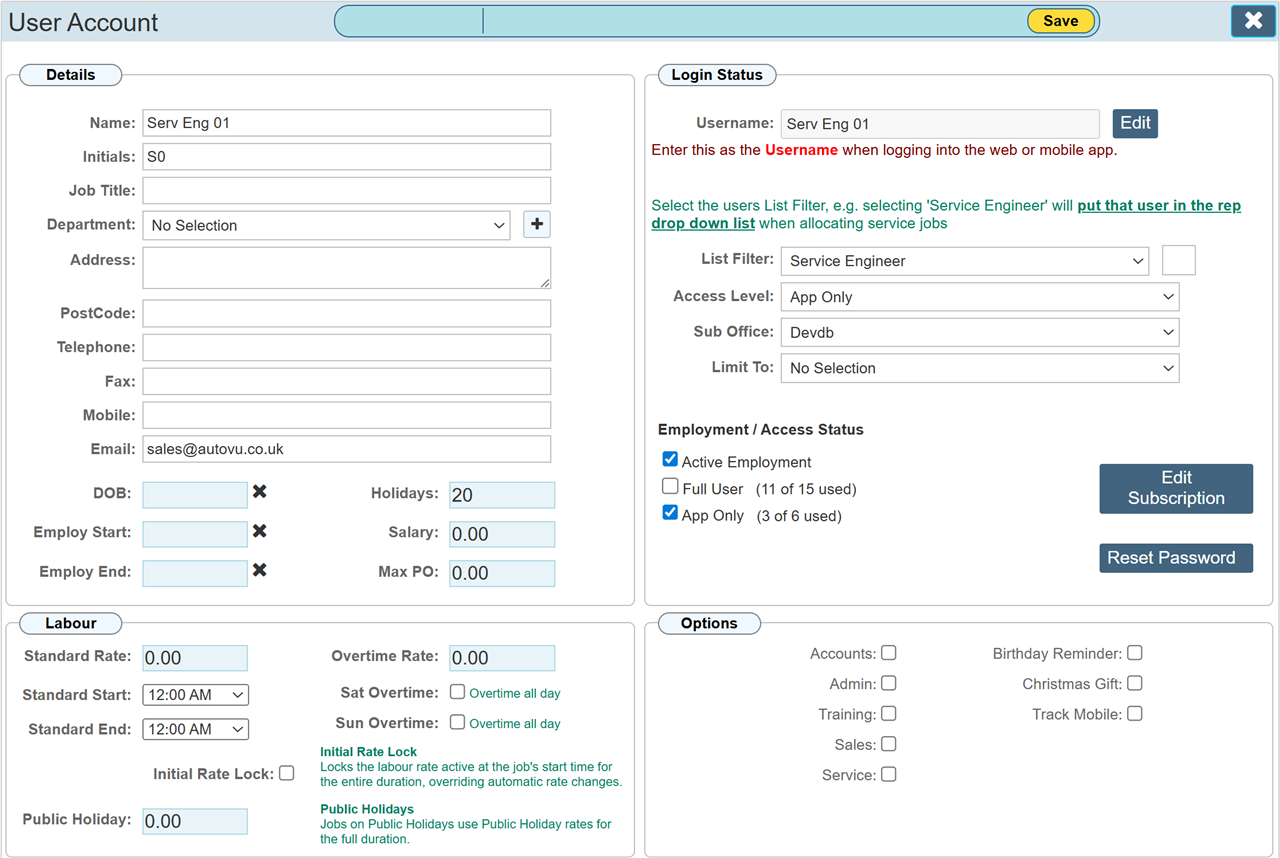
If you are a member of the 'Administrators' group, you will see user profiles showing the 'Login Status' panel.
Restrictions
There are several levels of restriction available for the 'User Profile' this includes all other user profiles when navigating users profiles via 'My Company'.
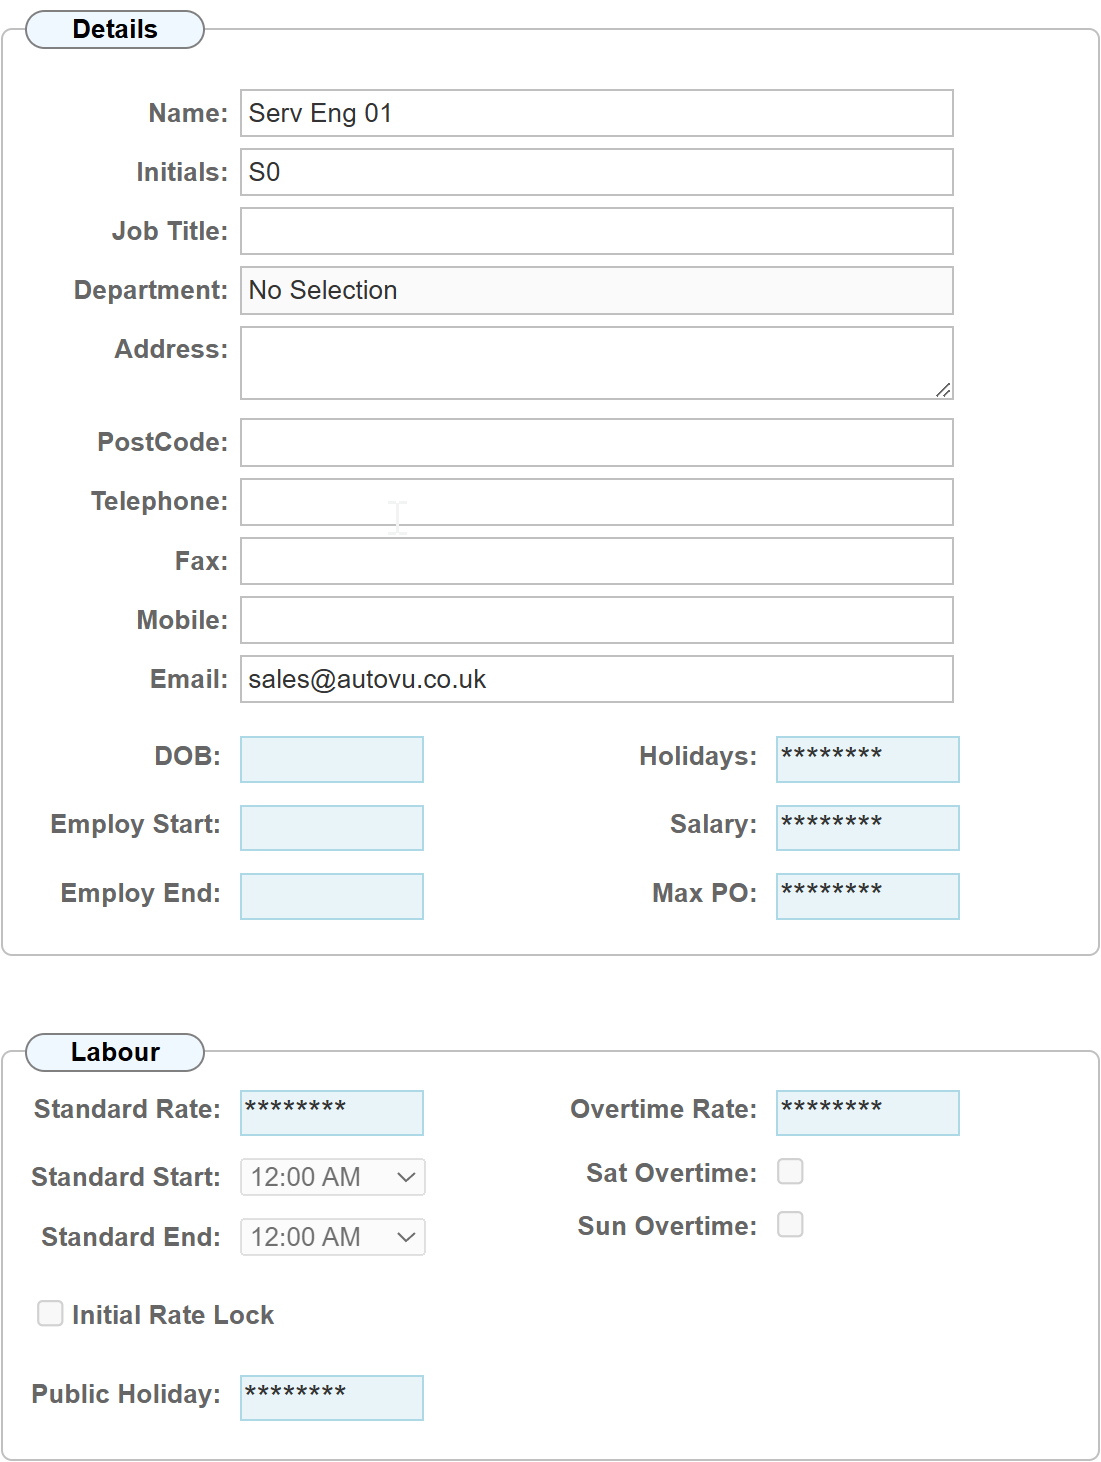
DOB, Holidays, Employ start and Employ End
If an access restriction (default for all users except Admin) is active, these fields will be 'Read Only' if an attempt to edit these is made, the user will be notified that they are unable to edit the value.
Salary and Labour Rate
These fields by default will not be visible. As shown below they are masked by asterisks.
Notes on Salary / Labour Rate
Salary is an informational field allowing companies to record the users annual salary within Workforce Manager.
The Labour Section is used within the system to determine the Job 'Labour Cost' within each Job Ticket. If 'Auto Labour Cost' is set within the Company Settings section, Each job attended using the App will automatically update the field 'Labour Cost' within the Job Ticket based on how long the engineer spent on site.
The values will be automatically updated when an engineer completes the work on site if the module is Active.
Admin location for locked / Asterisk fields activation
Admin > User Accounts > Edit Dates / Holidays / Salary. 439
There is an Admin Notes section detailed above, this again can be made visible or not as per the two images above.
Location for Administrator Notes activation
Admin > User Accounts > Show Administrator Notes. 340
Administrator Guide: Configuring Auto Labour Costs
To set these parameters, please navigate to the separate guide Settings - Auto Labour Costs
Left Hand Menu
Absence
Click the 'Absence' button to view all absences that have been recorded. Clicking on the entry will open the Task dialogue for editing. N.B. Editing is disabled for 'My Profile' accounts by default for all users except 'Administrators'. This can be enabled where required.
To create an entry here, go to the diary page, create a Task, select 'Absence' from the 'Type' drop down list, enter the particulars and finally select the user from the 'Share' drop down list that this applies to.

Holiday
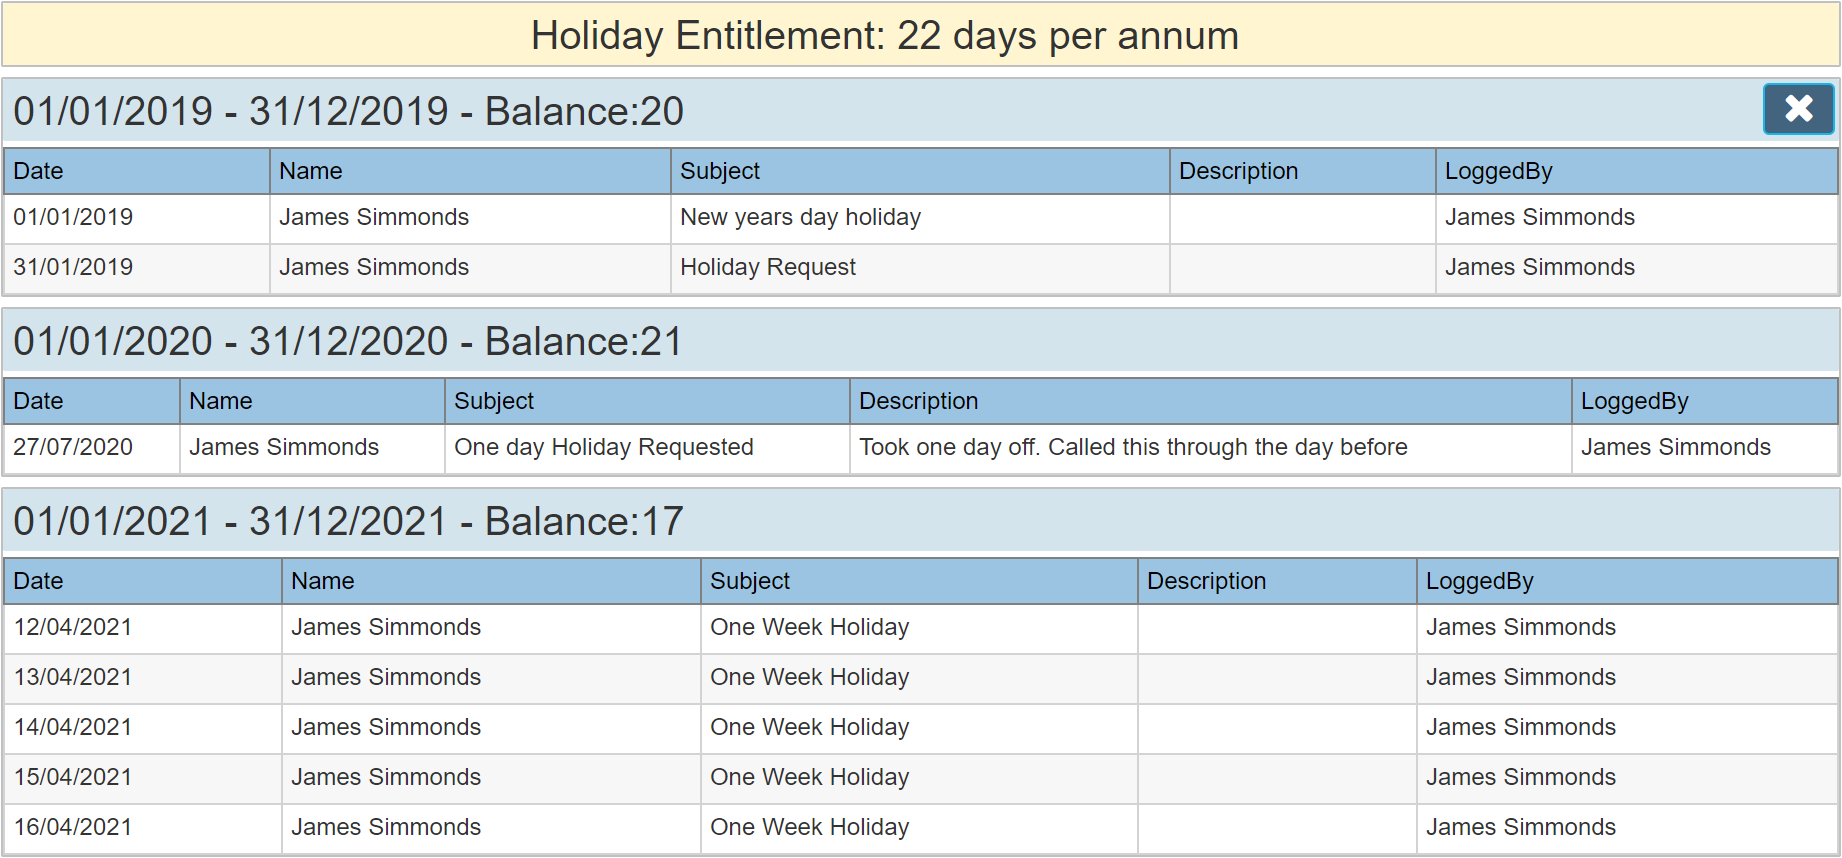
Click the 'Holiday' button to view Holidays booked during last year, the current year and next year. The general company holiday entitlement and start date is set within the Settings section. The individual employees holiday entitlement can be further edited on the employee User Account page.
Clicking on the entry will open the Task dialogue for editing. N.B. Editing is disabled for 'My Profile' accounts by default for all users except 'Administrators'. This can be enabled where required.
To create an entry here, go to the diary page, create a Task, select 'Holiday' from the 'Type' drop down list, enter the particulars and finally select the user from the 'Share' drop down list that this applies to.
On Call
On Call typically depicts periods of time where an employee is working 'After Hours' or on 'Night Call'. E.G. if you operate a 24hr operation but the main office only works 9 to 5. A specific job type is allocated to these periods for easy identification. Click the 'On Call' button to view all On Call periods that have been recorded. (This user, for all time). Clicking on the entry will open the Task dialogue for editing. N.B. Editing is disabled for 'My Profile' accounts by default for all users except 'Administrators'. This can be enabled where required.
To create an entry here, go to the diary page, create a Task, select 'On Call' from the 'Type' drop down list, enter the particulars and finally select the user from the 'Share' drop down list that this applies to.

Training Matrix
See the section on Training
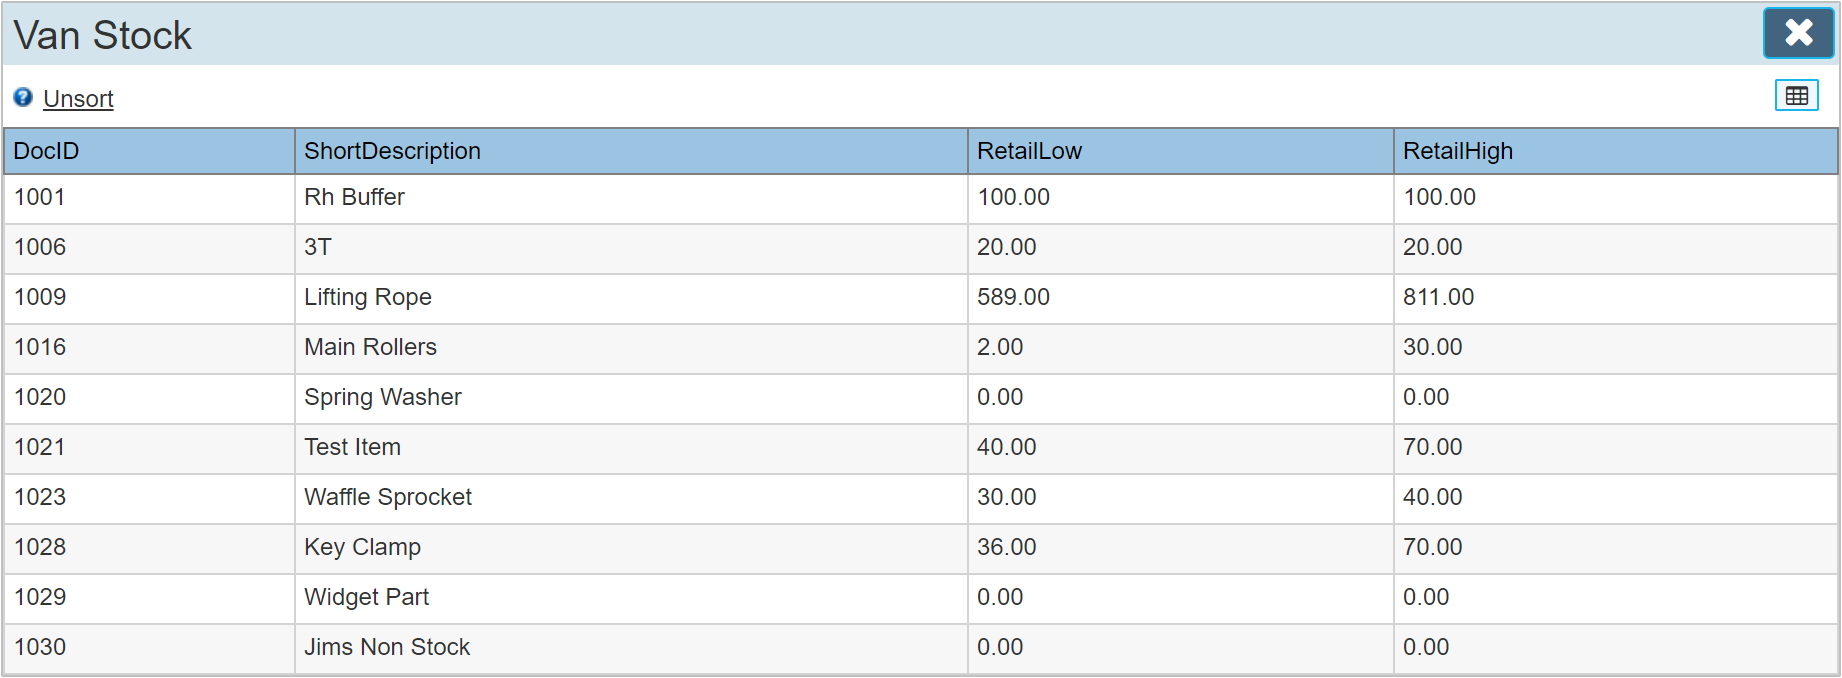
Vehicle Stock
This is a read only section that allows the logged on user to see the totals for Van Stock.
My Account Section
'My Account' is visible to the person logged on, and also 'Administrators' The system can be set to allow anyone (or restrict) to see other users accounts. Contact 'Support' if you wish to make this kind of change for individual users.
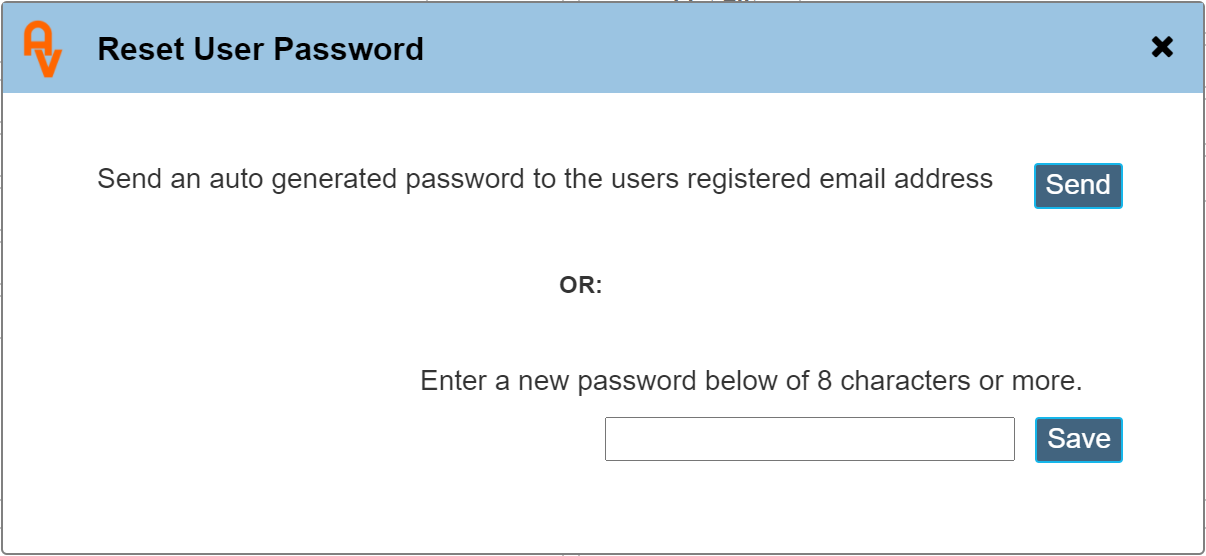
Change Password
An automated password can be created and emailed directly to the users email address, alternatively, select a password of your choice. This must at least 8 characters long, contain one upper and lower case letter, at least one number and at least one special character.
Email Settings
When you first begin using Workforce Manager, You may begin sending email immediately using your email address as shown in your profile.
The email will be sent using Workforce Manager's internal email server. When the email is received by the recipient, it will appear that the email is from you, and they may reply to you and the reply will arrive in your own in-box.
To allow this to work, the email is actually sent from our server / email address but the sender address is renamed to your own. This is not ideal, and we would highly recommend entering your own ISP settings and email password in order that you can use your own email server.
The benefits of this are numerous, the main point being that the email will appear in your own 'Sent' folder as well as being stored within the Workforce Manager account that it was created. (Some ISP's block the email from your sent folder)
Below is an image of how the Email Settings record will look once it has been verified. (Where in this example it states 'autovusolutions.com' in the verification panel coloured green, this will have your host name instead of ours.)
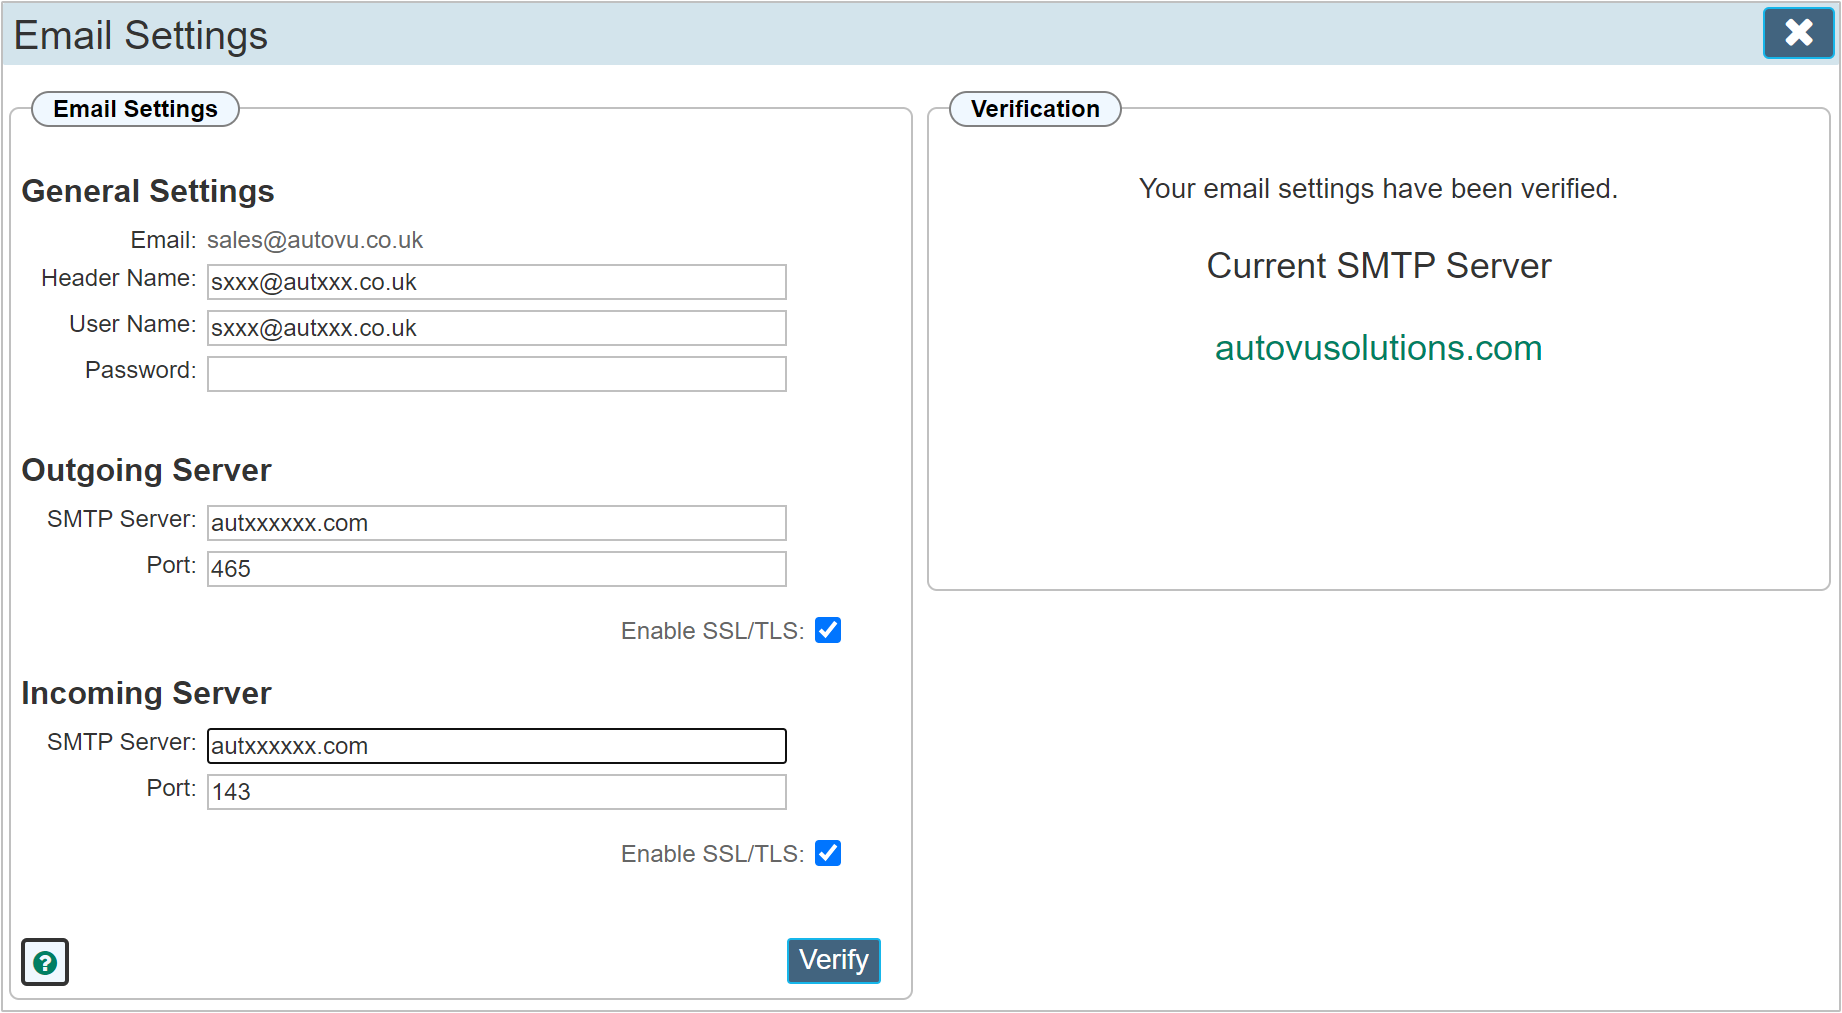
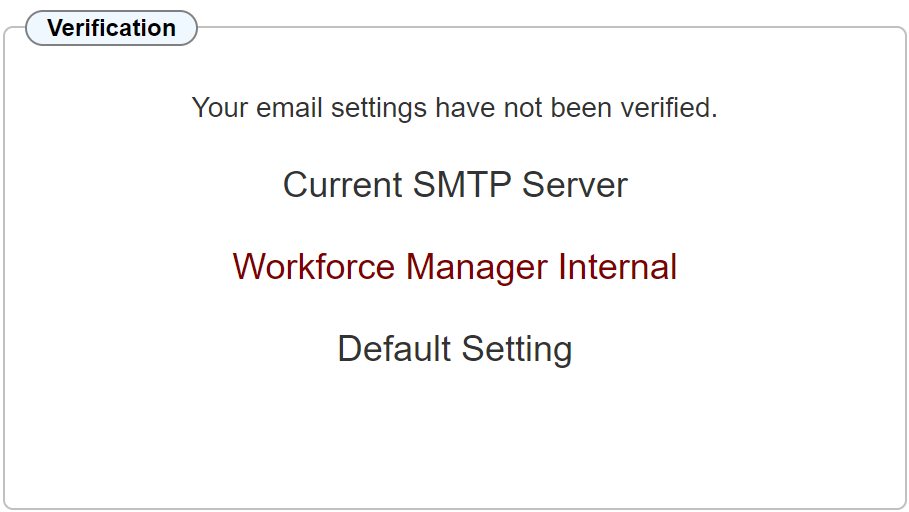
As can be seen in the 'Verification' panel, this email account has been verified and will send from the users own servers. If the account has not been verified, the verification panel will show as below;
In order to verify your email account, you will need your email password and the Outgoing / Incoming Server settings as supplied by your ISP. These are typically the settings you would use to set up Outlook on your PC
If your email account uses SSL/TLS encryption, toggle the appropriate switches. Once you have the correct settings, click 'Verify'
|
THIS MAY TAKE A FEW MOMENTS, PLEASE DO NOT NAVIGATE AWAY FROM THE PAGE WHILE THIS PROCESS IS IN OPERATION
|
|
IF YOU DO NOT VERIFY YOUR EMAIL ADDRESS, ALL EMAILS SENT WILL HAVE A 'POWERED BY AUTOVU' LOGO ADDED TO THEM. VERIFYING YOUR ACCOUNT REMOVES THIS
|
Email Signature
When an email is sent via Workforce Manager, the default is to use whatever information it can glean from your account / company and will automatically include it with every email you send, in the footer (email signature).
This can be overridden by setting a bespoke email signature.
Clicking the 'Email Signature' button will open an editor where your bespoke signature can be created. Once you are happy with the signature, toggle the 'Published' switch and Save.
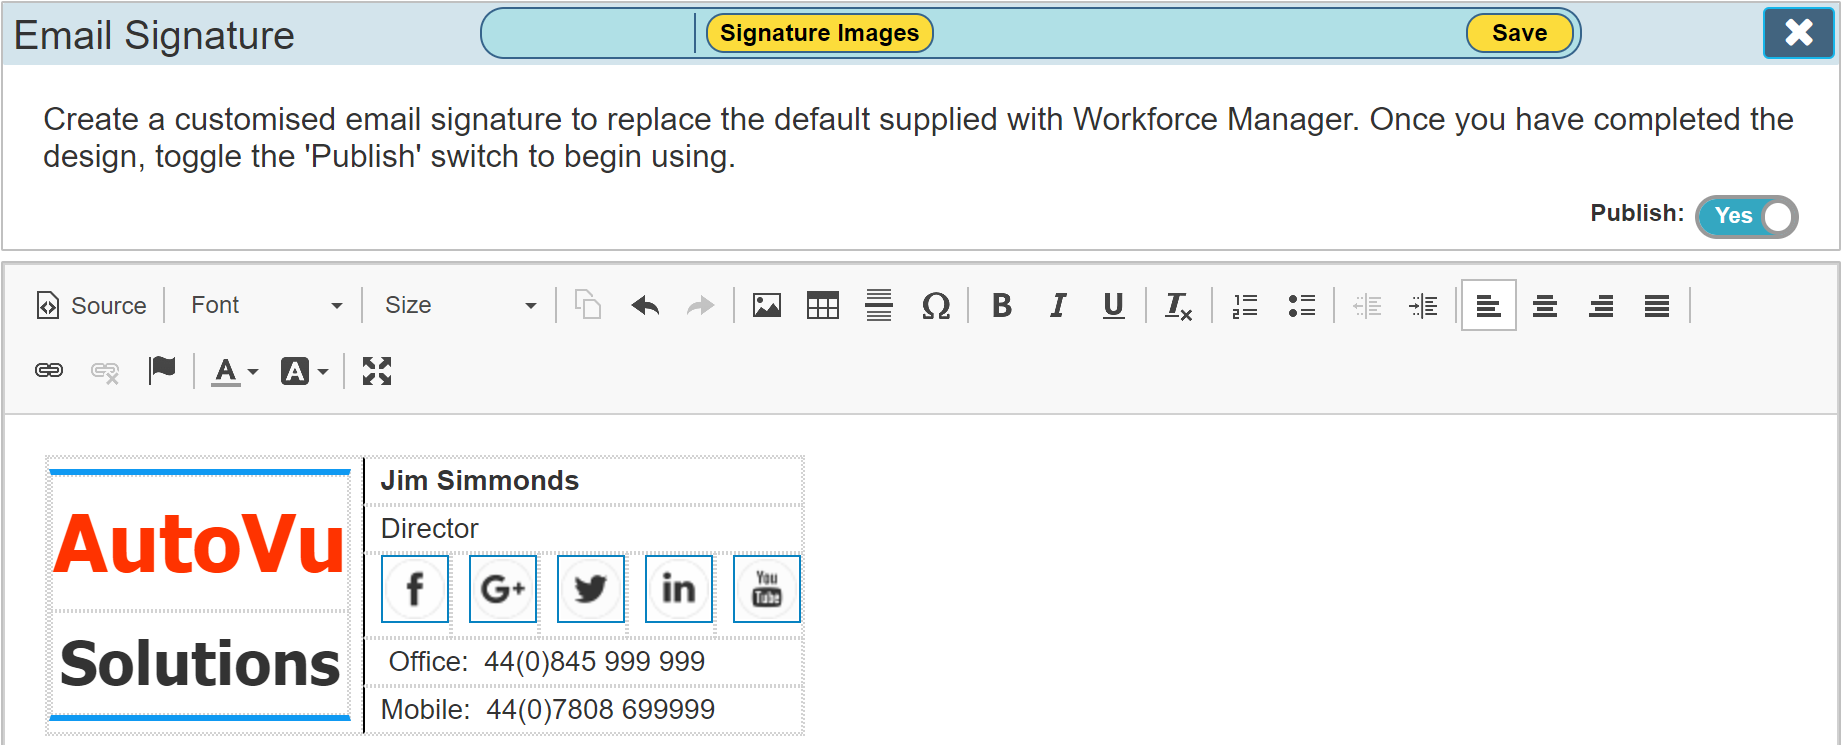
Signature Images
If you wish to use images within your Email Signature, these will first need uploading to the system. Click the YELLOW button in the ribbon bar labelled 'Signature Images' to open the uploader dialogue.

The image above shows the image uploader dialogue. You can either drag and drop an image to the UPPER SECTION of the dialogue, or select 'Upload Image' to locate the image on your machine.
Once the image is uploaded, the dialogue will appear as above. (multiple images can be uploaded where required)
To use the image, drag the image FROM THE LOWER SECTION OF THE DIALOGUE labelled 'Files' directly onto the editor. Once in the editor, you may resize / position as required.
Google Calendar Sync
This feature allows all your booked jobs and tasks from the Workforce Manager diary to be sent to your Google Calendar. YOU WILL NEED TO MAKE SURE YOUR BROWSER IS ALREADY LOGGED IN TO YOUR GOOGLE ACCOUNT FOR THIS TO WORK.
|
This is a one way operation, I.E. Once the job has been sent to Google calendar, editing it on Google will not update it on Workforce Manager
|
|
Once Google calendar has been set up, further syncing with Outlook can be achieved. To find out how to do this, google 'Google Calendar iCal to Outlook' for instructions on your particular instance of Outlook.
|
Clicking the Google Calendar Sync button will open the below dialogue;
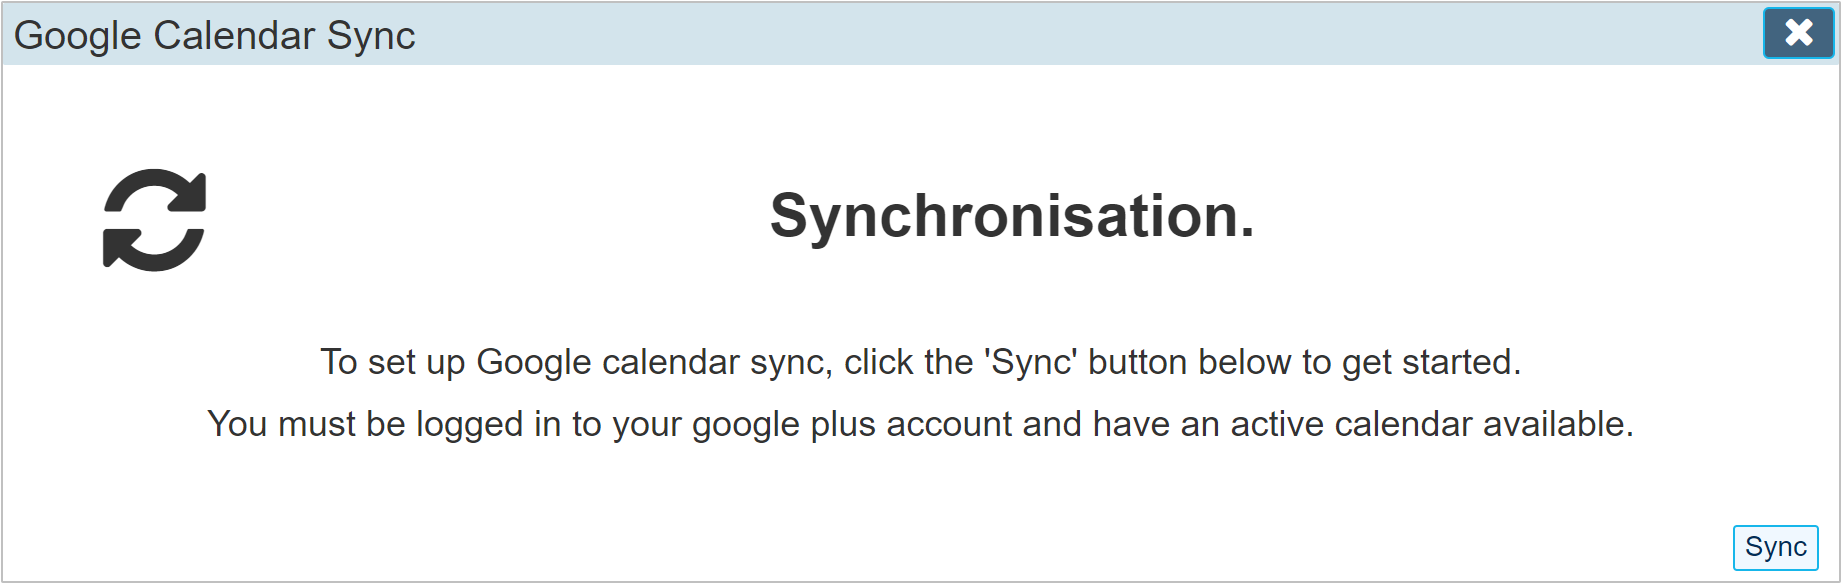
Click the sync button, Workforce Manager will redirect you to Google for verification. The below dialogue shows this screen;
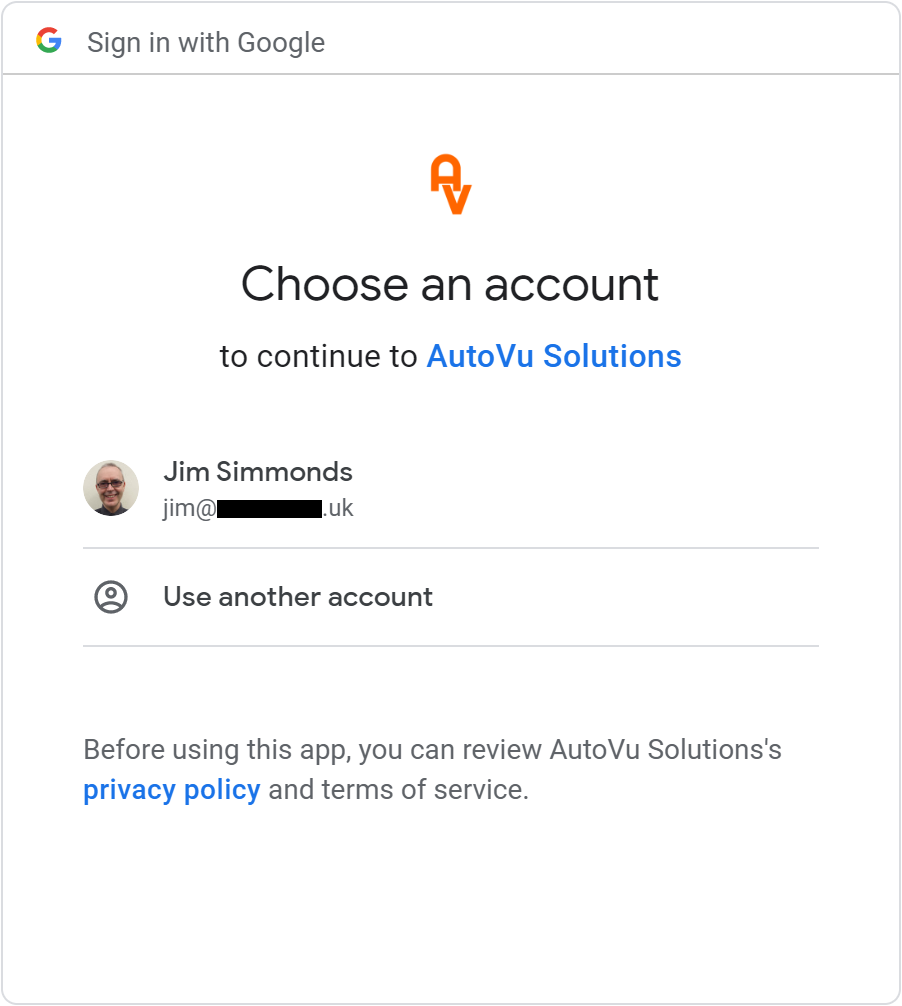
Click on your user account and follow the prompts from Google accepting any requests they make regarding access by AutoVu Solutions. Once complete, any job booked on the Workforce Manager diary with your name will also be sent to your google calendar.
If you wish to cancel this sync operation. You must do this from your Google Account. I.E. revoke access to AutoVu Solutions within the settings section of your Google Account.
Notification
Timeline and task elements can be linked to an email notification. I.E. if a task was raised and the 'Remind Me' option was set, a screen notification is shown at the allocated time. If the email notification flag is set in this section, you will also receive an email reminding you of the task details.
| Task: |
Receive email notifications prior to allocated time as well as displaying screen notifications.
|
| SLA: |
Receive screen and email notification one hour prior to the Service Level Agreement deadline time being broken.
|
|
Timeline:
|
Receive an email notification as well as a screen notification when a user tags you into a timeline action.
|
|
Timeline Reply:
|
Receive an email notification as well as a screen notification when a user replies to on one of your timeline updates. |
Preferences
Here the general layout and operation of the system can be changed to suite you preferences.
Below are listed some of the more significant preferences.
| Allow Mini Search: |
Show a popup search results window as you type, this enables you to see the results of your search without updating the main window.
This mini popup search is active only on the main diary page and automatically appears underneath the main search dialogue box, it begins to show when 5 or more characters have been typed in, and is limited to what it can display. I.E. it cannot show invoicing or purchase orders.
|
| Quick View Popup: |
Show the Quick View Service popup when clicking customer details in the details grid view.
This is a very significant preference. With this switched off, clicking anywhere within the diary view records will always take you directly to the record it depicts. Switching this on, allows the actual 'booking popup' to be displayed without actually navigating to the record when clicking the main section of the grid, clicking the 'Nav' buttons to the right will still take you to the main record.
|
| Default to service jobs: |
Default to show service jobs when entering the site record instead of timeline.
|
Signature
All documentation within the Workforce Manager system can incorporate your actual signature, hand written and specific to you. This is utilised by using the #Signature# hashtag within the document.
Once in the 'Signature' section by clicking 'Signature' from the LH menu, you are able to enter your signature. Click 'Tap to Renew' to initiate this.
|
To obtain the best signature, we would recommend doing this part on a mobile device where either your finger, or an appropriate 'Pen' can be used.
|
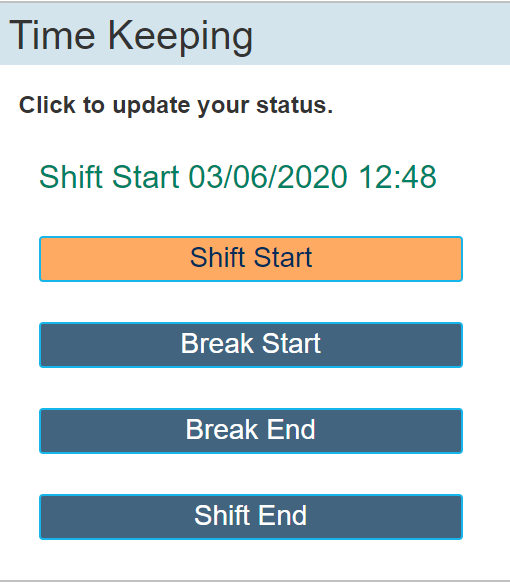
Time Keeping
The time Keeping function allows any user to 'Clock In', this function is also available on the app and is linked to the same function here. All time keeping records can be viewed in the reports section.
Booking Events
Setting a booking event on your profile will prevent or warn other users when they attempt to book a job for you that clashes with another previously booked job That is booked for this same user.
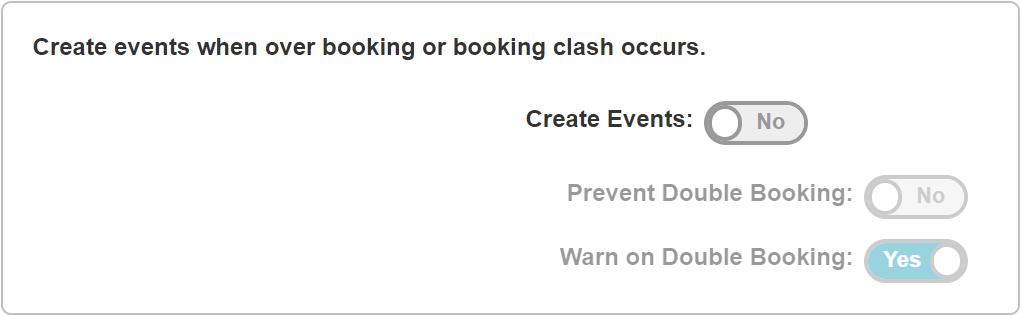
Toggle, 'Create Events' to activate. Then you have a choice to either 'Prevent' the booking from being made, along with a warning to the person attempting to double book you, or simply warn them that a double booking is about to be made.
File Upload
This is an area where any files associated with this profile can be uploaded / stored.