Before you can begin syncing invoices to your accounts package, depending on which accounts package you use, I.E. Xero, Sage, QuickBooks, you will be required to set some basic parameters. Setting these parameters is generally a one off procedure. I.E. once they are set, you do not often have to re-visit this page unless you are adding additional codes.
Workforce Manager
In Workforce Manager, it will be required to record the accounting 'Codes' as used in your accounting package. 'Codes' are stored within the 'Chart Of Accounts' in Workforce Manager. Each of the codes used represents the same code used within your accounting package for each line of your invoice. Codes are linked to the nominal codes used within your accounts package, often through a system called 'Products and Services'.
To navigate to the Chart Of Accounts in Workforce Manager;
Settings > Custom Values > Chart Of Accounts
Here we record the information required in order for your invoices to sync with your accounts package. Below is an image showing the 'Chart Of Accounts' as it is in a default state. The two entries shown are there as examples, the Code is shown as a number in this example, it can equally be a word as well as a number. These can be deleted or edited where required.
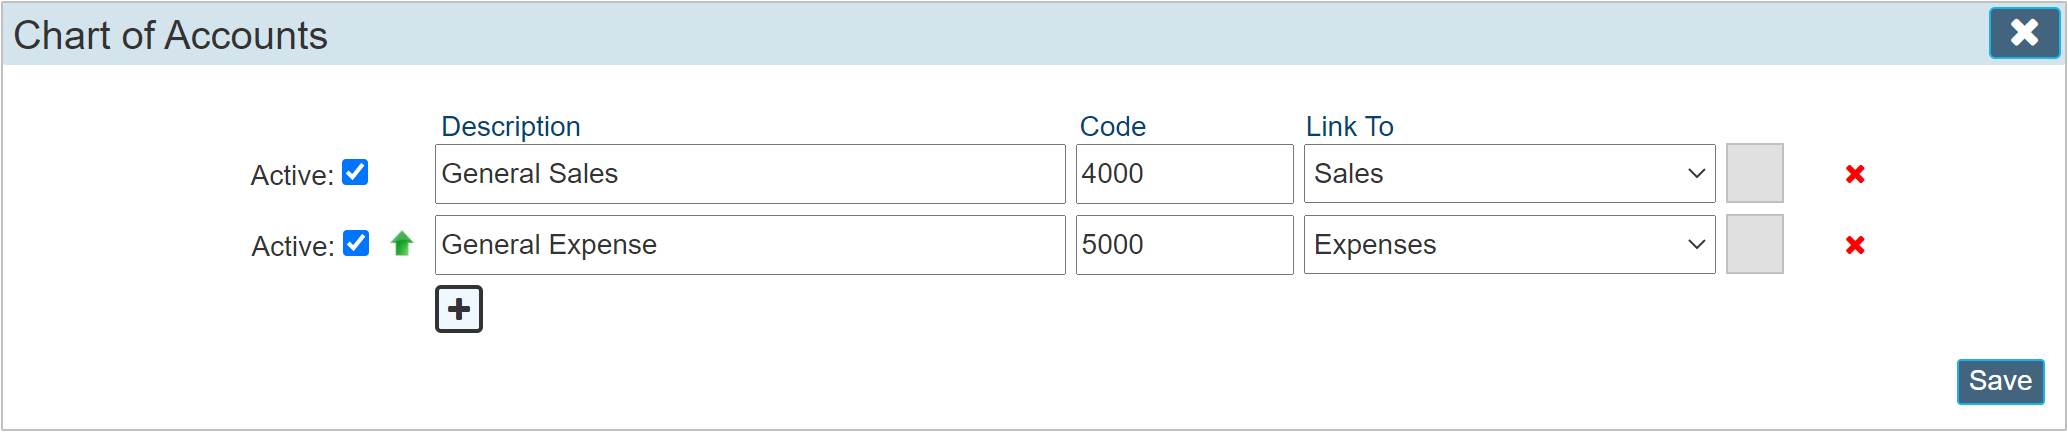
The example shows three columns. Click the 'Plus' symbol beneath the 'Description' column to insert an additional line.
Description
A general name used for this code (this description is only used within Workforce Manager as an identifier). We include a description for instances where you may use a numerical value for your 'Code' to allow you to more easily identify what the code means.
Code
The code field must match exactly to the code that you have used in your accounts package. This field must contain unique values. It may also be case sensitive so please use copy and paste to obtain the codes that you use within your accounts package. I.E. copy the code from your accounts package, then paste it into Workforce Manager. (learn more on this subject further on in the guide based on your particular accounting package)
The CODE can be alphanumeric to coincide with the values used within your accounts package.
Link To
There are only two options in this list. 'Sales' or 'Expenses' These two options tells Workforce manager where to apply the code. I.E. if you select 'Sales', this code will appear within a sales invoice when using the details editor. I.E. there is a 'Code' drop down list for each details line that will list all the codes linked to 'Sales'. The same applies for purchase orders instead the 'Code' drop down list will only show codes linked to 'Expenses' when creating a 'Purchase' Order'
Setting up your accounts package
Many of the settings will already have been set if you have been using your accounting package for some time. As a quick tutorial on how to get things moving if you are new to your accounting package, below are several guides based on each of the accounting packages that we support.
QuickBooks
QuickBooks requires a little more setting up than the other accounting packages in that it requires you to record some additional information. Log into QuickBooks.
Products and Services
This area is the section used to record the 'Code' that you will use in Workforce Manager that allows your invoices to sync to the correct nominal.
|
If you see the message 'Nominal code (xxxx) does not exist in QuickBooks' when you attempt to sync your invoices, it means you have not told WorkForce Manager the names of the Products and Services codes you have set up in QuickBooks.
|
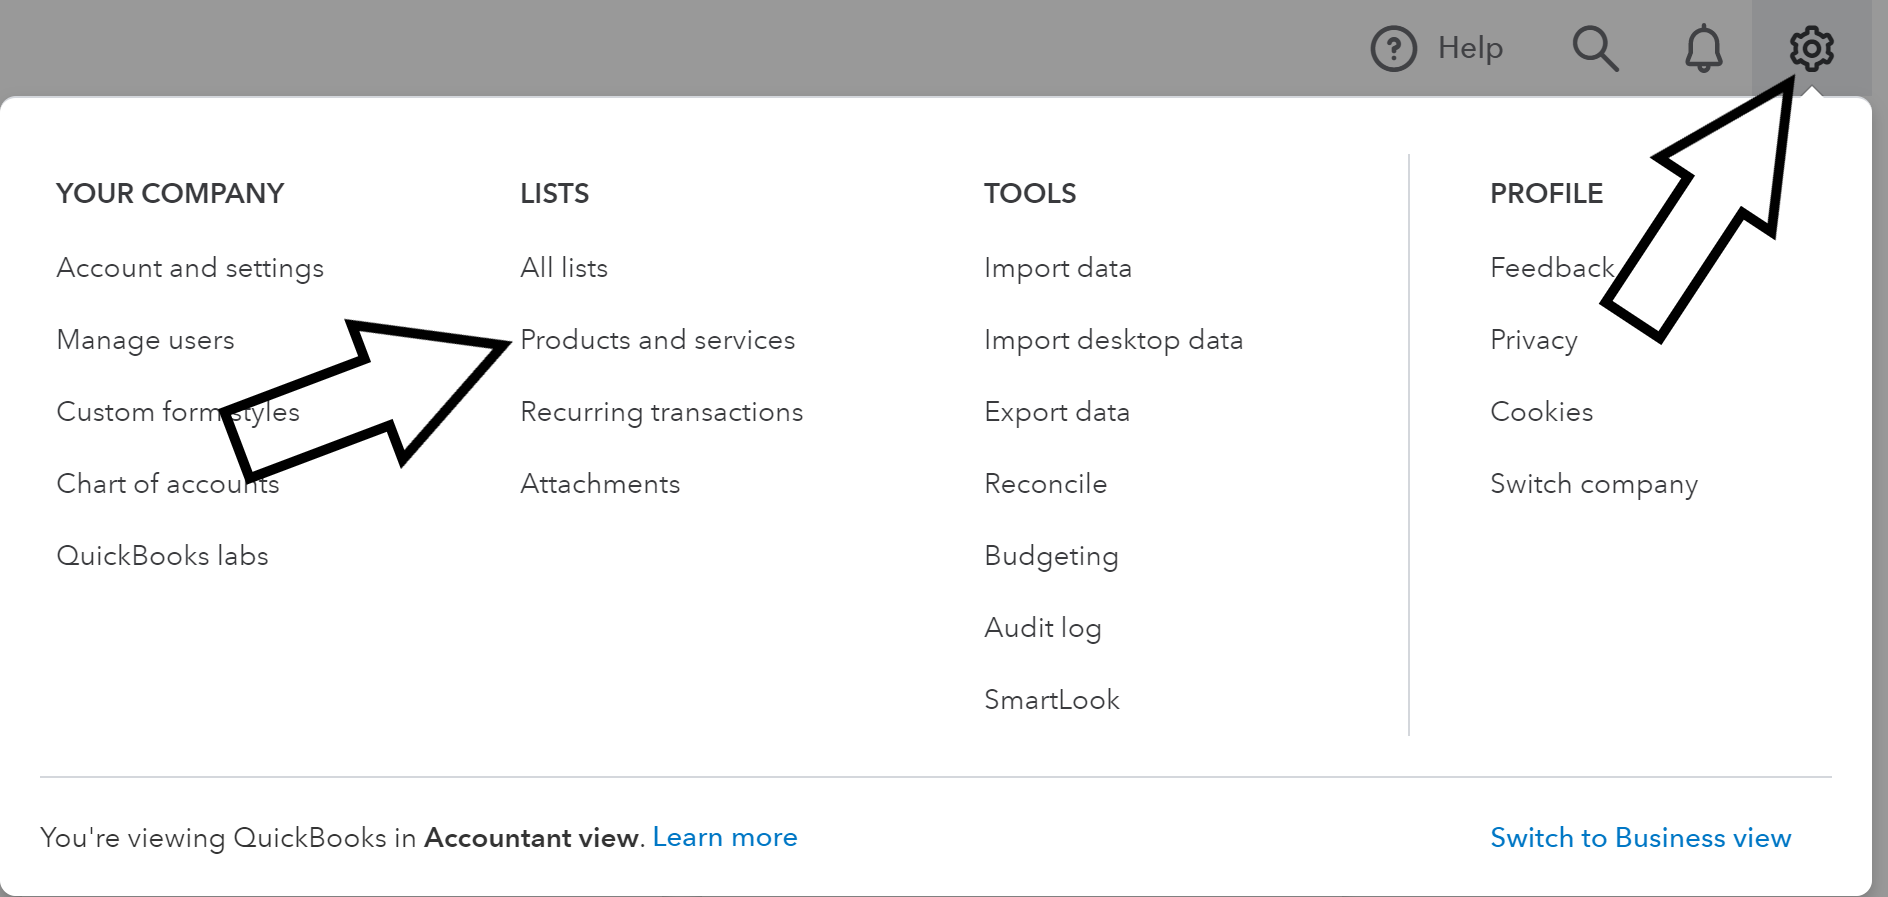
To set / select the relevant code, click the 'Cog' symbol in the top RH corner of QuickBooks to open the settings dialogue. (Some versions of QuickBooks use a different symbol)
Below is an image of the settings dialogue. Click the cog symbol to open the dialogue then click 'Products and services'
Once you click the 'Products and services tab, the page below will open. This is an example, your page may have different entries.
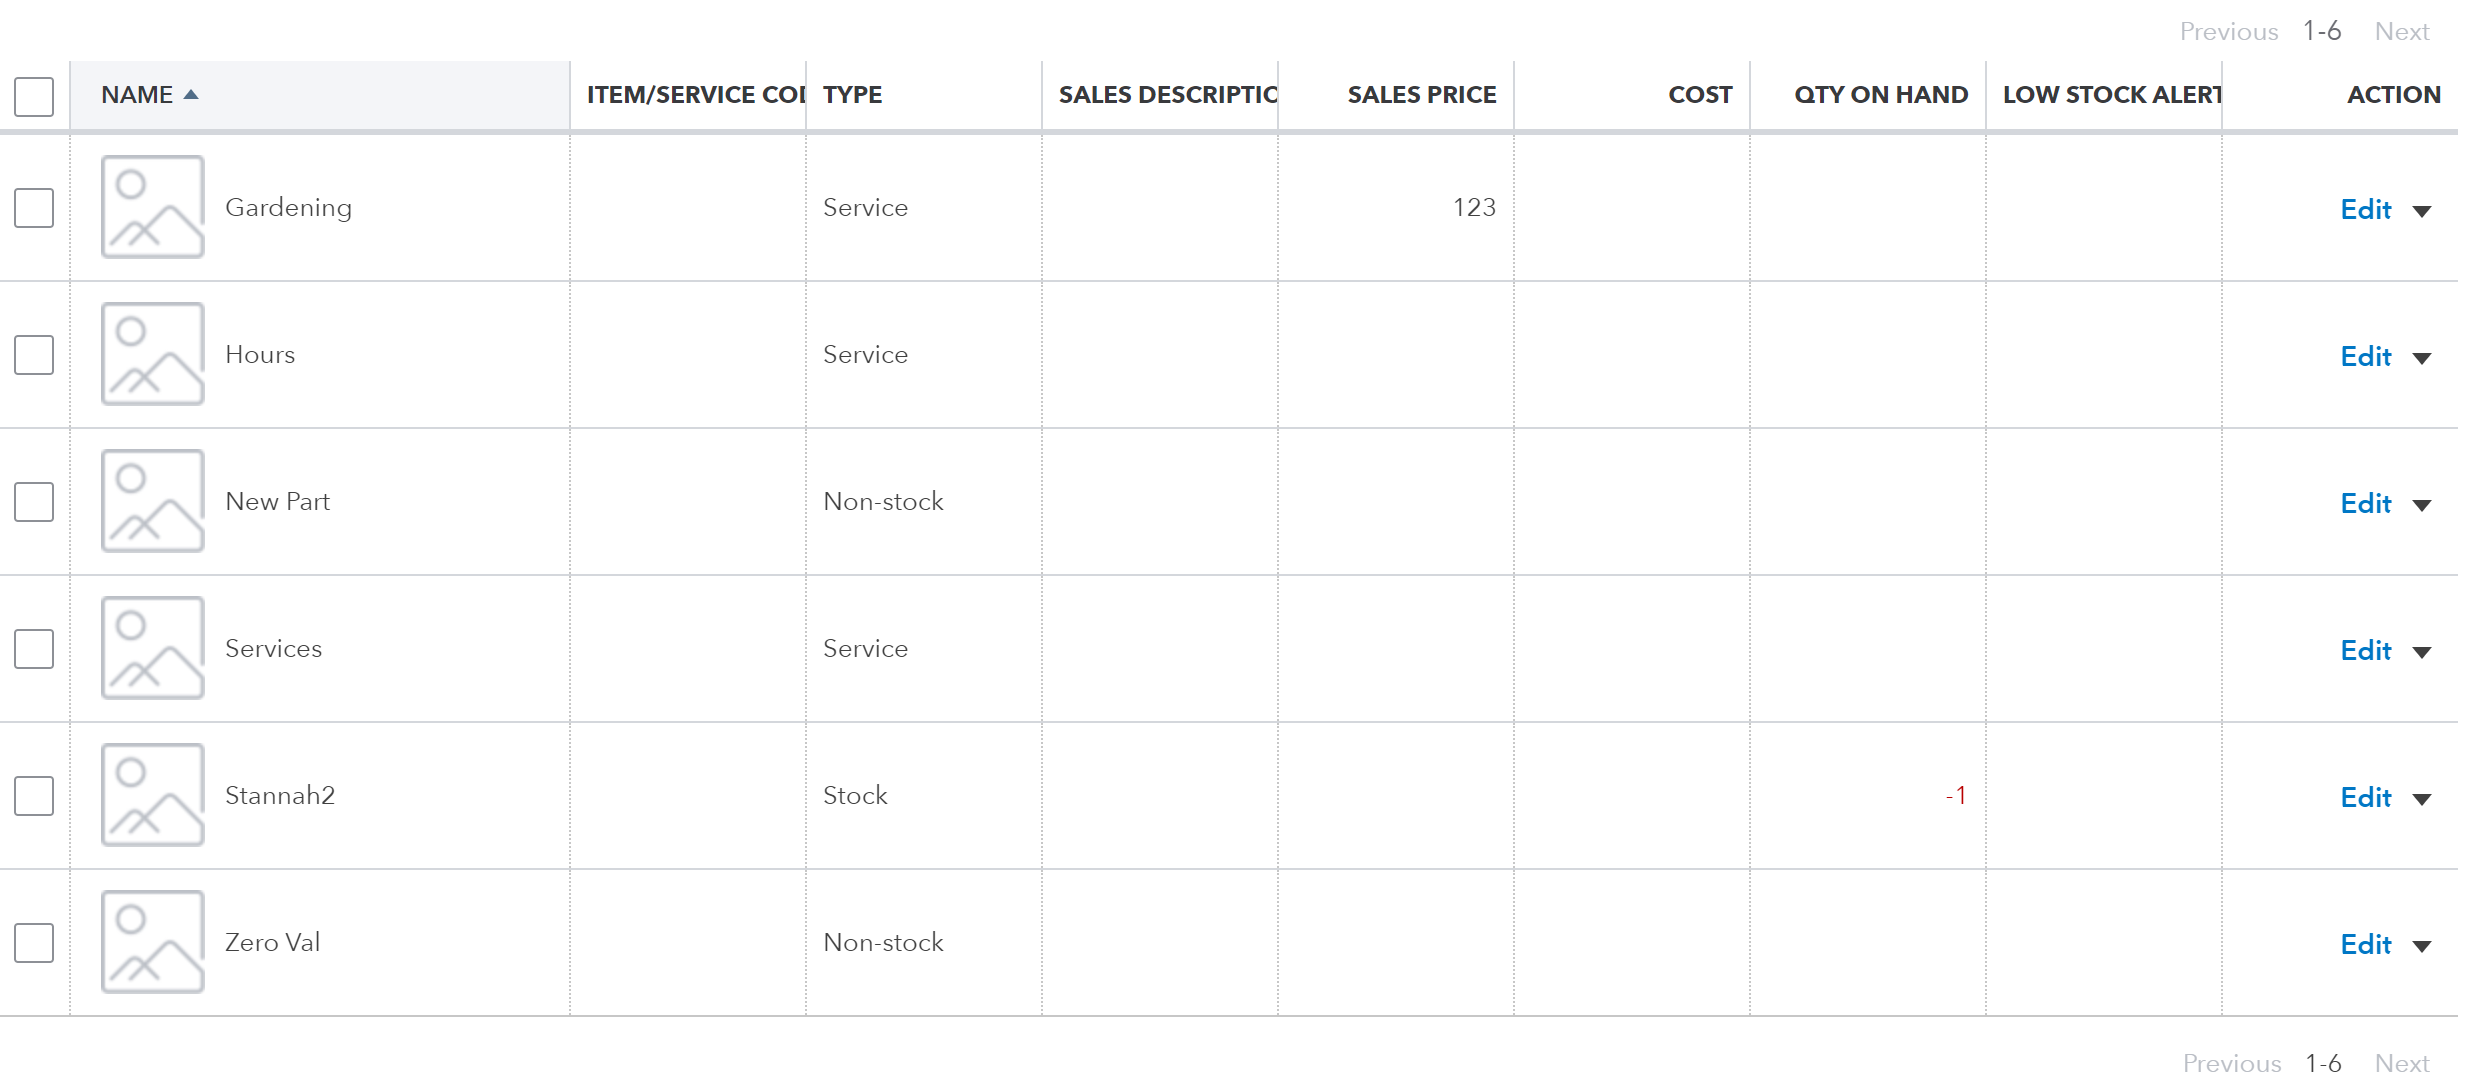
The name column is the 'Code' used in Workforce Manager to link the correct code in QuickBooks.
There are a number of different types of entries that can be used in this page. As a general 'Getting started' process, use the 'Services' 'Type' for things related to sales invoicing and the 'Non Stock' 'Type' for Purchase invoices.
If we click 'Edit' for one of these entries, we can see the details required. The below image shows the details. (you can click 'New' for a new item where required)
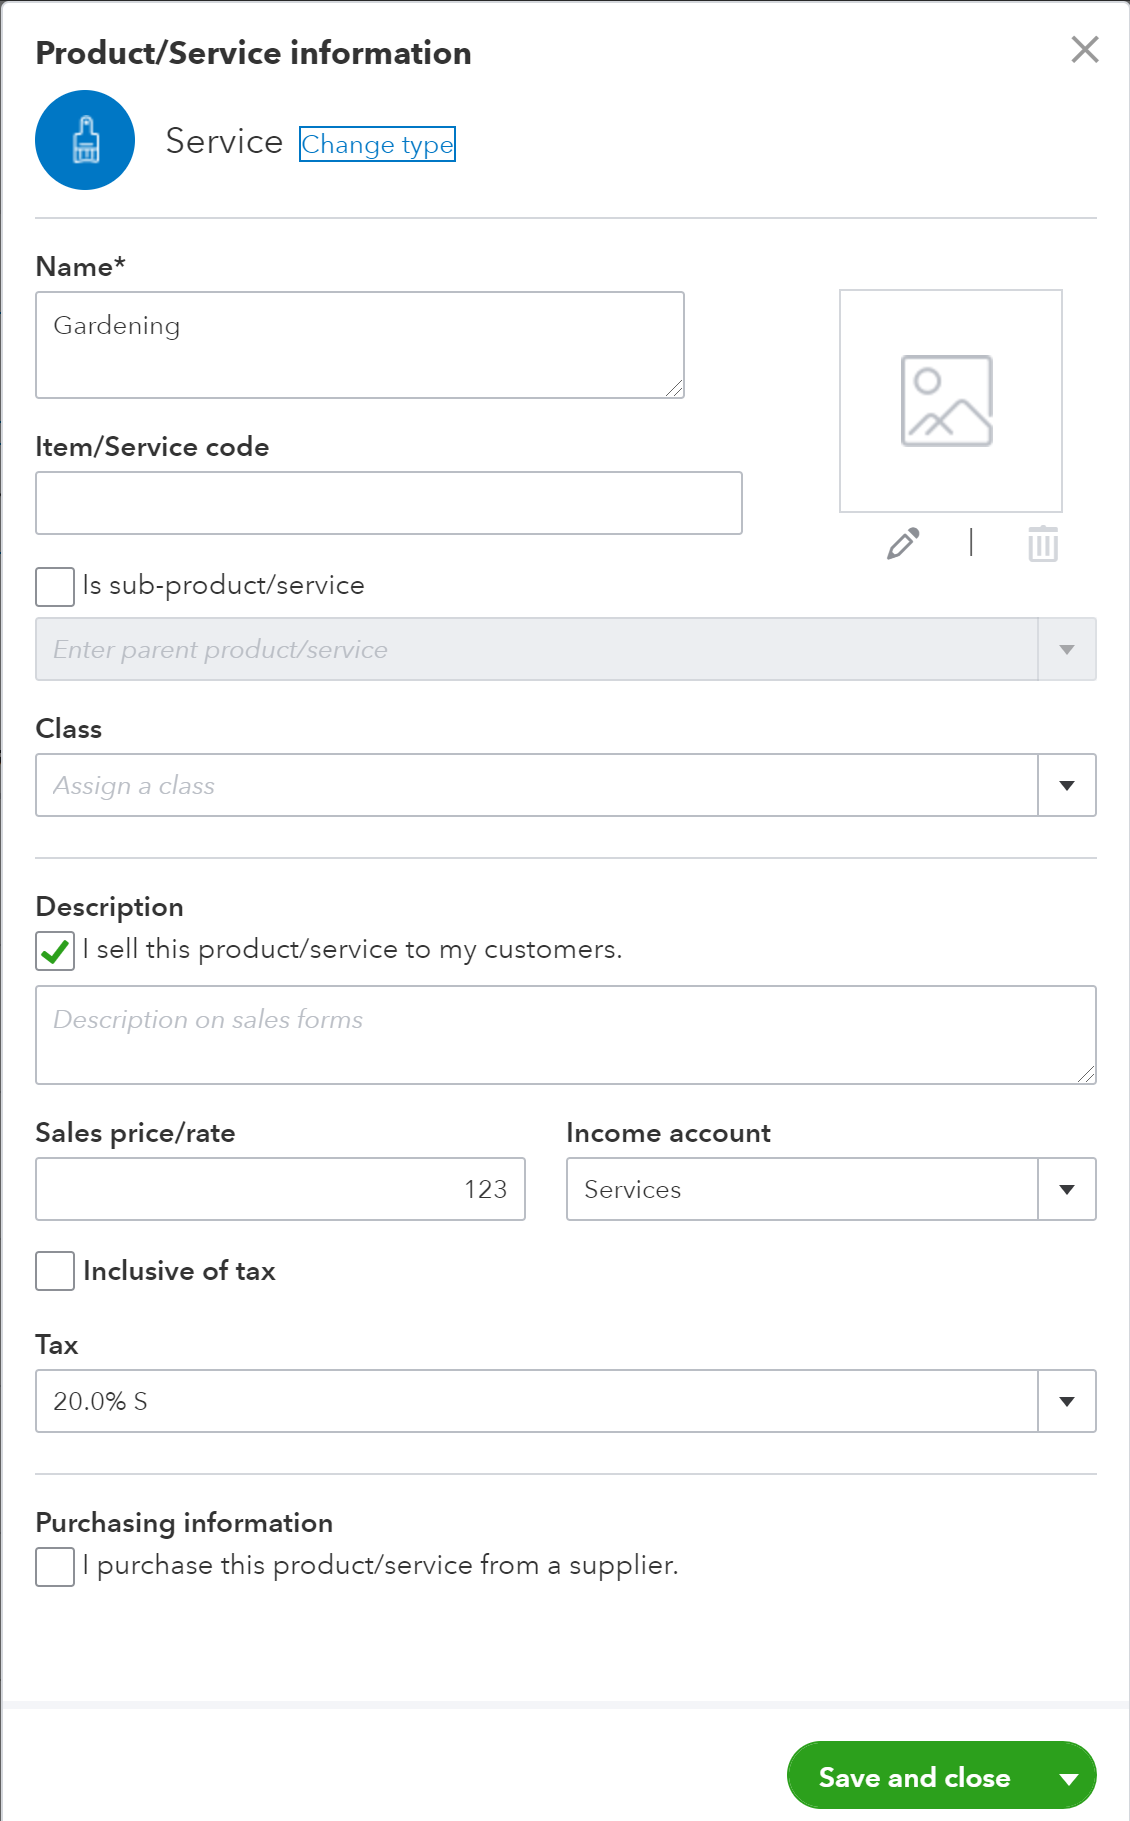
The main things to set on this dialogue as follows;
Name
A unique name used for this code
Description
Check the box labelled 'I sell this product/service to my customers.
Income account
Select 'Services' (or any other income account type that you wish to use for this code)
Tax
Using the drop down list, select a 'Tax' rate used for this code.
The process is similar for 'Non Stock' or supplier invoices except you must check the checkbox 'Purchase Information' / I purchase this product/service from a supplier. Also select the 'Expense account' to 'Cost of Sales' (or any alternative appropriate account. Finally set the 'Purchase Tax' drop down list to select the appropriate Tax / VAT rate.
It is important to note that if you wish to separate vatable items from non vat (exempt) items within a sales invoice, you must list 2 separate codes. If you do not do this, and the VAT is zero, it will still sync the invoice with zero VAT but the VAT exempt code will not be used within QuickBooks unless you specifically use a code for it.
QuickBooks Plus Options
If you have signed up for the 'Plus' account type in QuickBooks, you may utilise the features of 'Location' and 'Class' within QuickBooks. By selecting the 'Plus' option in the Workforce Manager API setup pages (when selecting QuickBooks as your accounting package), This will push through the 'Department' within Workforce Managed through to the 'Location' within QuickBooks, also the service 'Job Ticket' name and the purchase order 'Type' will be pushed through as the 'Class' within QuickBooks.
Location
Location is used in QuickBooks to record transactions to different sections of your company. Workforce Manager uses this section to record which department your transaction is designated to. Primarily this is a feature used for multi shop / office environments. I.E. if you had a head office and several premises in different parts of the country that also raise invoices. You may not have multiple premises, but your 'Company Name' must appear in this list. It is important that the name is exactly as recorded within Workforce Manager. Use copy and paste to ensure this.
To create a location in QuickBooks, click the 'Cog' symbol in the top RH corner to open the settings dialogue, then click 'All Lists'
The below image shows the 'Lists' panel in QuickBooks.
(Locations may not immediately show depending on your QuickBooks installation. to enable it, open the settings (cog symbol top right) Select 'Accounts and settings', click the 'Advanced' tab, scroll down to the section labelled 'Categories' and switch on 'Track Classes' and 'Track Locations')
From this list, select 'Locations'
Click 'New' and paste in your company name as used in Workforce Manager. (To obtain your company name as used in Workforce Manager, open workforce manage and click 'My Company'. Copy the details shown in the 'Name' field and paste into the new location panel within QuickBooks)
Classes
Workforce Manager uses the 'Classes' section within QuickBooks to record the Service or Purchase Order Job Type. To open the 'Classes' dialogue within QuickBooks, open the 'Lists' panel as shown above then select 'Classes'
(Classes may not immediately show depending on your QuickBooks installation. To enable it, open the settings (cog symbol top right) Select 'Accounts and settings', click the 'Advanced' tab, scroll down to the section labelled 'Categories' and switch on 'Track Classes' and 'Track Locations')
Click 'New' to add in each new class. Primarily, this will be all the 'Service Job Types' that you use in Workforce Manager. You can see a list of these within Workforce Manager by navigating to Settings > Company Settings > Job Ticket Types. The 'Value' column shows all the job type names currently in use within Workforce Manager. Copy and paste each of these into QuickBooks by adding each new line within the 'Classes' section.
You will also be required to add in each 'Purchase Order' type if you utilise this within PO's. PO's within Workforce Manager do not initially use the 'Type' setting unless you create some 'Types' within Settings > Custom Values > Purchase Order Type. You can record a PO type here and select it within a PO when creating it. If a type has been selected in a Workforce Manager PO, then that type must appear within the 'Classes' section of QuickBooks. If you do not select a PO type within a Workforce Manager PO, then QuickBooks will not prompt for it.