Integrate your email account with Workforce Manager allowing you to send and receive emails directly into each client record. This means locating emails specifically targeted to a site or company record is much easier to find as time passes by.
Diary Email
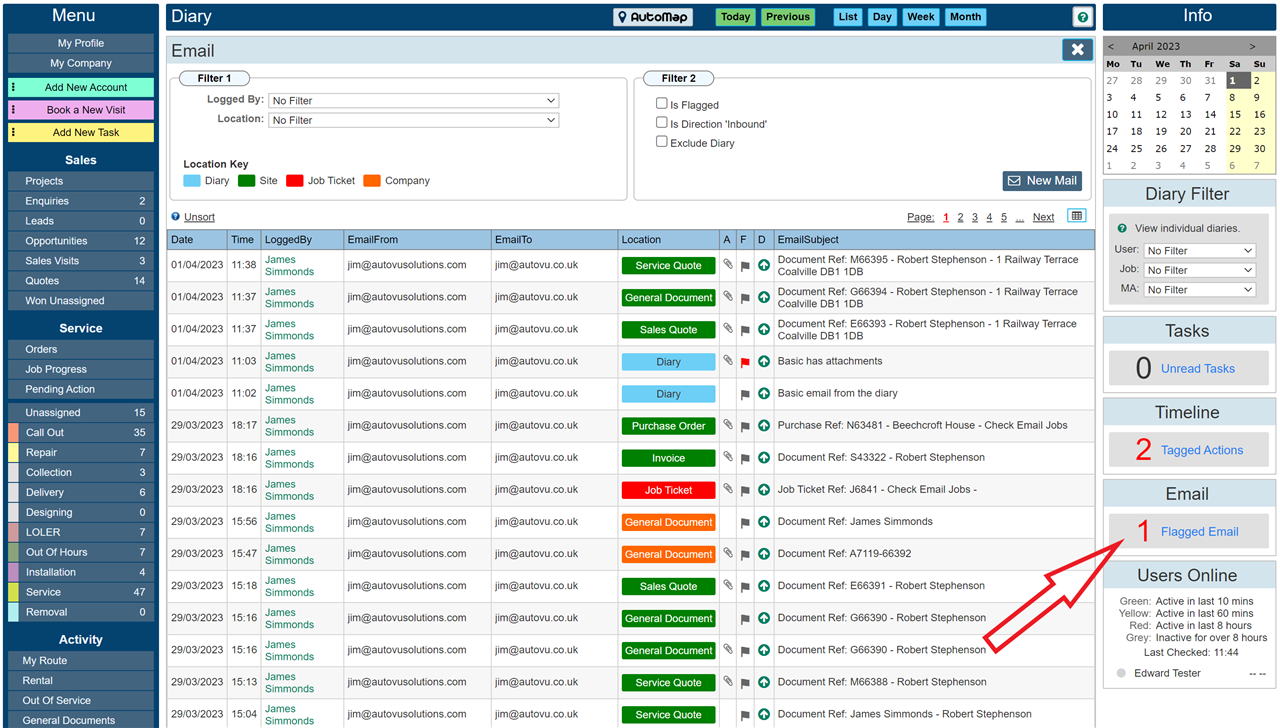
The diary email panel shows an overview of emails sent within the system allowing filters to quickly locate specific emails. Open the panel by clicking where indicated below.
The filters
| Logged By: |
Shows only emails logged by the selected user.
|
| Location: |
Limit the list to emails from only a specific 'Location'.
|
| Is Flagged: |
Show only 'Flagged' emails.
|
| Is Direction 'Inbound': |
If an email was was a reply or was imported into the system, these are marked as 'Inbound' checking this flag shows only Inbound emails.
|
| Exclude Diary: |
Excludes any emails that originated directly from the diary email panel.
|
The Columns
| Date: |
The date the email was Sent / Received.
|
| Time: |
The time the email was Sent / Received.
|
| LoggedBy: |
The user of the system that created or imported the email.
|
| EmailFrom: |
The email address of the user that logged the email.
|
| EmailTo: |
The email address to sent the email to.
|
| Location: |
Location in the system where the email was created. This is colour coded to show more clearly the location.
|
| A: |
Shows if the email has an attachment.
|
| F: |
Shows if the email is Flagged.
|
| D: |
The direction of the email. A green 'Up' arrow is an email sent from the system. A blue 'down' arrow is an incoming 'Received' email.
|
| EmailSubject: |
The subject of the email.
|
Search within a Column
If the filters are not returning a specific enough result. It is possible to search specifically within any column for matching text.
Clicking on the column heading to highlight / sort into column order will additionally open a column search dialogue allowing a specific search criteria for that column.
The image below shows the grid when clicking the 'EmailFrom' column heading which has now turned green, telling us it has been selected for Sort / Search. Immediately the results have been sorted into alphabetical order (clicking it again will reverse the order)

The search will return anything in that column having the word as shown in the search field. In this instance we wanted to find an email address that contained the word 'noreply'.

To remove the filter, click 'Unsort'
Flagging an email
Any email within the system can be flagged. It must be noted that flags in Workforce Manager email are local flags only. These are not automatically flagged within your own email program. Primarily this is because the Workforce Manager email system / panel works with multiple email accounts all within the same interface and flagging is specific to a users email account. Within Workforce Manager, all users have the ability to flag any email.
|
Flagged emails do not automatically flag in your Outlook
|
To flag an email directly from the results panel simply click the flag.

Open an email for viewing
Click within the grid to open a specific email for viewing. Once opened, just that single email is visible in the viewer.

You may view the attachment by clicking on it, Reply to the sender, or forward the email to another email address.
The red arrow shows the 'Links' created by the email that allows you to navigate directly to the location the email was originally created from. In this instance, clicking the 'C41090' will navigate the the site with reference 'C41090', clicking 'E66393' will navigate directly to the Quote page where the email was originally created.
Navigate to a Location
For our demo, we will click the 'C41090' to navigate to the site. The below image shows the site record. Our red arrow highlights the email button on the site.

If we click the yellow 'Email' button, it will open the email dialogue to view all emails specific to that site. (financial emails will be restricted from view unless you specifically allow them in the settings section)

Clicking an item in the LH pane will open it in the RH pane for viewing.
The first arrow pointing at the 'Refresh' button will send and receive emails on that client.
Importing emails from Outlook (or equivalent)
The second arrow points at the 'Forward' code that can be used to forward an email from your own Outlook program (or equivalent) Using this code, on your outlook, find an email you want 'Import' then on Outlook find the button to 'FORWARD AS ATTACHMENT' this is important. Once the email in outlook is set to forward as attachment, paste the copied forward code into the subject line overwriting anything that is already there. Email it to. You must email this to avmail@autovusolutions.com
The below image shows the email in Outlook ready to send as an attachment.

There are many things you can do to speed up this process of importing emails such as setting up a 'Quick Step' in your outlook to automatically set up the email address for avmail@autovusolutions.com. Alternatively you can create a one click 'Macro' that does the whole thing ready to send. These steps are specific to Outlook versions (or similar vendors)
|
You must use 'Forward as Attachment' in Outlook. DO NOT simply forward the email.
|
Once the email has been sent from your Outlook, clicking the refresh button periodically will refresh the view to show the imported email.
Automatic replies
To set up Automatic Replies, navigate to My Profile > Preferences and toggle the switch 'Enable Email Replies'
This option will automatically embed the reply code directly into every sent email that you send from Workforce Manager. When someone replies, not only will you see the reply in Outlook, the email will also we automatically inserted into the location within Workforce Manager. Please note: this process is not immediate and may take several minutes before the email is imported.
General Notes
The dairy email panel shows the last 2000 emails sent based on the filters you select. For example, with no filters set, the last 2000 emails will be available in the panel. If you select a particular user of the system, the last 2000 emails they sent will be shown. If the 'Is Flagged' checkbox is also checked, the last 2000 emails for a given user where the checked flag is checked will be shown.