The financials module is available from both the Site Record and Company Record. It can be accessed directly from the menu on the LH side by clicking the 'Financials' button. From this page, the credit terms for the site can be set. If a Main Contractor has been selected, credit terms for this can also be set here.
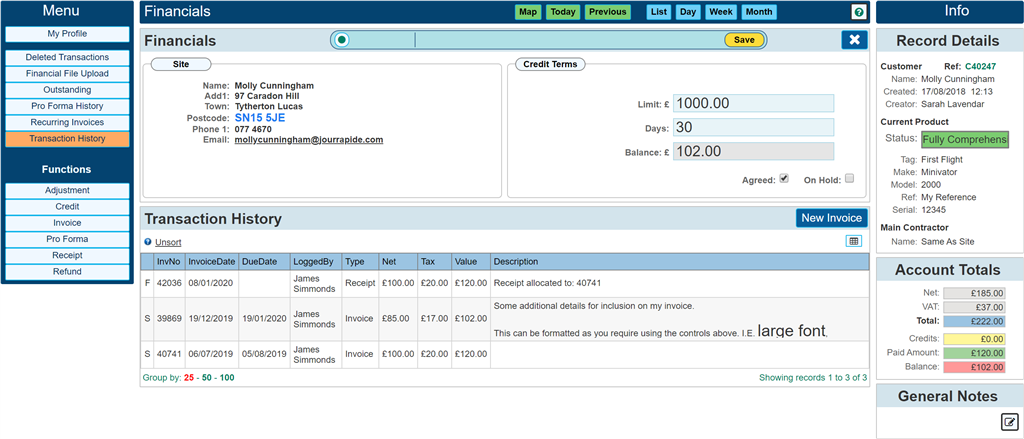
The above image shows the financials page opened from a site. In this instance the site does not have a main contractor selected so the credit limits available are for the site only.
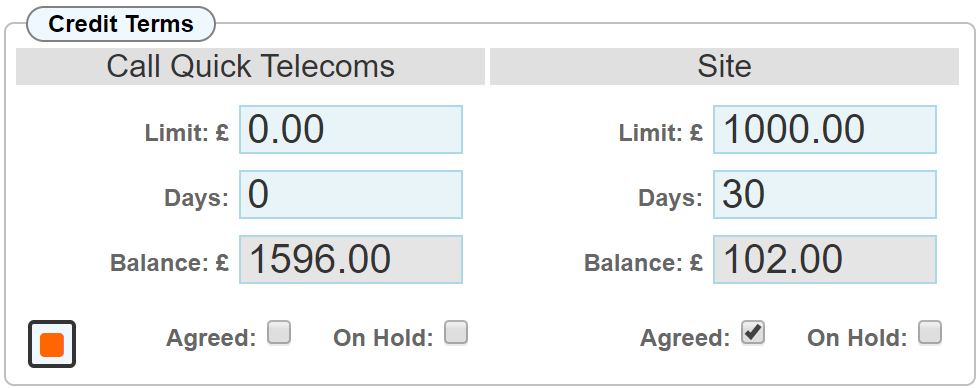
The below image shows the Credit Limits panel should a main contractor be selected within the site.
Setting the terms
Credit terms allow you to set limits on how much a Company or Site can spend and for how many days you allow credit on that value.
In the image shown above, we show credit terms for the Main Contractor 'Call Quick Telecoms' and also for the site. This is because 'Call Quick Telecoms' has been selected as the main contractor for this particular site. The main contractor credit terms are available for edit within any site where that main contractor has been selected.
If a main contractor had not been selected for this site, only the site limits would be visible. (as shown in the opening image for this section)
Please Note: Credit term settings applied to the Main Contractor are global values, I.E. If you change the main contractor credit terms from any site, they will instantly be applied to all sites that have this particular main contractor selected. The balance shown for main contractor credit terms is the total outstanding for that main contractor, not the current site.
Limit
This is the credit limit applied to this account. If a site or company exceeds this limit, a warning flag will appear each time the site is visited.
Days
The number of days credit applied to this account. This number allows you to automatically set the due date for any invoice created. I.E. if you have 30 days credit, set the invoice date to 1st April, the due date for this invoice would automatically be set for 30th April.
Balance
The current outstanding balance for this account. This is a read only value. It shows a total of all outstanding invoices for that account.
Agreed
Activate the terms as agreed with the customer. Ticking the 'Agreed' checkbox tells the system to apply these limits to the account. I.E. when you tick this, the warnings will be visible should the account go over its credit limit. Leaving this box un-ticked will suppress the warnings.
On Hold
Places the account 'On Hold'. Ticking this checkbox sets a warning flag reminding the user that this particular account is on hold.
Use Cases
Scenario 1
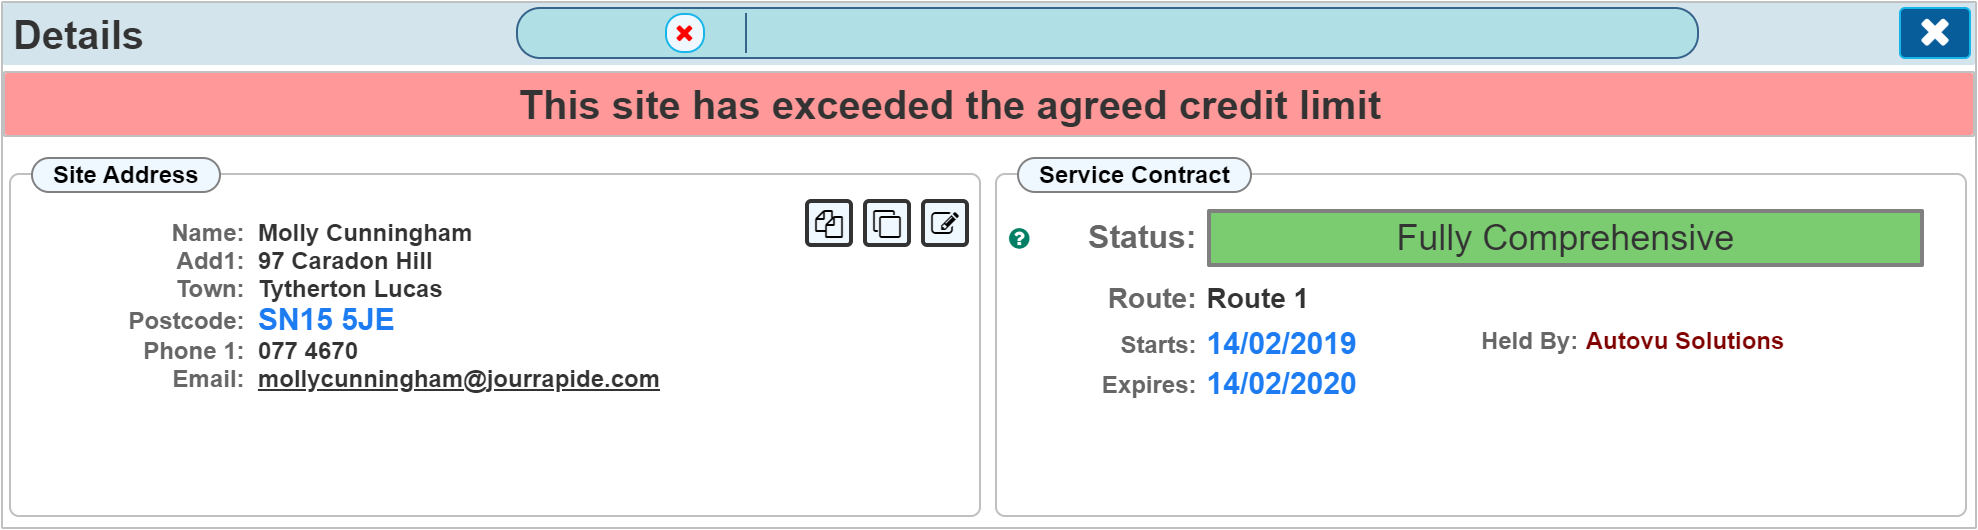
A site has been set up without a main contractor, the credit limits have been set and the terms agreed. If the site goes over the credit limit, each time you visit that site, create job tickets or add new invoices, a warning flag will display at the top of the page.
An example image shown below with the warning flag set showing that the site has exceeded its credit limit.
Scenario 2
A main contractor has been selected within the site allowing you to set credit terms for both the main contractor and the site.
This combination allows you to set an overall credit limit that is applied to the Main Contractor, but a lower limit that is applied to an individual site.
So, if the credit limit for the main contractor was set at £5000 and several sites were using this main contractor each with its own credit limit of £1000, the warning flag for an individual site would appear if the value for that site went over £1000, but the rest of the sites would be OK.
If the main Contractor value went over £5000 then all sites that had that main contractor would show the warning as seen below;

Should both the site and the main contractor exceed their limits, both warnings would be shown.
If the account is on hold;

LH Menu
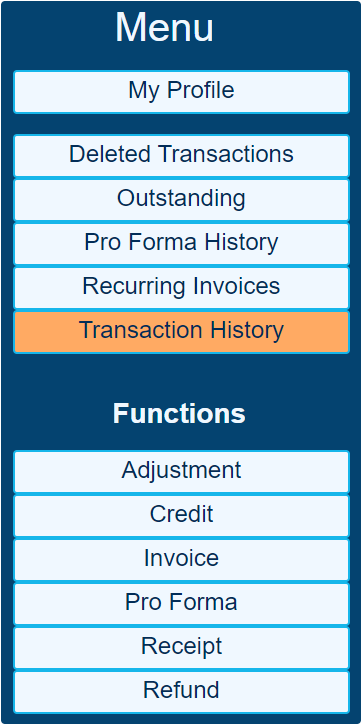
Deleted Transactions
Invoices, receipts, credit notes etc can all be deleted. A record of these will be shown in this list.
Please Note: Deleted transactions can not be 'Un-Deleted' It is also not possible to delete an invoice if a receipt has been applied to it. To delete the invoice, the receipt must first be deleted.
Outstanding
Some accounts become congested with many transactions within the transaction history. To see only invoices that have an outstanding balance (I.E. unpaid), the 'Outstanding' tab shows just these.
Pro Forma History
Pro Forma invoices are kept separate to the main transaction history and are visible only in this list.
Recurring Invoices
A list of invoices on this account that have been set to recur.
Transaction History
The default view when entering this page shows the full transaction history for this account.
Functions
Adjustment
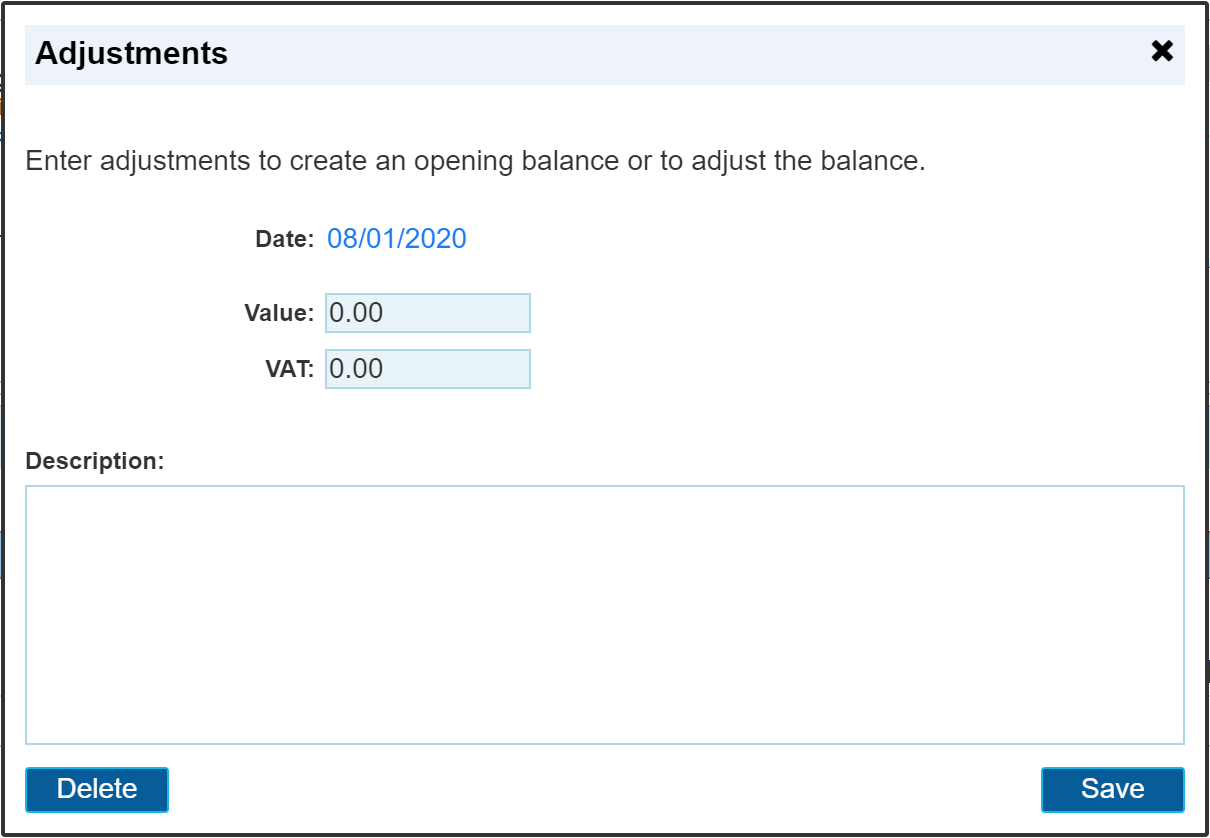
An adjustment allows you to simply alter the account balance. Ideally this would never be used but is available nonetheless. It may be a situation where there are so many transactions on the account that an error cannot be found. Using the 'Adjustments' option allows you to adjust the balance to a figure of your choice.
The below image shows the adjustments popup;
Credit
Credits can only be applied to an existing invoice. This can be credited in full or as a part credit. When clicking the credit tab, a list of available invoices that can be credited will be shown. Please Note: Only invoices that have an outstanding balance will be available for credit. I.E. you cannot credit an invoice that has already been receipted in full.
The below image shows a list of invoices available for credit;

On clicking this entry will open a dialogue as shown below;

Options to pay in full, add a description and individual values are available for entry. The accounts integration panel for sync to your financial package will be visible once the credit note has been created. I.E. save the credit note then re-open it to set the sync option as shown below;
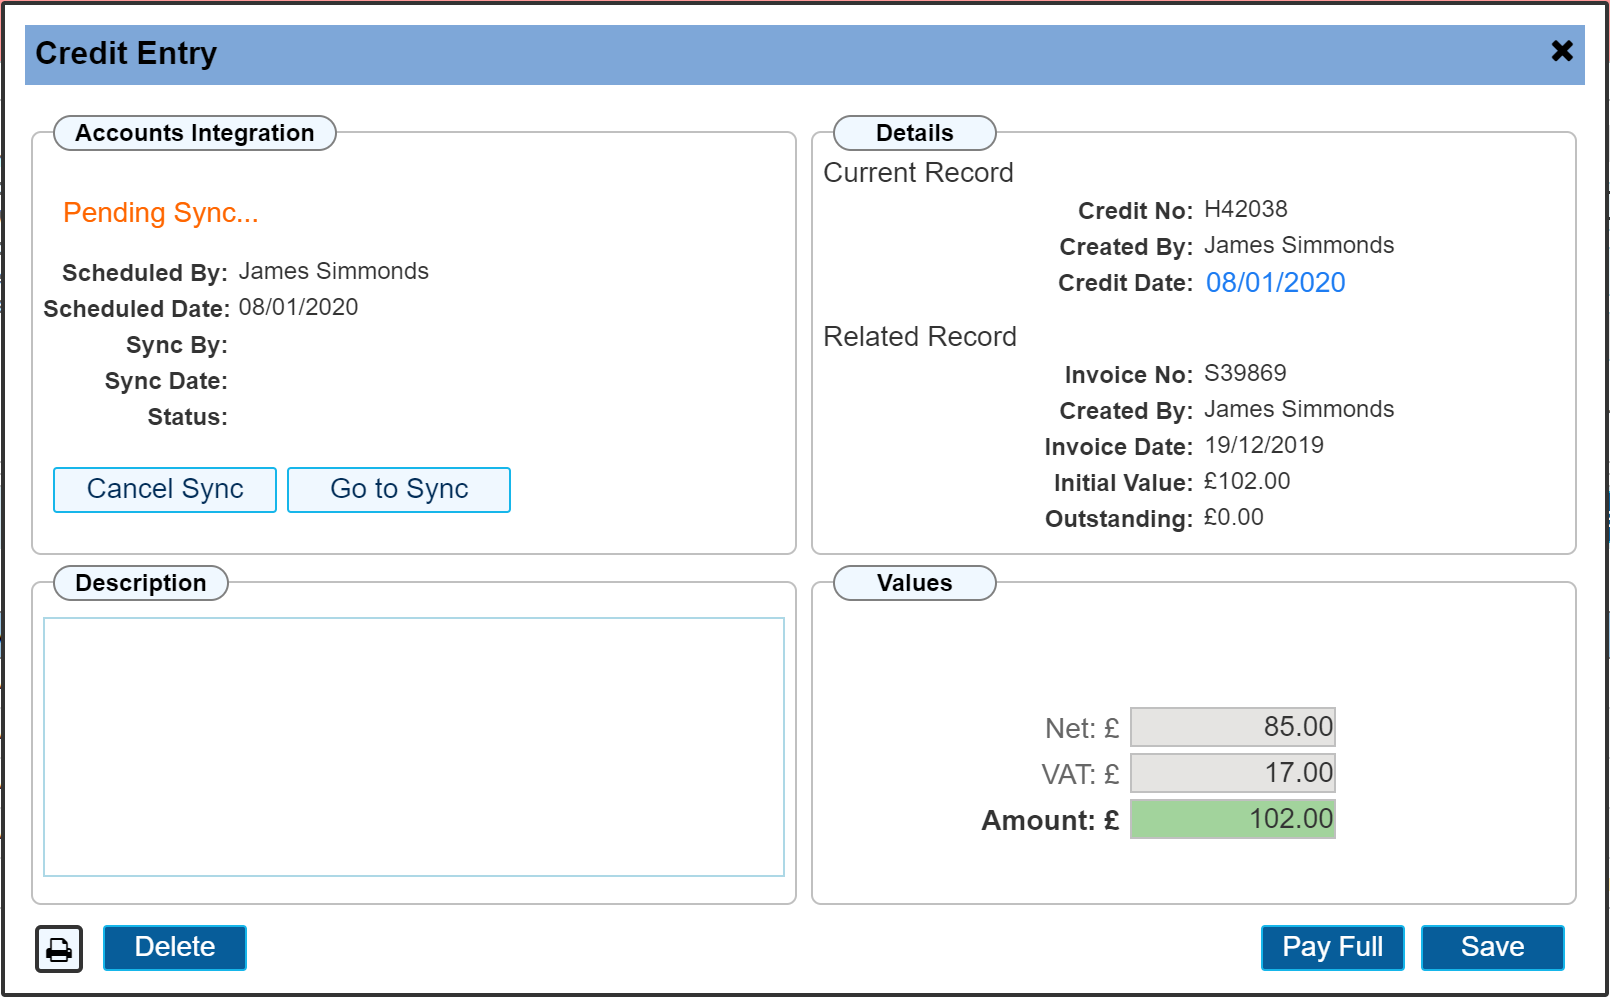
Once the credit note has been saved, options to delete or print / email and sync to your accounts are visible.
Invoice
The Invoice section is covered in detail here in a separate topic.
Pro Forma
The Pro Forma section is covered in detail here in a separate topic. A pro forma is set up in exactly the same way as an invoice and is covered within the invoice topic. Pro Forms's do not form part of your transaction history but are kept separate until they become invoices.
Receipt
Receipts are applied to invoices either in full or any value up to the outstanding amount on the invoice. Clicking the Receipt button shows a list of all invoices that are available for receipt. I.E. they have an outstanding balance.

On clicking this entry will open a dialogue as shown below;
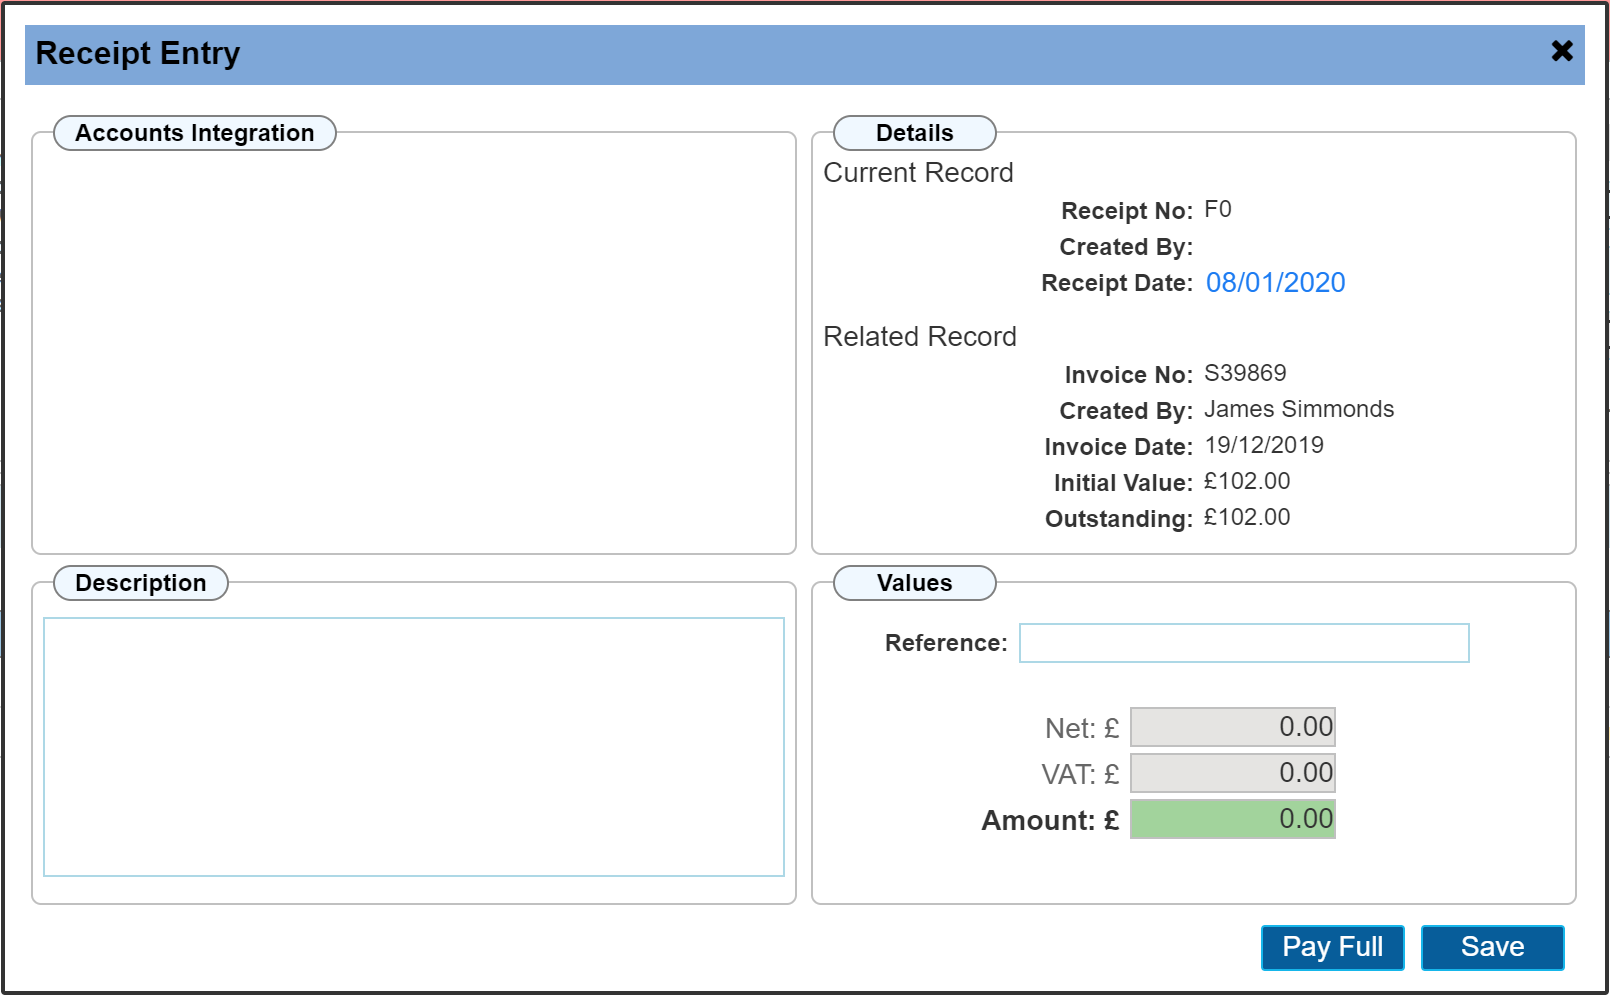
Options to pay in full, add a description / reference and individual values are available for entry. The accounts integration panel is not available for receipts.
If using accounts integration via sync, receipts are not generally created within AutoVu, but are receipted via your financials package via bank feeds etc. I.E. it is usual to use your accounts package / bank statements to determine if an invoice has been paid and record it directly there. Receipts can be synced back to AutoVu once the invoice has been paid within your accounting software. While synchronising your accounts, receipts paid in full will be automatically created within AutoVu.
Once the Receipt has been saved, options to delete or print / email will be available.
Refund
A refund allows you to record details where paying back monies for a receipt are required. On clicking the refund tab opens a list showing receipts available for refund.

On clicking an entry will open a dialogue as shown below;

Options to add a description / reference are available for entry. Part refunds are not possible. Refunds can only be made in full. If a part refund is required, refund the the full amount then create a new receipt for the required amount. The accounts integration panel is not available for refunds.
Once the Refund has been saved, options to delete or print / email will be available.
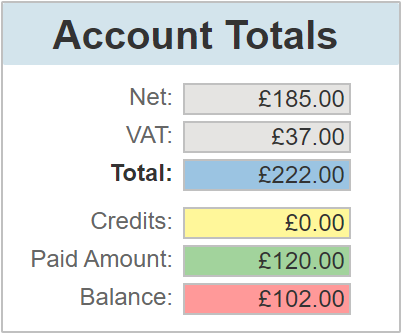
Account Totals
The account totals panel shows the total amounts for this account to date.