Opening the map
To open AutoMap, click the 'AutoMap' button located on the top navigation bar of each window. See the diagram below highlighting the AutoMap button red.

AutoMap is a self contained map window that can be positioned anywhere on the screen. If you utilise a dual display system, this can allow the main 'Workforce Manager' app to be open on one screen with 'AutoMap' opened on the other. The window can be resized or maximised to full screen where required. This is particularly useful in an office environment where a large screen display on the wall showing AutoMap could be arranged, allowing an instant view of all jobs, the job stage, and where each of your engineers are.
By combining 'Google Maps' with your jobs diary and vehicle location, you can visualise you current days work at the click of a button. On opening 'AutoMap', the current diary is shown with each marker indicating the same job stage colour codes as those used on the main diary.
A route can be created for each individual rep that can be optimised based on the current road and traffic conditions using the Google Maps traffic service. Once an optimised route has been created, this can be saved into your diary.
Any outstanding work, such as Service' visits can be viewed, shown geographically to indicate where most of your service work is.
The open map
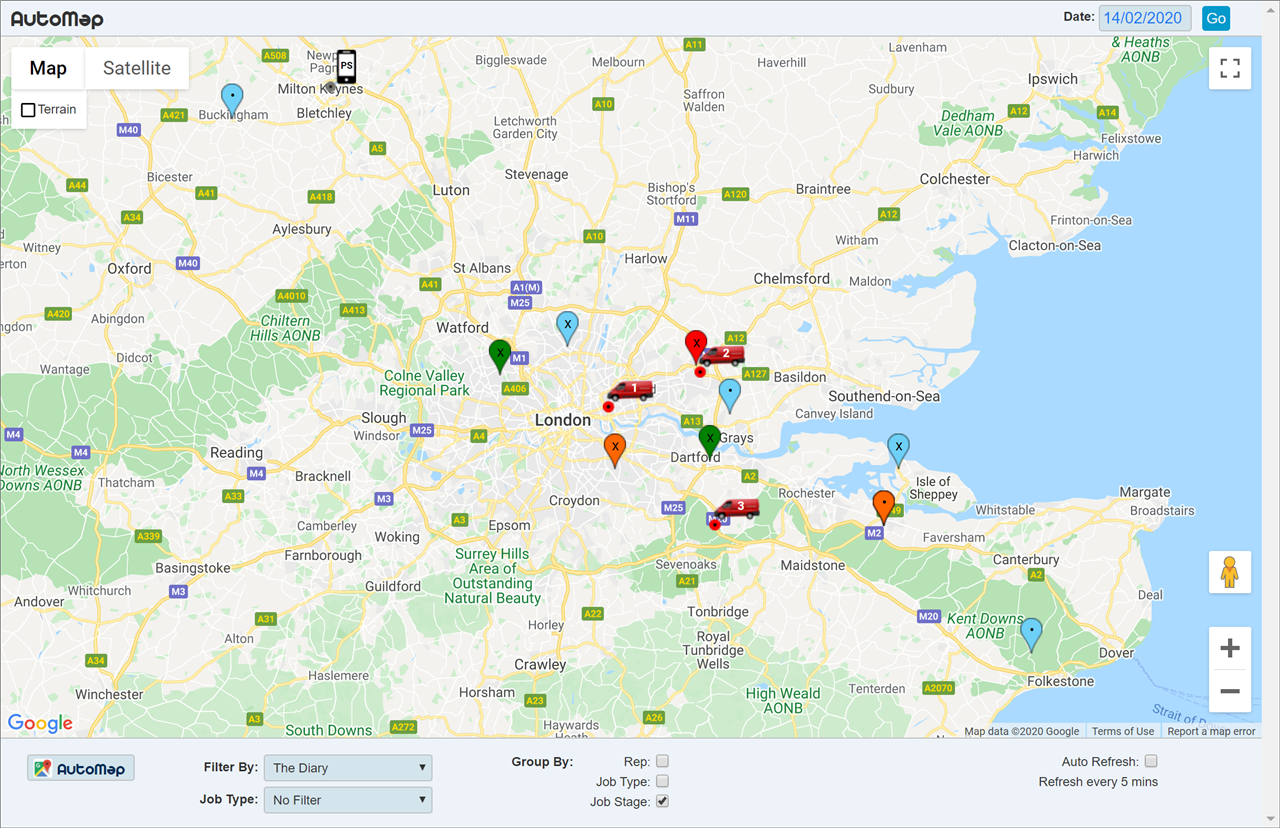
Below is an indication of how the map may look when first opening. The number of jobs and vehicles will depend on your particular business.
The Date
When AutoMap is initially opened, the current date as shown on the main diary page is used showing the jobs booked on that day. Typically this would be the current day.
The top right hand corner of AutoMap shows the current processing date, clicking this allows you to change the date to view jobs booked on any date. Once the date has been changed, the view will automatically update. The 'Go' button is for older browsers and mobile devices where the view may not automatically refresh.
Map Display
Many of the functions within the main map display are provided by 'Google Maps' directly. These include showing the map full screen with no browser borders, zooming in and out, and street view by dragging and dropping the 'Yellow Man' symbol onto the map. Ideally, zoom in to a street to allow more accuracy. You can learn more about the basic google maps functions simply by googling 'How to use google maps'.
Vehicle Markers
If your have trackers fitted to your vehicles, and the company you use for this service has an API for us to connect with, we can show the current location of each of your vehicles utilising the data from your tracker device directly on to our map. Currently we have API links to 'Quartix', 'Movolytics' and 'Kinesis' trackers.
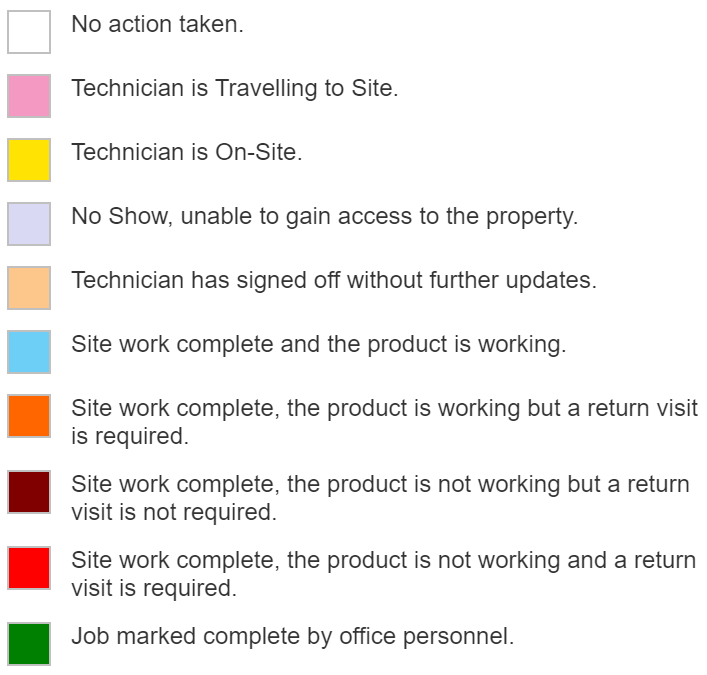
Vehicle Status Symbols
The colour symbols below the vehicle: Depending on the tracker company you use, the ignition status your vehicle can be categorised into the following;
 |
The vehicle is stationary with the ignition off.
|
 |
The vehicle is stationary with the ignition switched on.
|
 |
The vehicle is travelling.
|
Mobile Phone Markers
In a similar way to the 'Vehicle Markers' the mobile device can also be used to pinpoint a location on the map. This is highly dependent on the device being used allowing GPS tracking details to be used. (This is a user option set on the device).
Mobile phone markers are switched on or off within each user profile record. Toggle the switch 'Track Mobile' on or off to show the device on the map. Please Note: If the last response received from the mobile device exceeds 24 hours, the device will no longer be shown on the map.
Clicking the vehicle / phone marker
The below image shows all bookings on the current view. 'This Schedule' are those assigned to that engineer / van. 'Other Bookings' shows all other jobs on the system for that day. (Some details have been obscured / omitted for privacy). If the vehicle driver is not set, the phrase 'Driver Not Assigned' will show after the vehicle registration. To set up who drives which vehicle, see the 'How To' guide Assets - Vehicles https://autovusolutions.com/Documentation.aspx?i=21
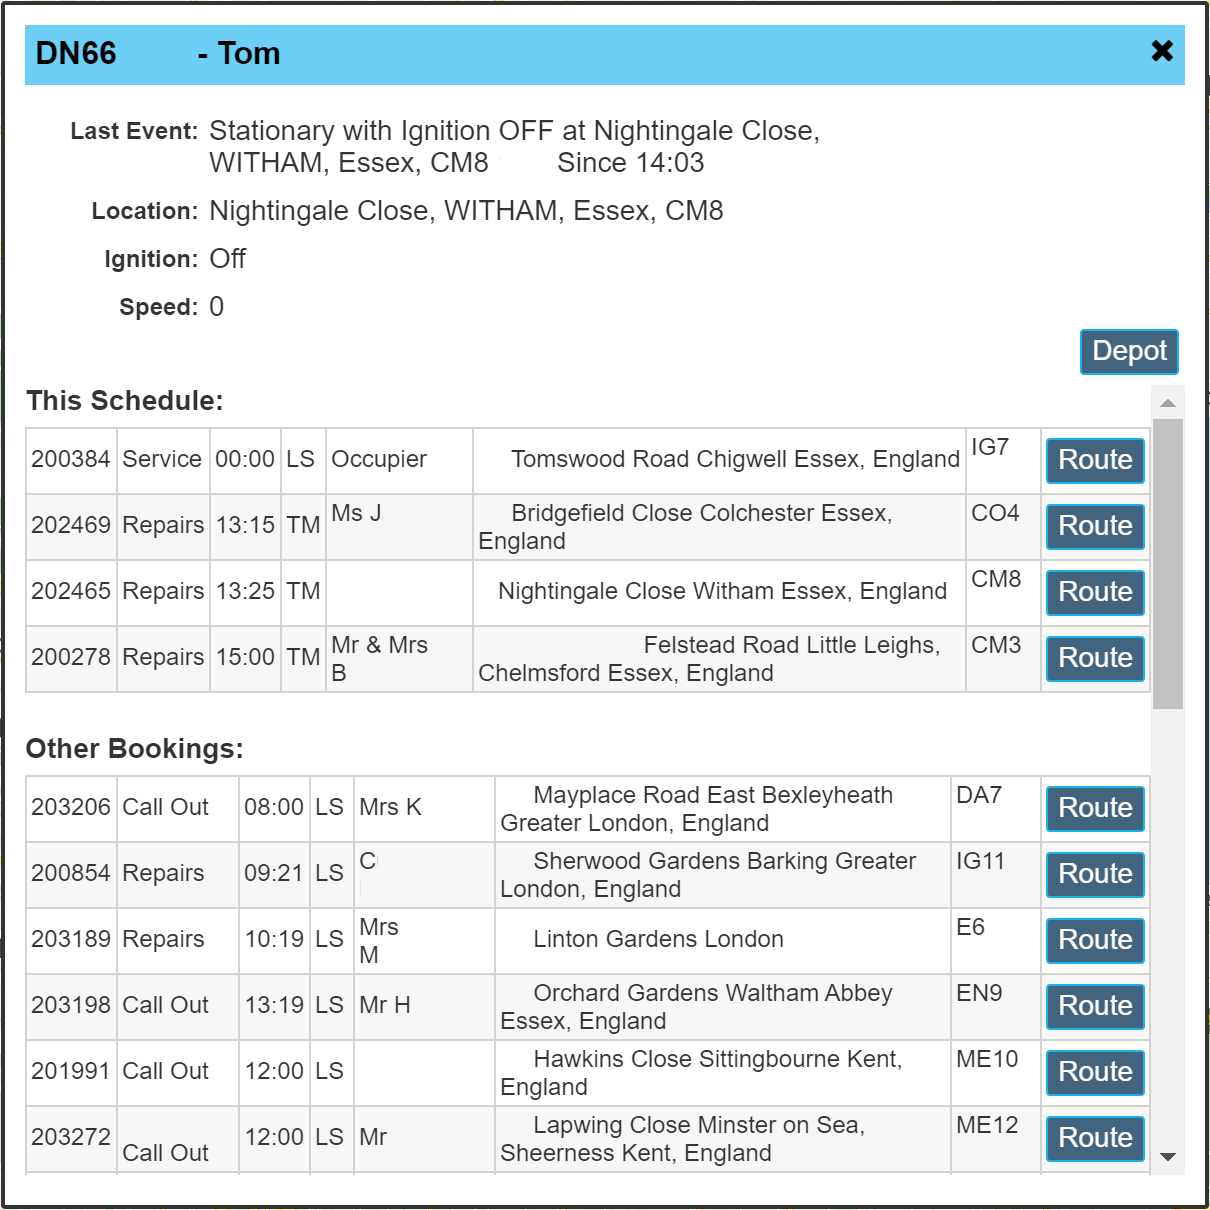
Last Event
This is the date / time that the tracker was able to report its location.
Location
The location of the vehicle when the last event was received.
Ignition
The status of the vehicle ignition.
Speed
The speed the vehicle is currently travelling.
Depot
Clicking the 'Depot' button creates an instant route and ETA from the current vehicle location to your Depot. Clicking the 'Route' button within any of the scheduled booking will perform the same process but to the destination of that booking. This is extremely useful for instantly viewing the ETA of an engineer to his next appointment.
An example route instantly created by one click routing.

The Map Markers
The individual location markers for each job booked for the selected day are initially colour coded based on the job stage. These colours are the same ones used in the main diary page. For reference, the codes are included below;
The symbol within the marker while in this mode will either be a 'Dot' or an 'X' This indicated the 'Confirmed' booking status. I.E. 'X' means the job has not been confirmed with the customer and a 'Dot' means it has.
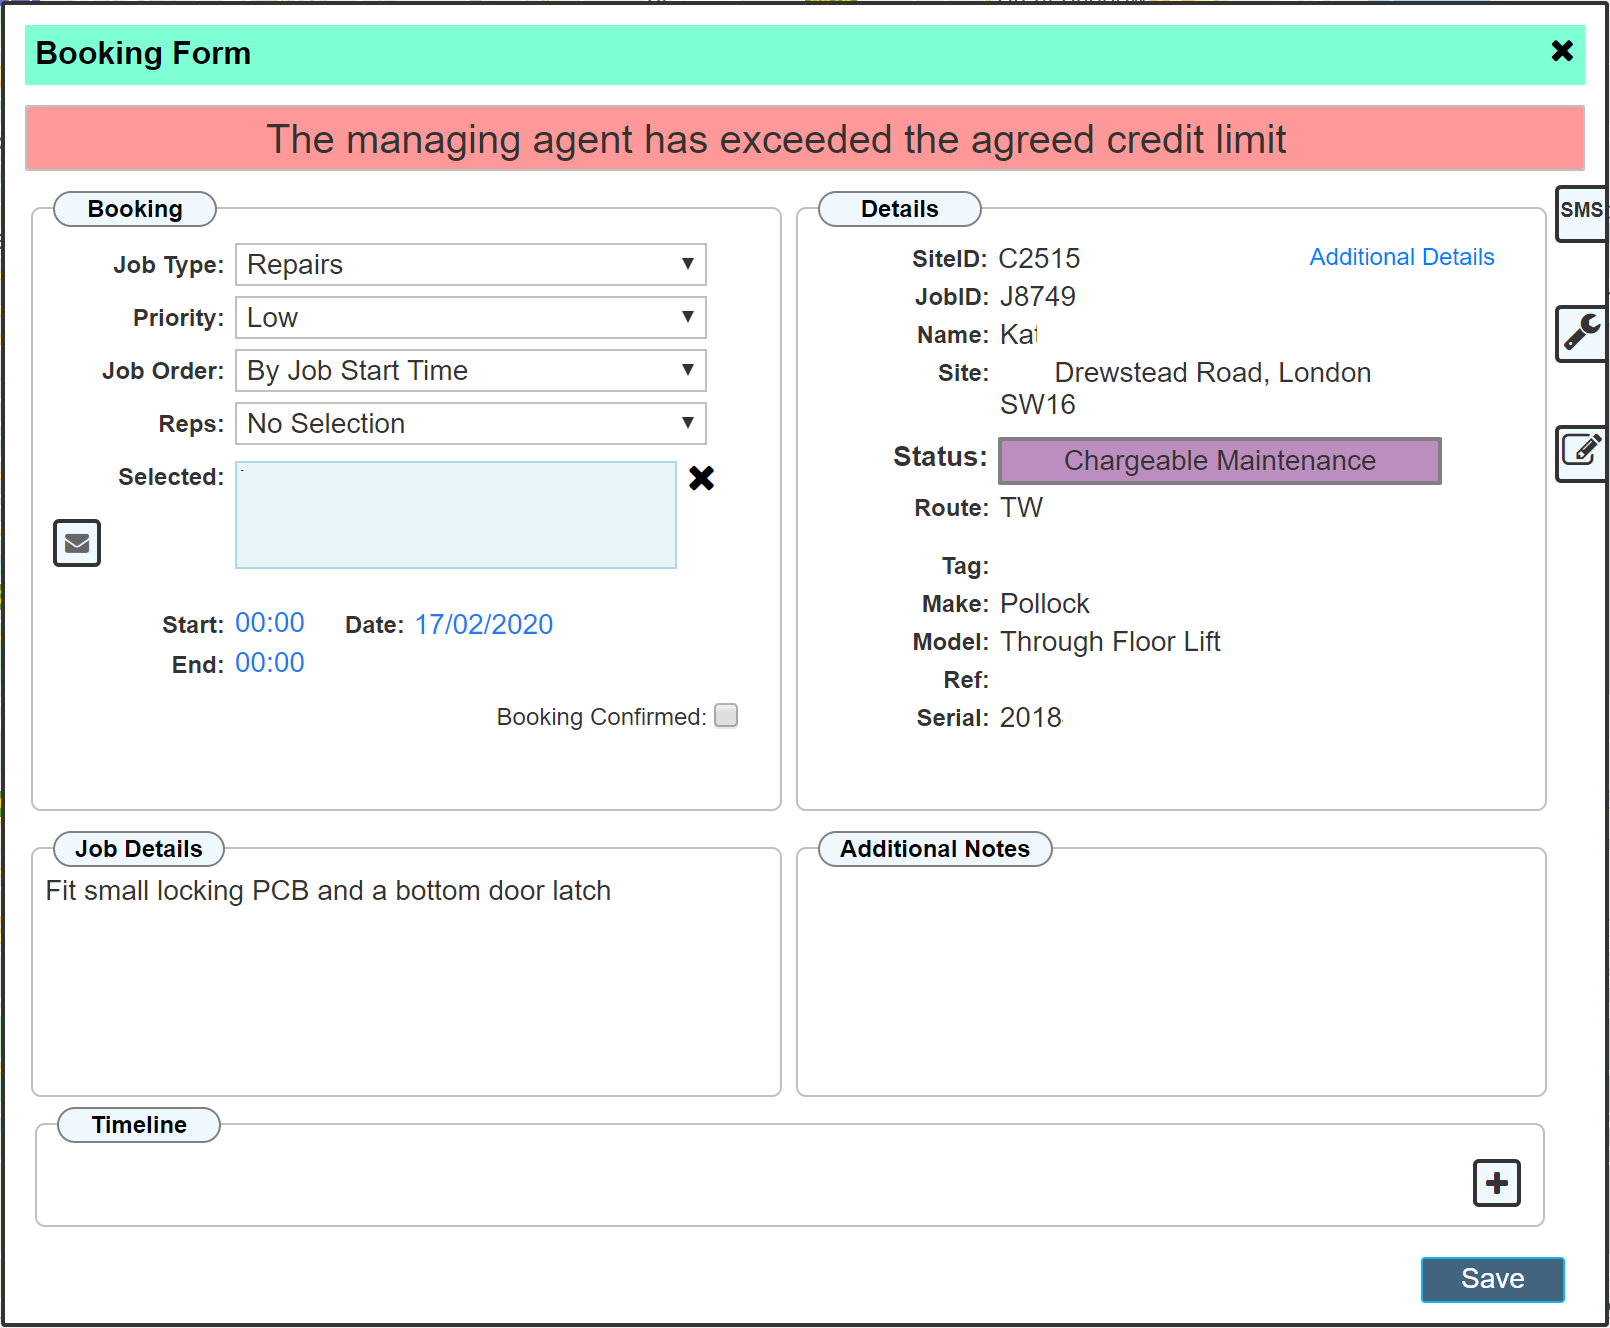
Clicking the map marker opens up the 'Booking Form' for the selected job allowing you to edit / update the details directly from the map.
Below is an example booking form;
Options Panel (at the bottom of the screen)
The default view can be filtered / changed to view jobs booked, Jobs Incomplete or route a specific engineer step by step from one location to another.
AutoMap Button
Clicking this simply refreshes the current view to include any new jobs that may have subsequently been added since opening the map.
Filter By
The default option is 'The Diary' as detailed above. Other options in this list are 'Jobs Incomplete' and all the current reps assigned as 'Engineer' allowing a filter of a single rep.
Details of each option below;
The Diary
Selecting 'The Diary' (default option) a further selection in the 'Job Type' drop down is made to determine which type of diary job to show. This option applies to the currently selected date / jobs booked and returns results on 'ALL REPS'. If your selection in the filters returns no results, an empty map will be shown.
| Exclude Service: |
The default view shows all jobs for all reps. By Selecting 'Exclude Service' allows all jobs still to show, but misses out the service job types. Often these are not booked jobs but shown on the map at your own preference / workflow.
|
| Exclude Sales: |
The same as above. Excluding all sales allows you to segregate sales from service job types. View only Sales job types by selecting 'Sales' from the drop down list.
|
| Exclude Sales & Service: |
Excludes both sales and service.
|
| Job Types: |
Selecting the individual job types allows you to filter so that only that job type will show on the map.
|
While in 'The Diary' filter option, there are further options to change the marker style to group the colours by type.
The default option 'Job Stage' shows as detailed above, each marker is coloured according the the job stage.
Rep:
Selecting 'Rep' will update the colours to indicate all jobs by a particular rep, I.E. all the jobs for rep 'A' will be one colour whereas all the jobs for rep 'B' will be a different colour. The colours in this instance are system generated.
Job Type:
The marker colours will change to indicate the actual job type as defined in your Job Type setup. I.E. you can assign colours to each job type. Selecting this option will group the jobs based on its job type, to its associated colour.
Jobs Incomplete
Selecting 'Jobs Incomplete' is a two stage process. On selecting 'Jobs Incomplete', a further selection in the 'Job Type' drop down is made to determine which type of incomplete job to show. This option does not utilise the date selection, instead, this view visualises the jobs as shown within the main diary page LH menu for each of the 'Service' job type buttons.
| Exclude Service: |
This option has no effect in this view.
|
| Exclude Sales: |
This option has no effect in this view.
|
| Exclude Sales & Service: |
This option has no effect in this view.
|
| Job Types: |
Selecting the individual job types shows all incomplete work for that job type.
This visualises the same jobs as when clicking the same named button within the main diary LH menu. Everything listed in those 'Service Buttons' is either 'Work In Progress' or 'Incomplete' The jobs are only removed from this view after the 'Job Complete' toggle is set to 'YES' or the job has been 'Archived' due to a pre set period of inactivity.
An example of where this may be useful could be to display a map showing all outstanding service jobs. Below shows an example of many jobs at differing stages;
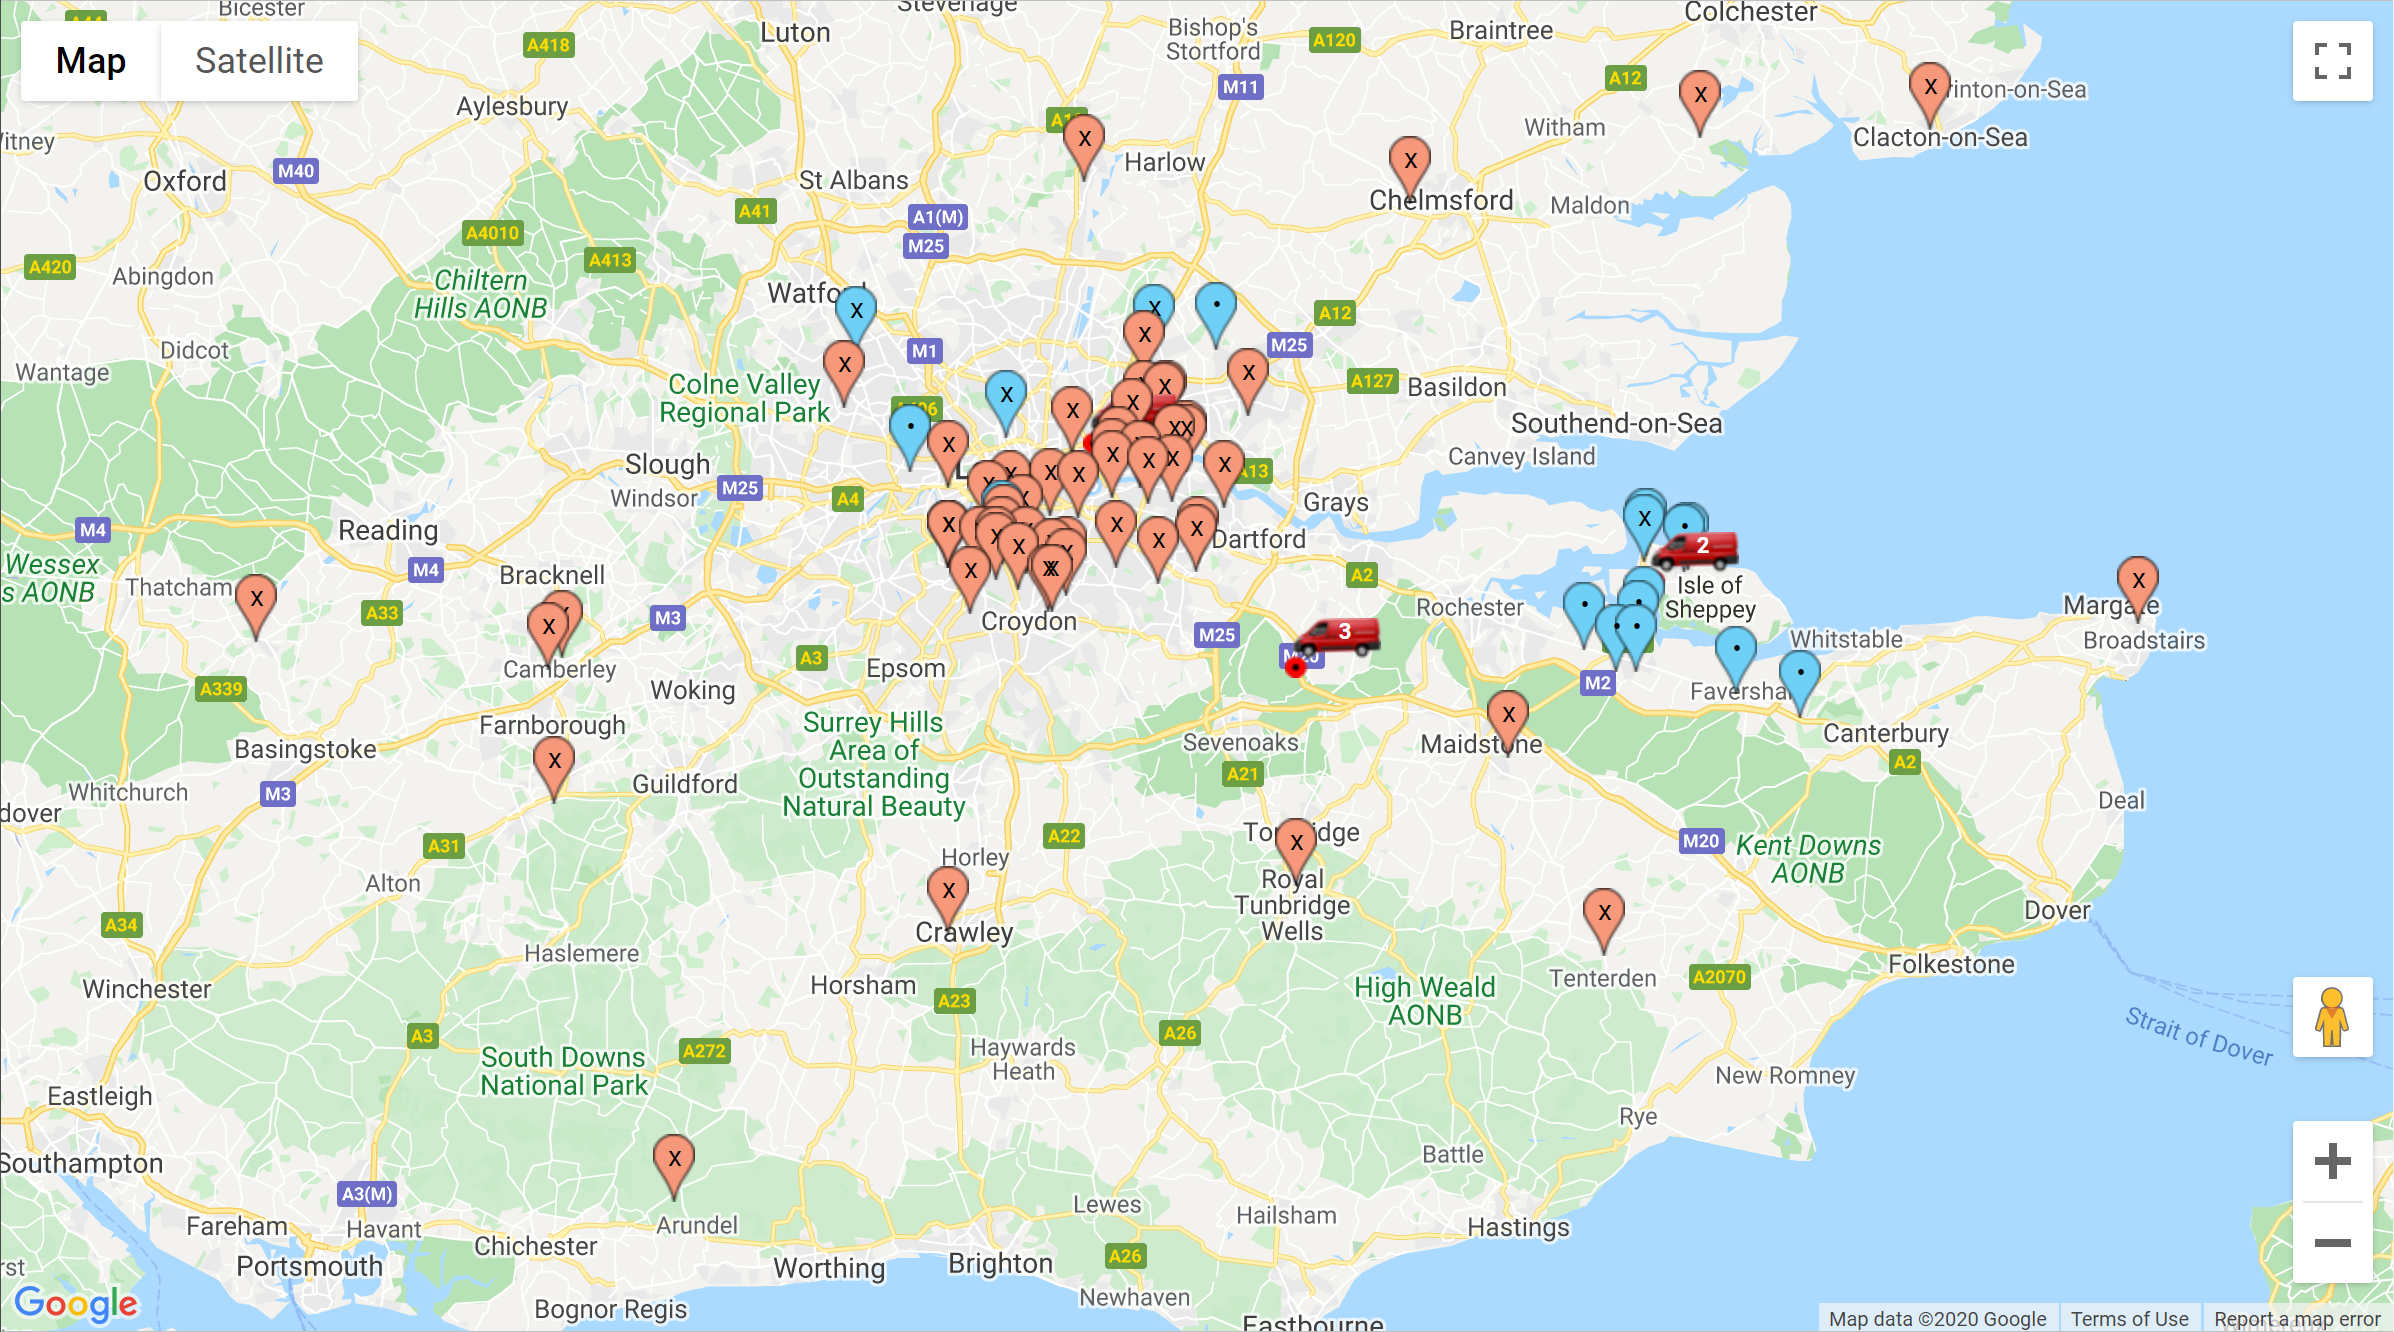
Each map marker in this view is colour coded 'Blue' for jobs that have a booked date and 'Red' for jobs that have not yet been booked. This is a clear indication showing all jobs that require a booking.
For jobs where multiple bookings are for the same job, I.E. a service visit may have just been completed but the next one is actually due and is shown in the Service list. Potentially there could be two markers directly on top of each other. The rule for this is that the earliest booked job is shown allowing you to 'Job Complete' it making way for the next 'Incomplete' job for the same site.
The symbol within the marker; 'Dot' means the job has been confirmed with the customer and a 'X' means it has not been confirmed.
Clicking the 'Map Marker' opens the booking dialogue as shown above allowing booking to be made directly from the map.
|
Individual Rep
Selecting an Individual Rep name filters the currently selected diary date by that rep. I.E. all other reps are omitted from the map. The map marker symbols change to indicate the 'Job Order Number' based on the current booking times / job order shown on the booking form.
Below is an example map showing jobs booked for a particular rep
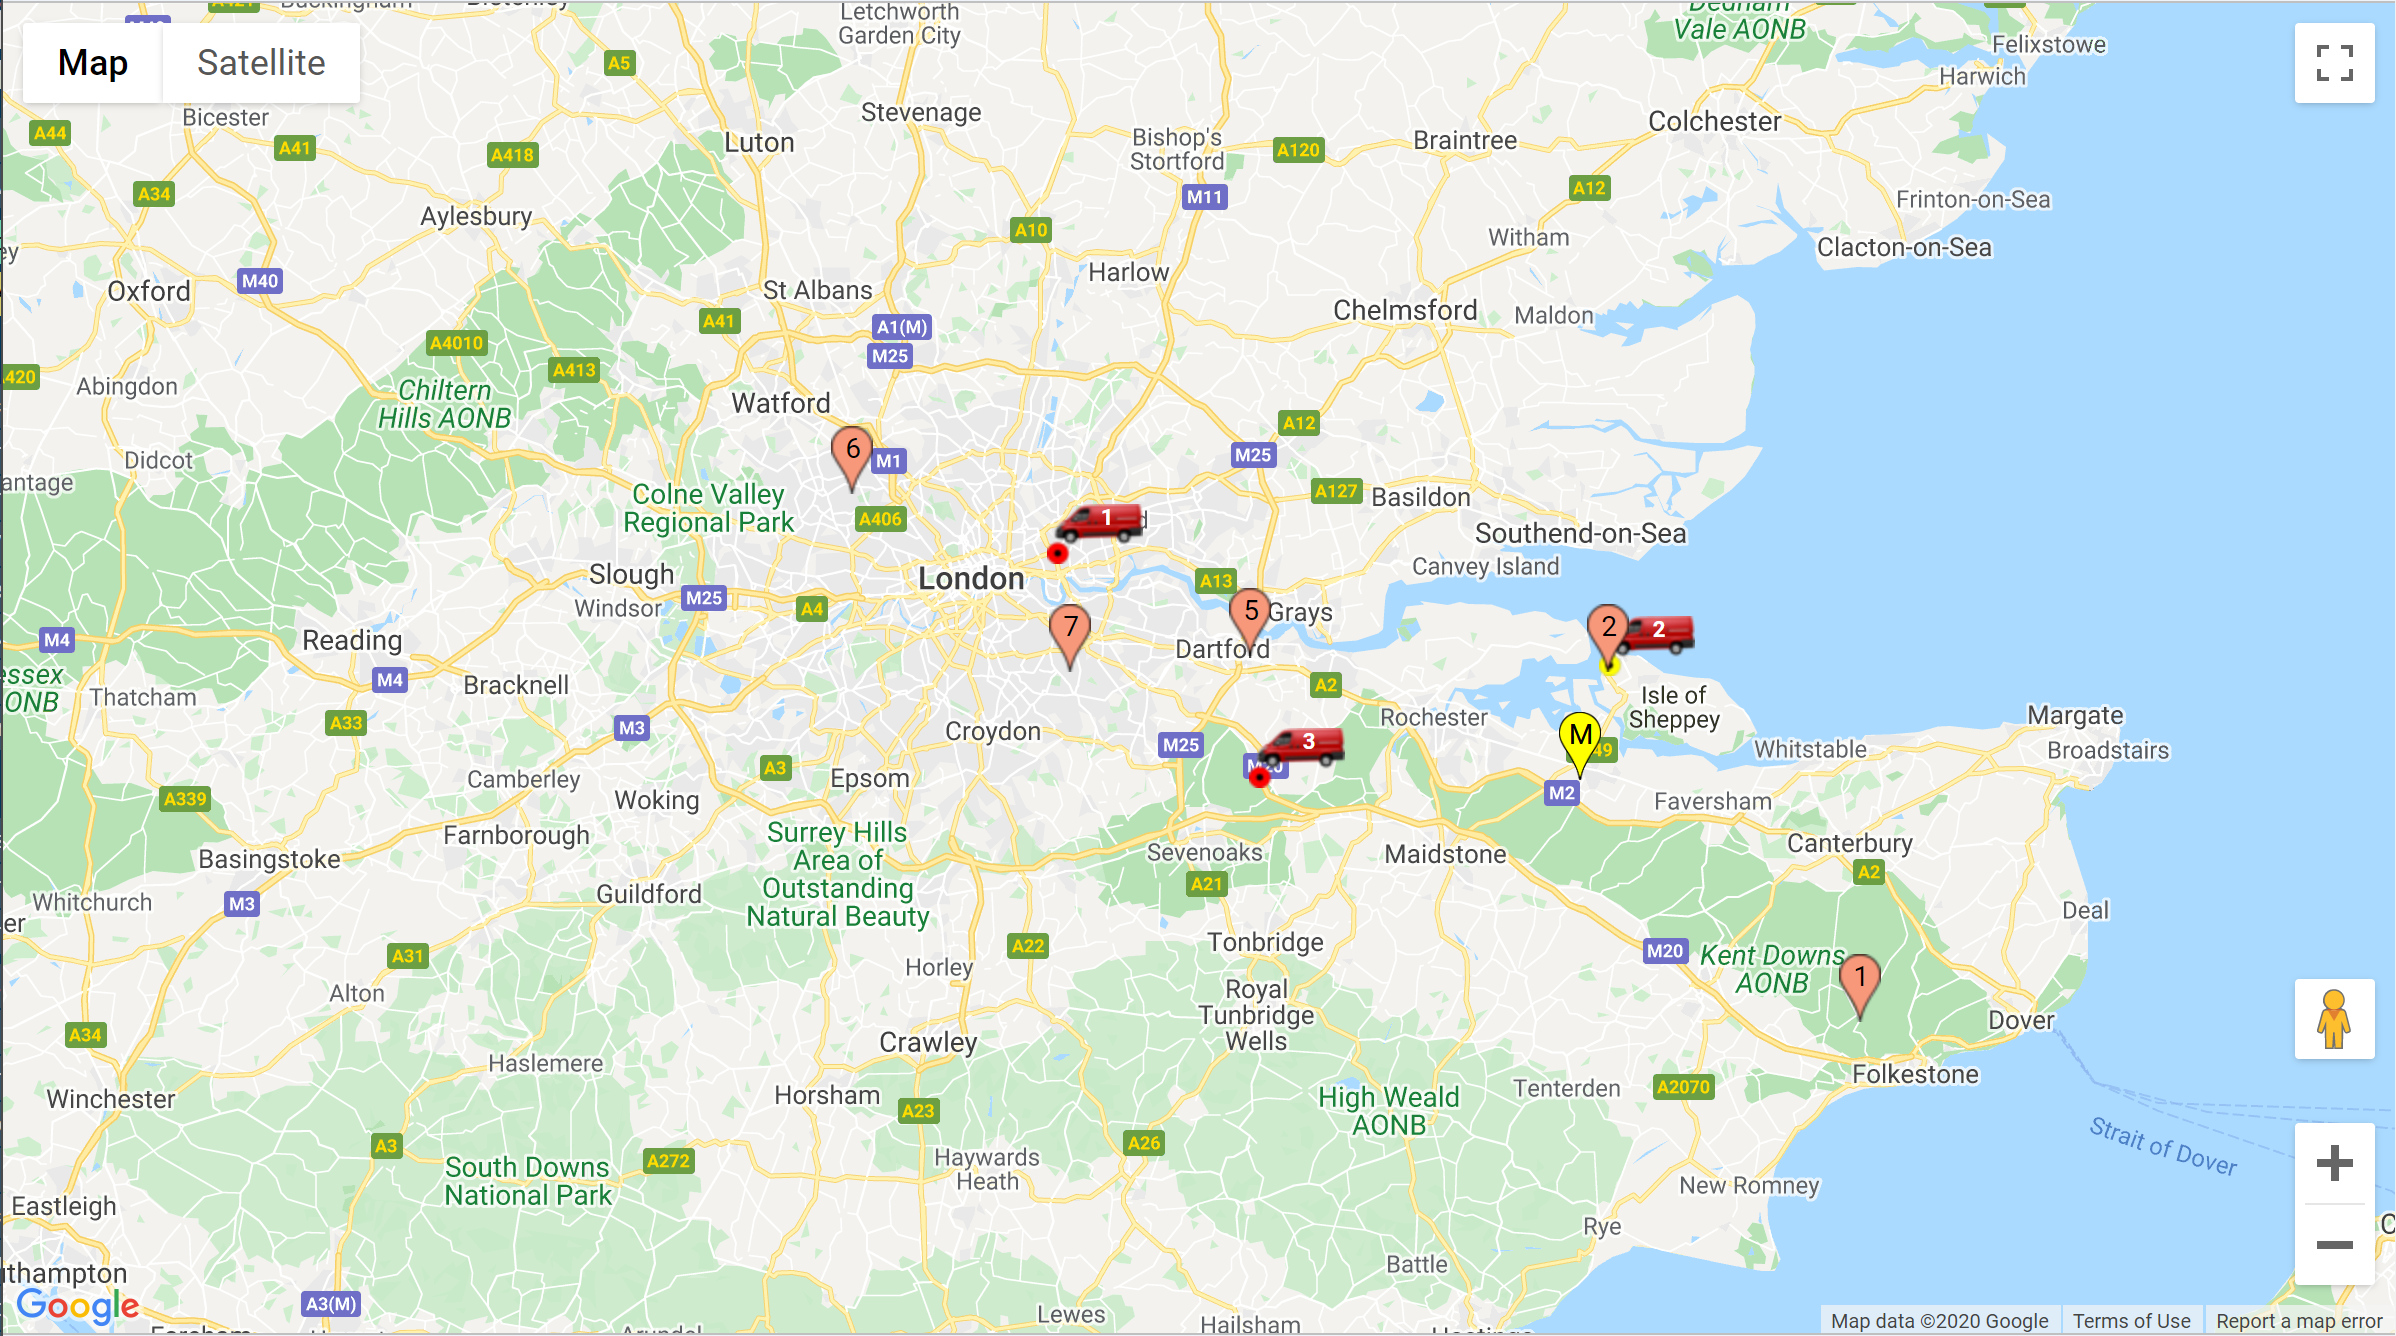
The numbers indicate the job order as per the diary bookings made.
Markers that show in 'Yellow' with the letter 'M' simply mean that there are multiple jobs for the same site and the ability to show a single number is not possible.
| Exclude Service: |
Limits the view to exclude all service jobs for the selected rep.
|
| Exclude Sales: |
Limits the view to exclude all sales jobs for the selected rep.
|
| Exclude Sales & Service: |
Limits the view to exclude all sales & service jobs for the selected rep.
|
| Job Types: |
Limits the view to the selected job type for the selected rep.
|
Automatic Job Routing
When the 'Filter By' drop down list is set to an individual rep, the option the 'Show Route' will be visible.

Show Route
Selecting this option will display the route based on your current diary bookings / times. The route shown will be determined by 'Google Maps Service' taking into account current traffic and road conditions.
Start Home
This allows you to begin the route from your depot or the reps home location. In the absence of a postcode within the reps profile, the system will route jobs from your company post code when start home is selected. Should a post code be present in the rep profile, the route will start from there instead. (Please note: The red map marker indicates your home / work location)
End Home
Creates a route that ends at your company or home location. (Please note: The red map marker indicates your home / work location)
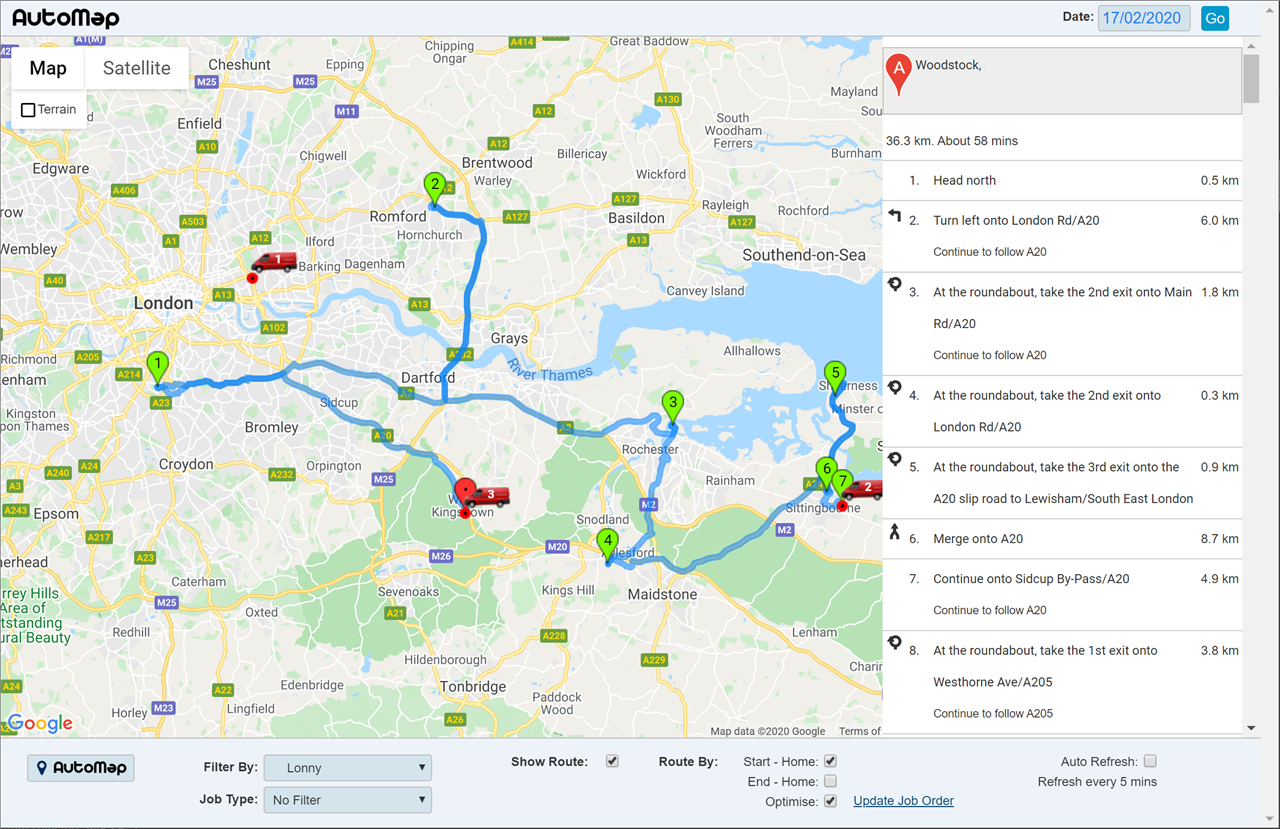
Below is an example map based on a route determined by the current diary job order.
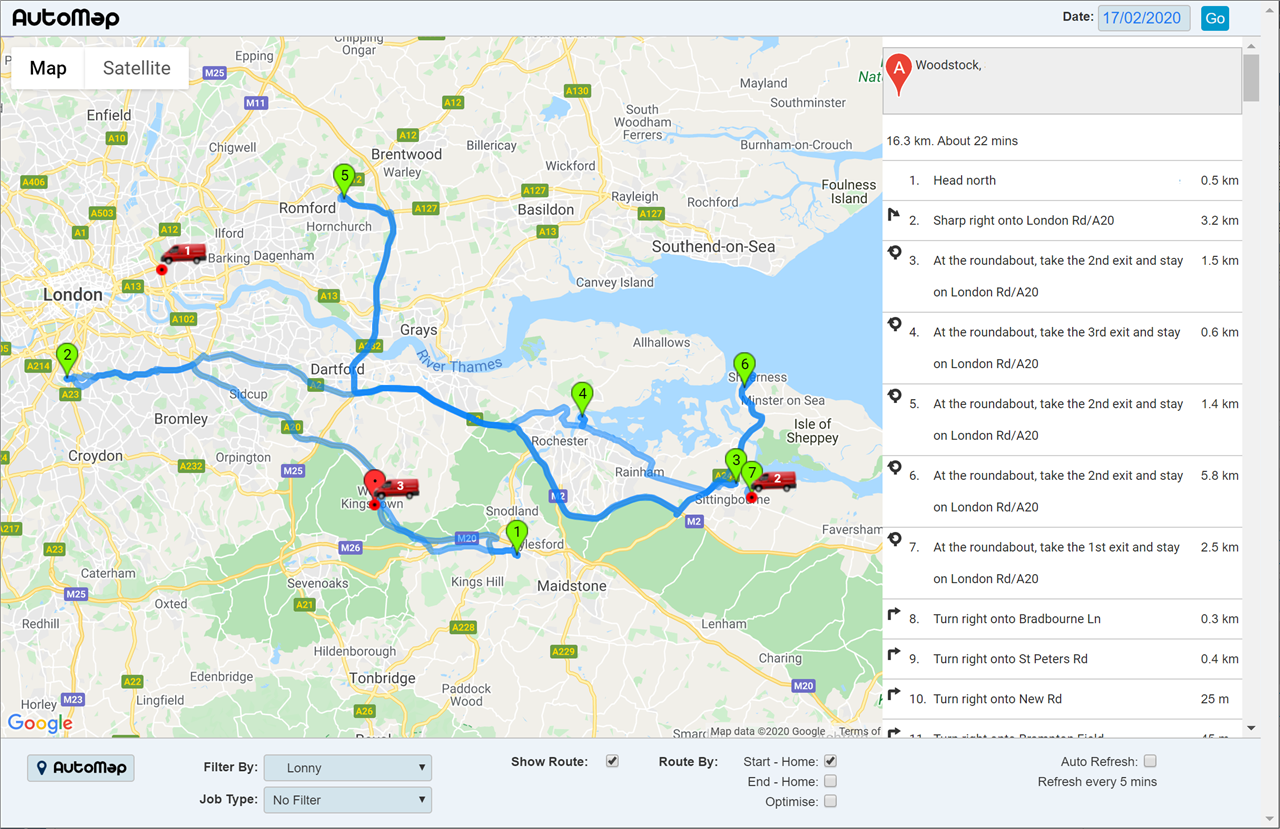
As can be seen, the job order indicates that the route could potentially include a number of backwards and forwards journeys potentially wasting time.
Optimise
Clicking the 'Optimise' option will optimise the route based on current road and traffic conditions.
Routing Rule:
| Start and End Home Off: |
With both home options switched off, the route optimiser will take the current 'First' job as the starting point and the current 'Last' job as the end point. The optimisation will be performed on all the jobs in between these two points.
|
| Start Home On: |
With the 'Start Home' option switched on, the route will begin from the home location and the current 'Last' job will be used as the end point. All jobs excluding the last current booking will be optimised.
|
| End Home On: |
With 'End Home' option switched on, the route will begin from the current 'First' booking and end with the home location. All jobs except the current 'First' job will be optimised.
|
| Start and End Home Off: |
Start and end the journey with the home location to optimise all jobs.
|
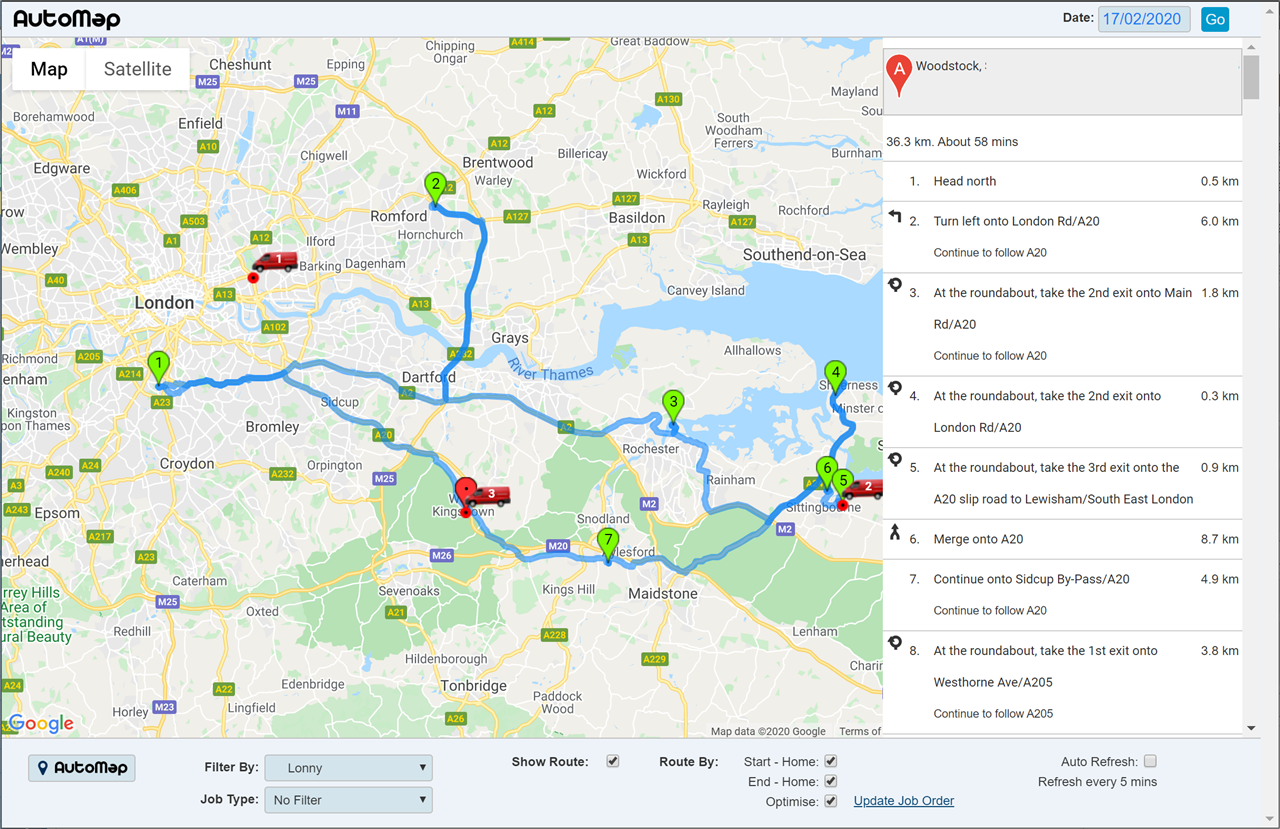
With the optimiser option ON, the below image shows the same jobs as above but the job order has been optimised to reduce the travel time required to complete the journey. The last job in the current job order is used as the last job in the optimisation process.
With both the 'Start Home' option and the 'End Home' option switched on, the route is further optimised to include all jobs. The below image shows the fully optimised route.
Update Job Order
Once the optimiser has re ordered the jobs, the new job order can be saved to the diary by setting the 'Job Order' drop down on each booking form automatically to the same order as provided by the optimiser.
This optimised order is instantly sent down to the engineers app suggesting the order each job should be completed.
Please Note: The times within the booking form are left unchanged. These times will reflect the time the job was actually done irrespective of which job order the optimiser chose.
Auto Refresh
Checking this box allows AutoMap to automatically refresh the view every 5 minutes. This is particularly useful if you use AutoMap on an unattended large screen display.