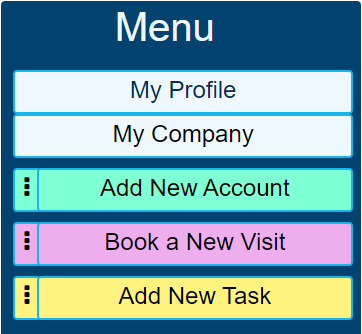
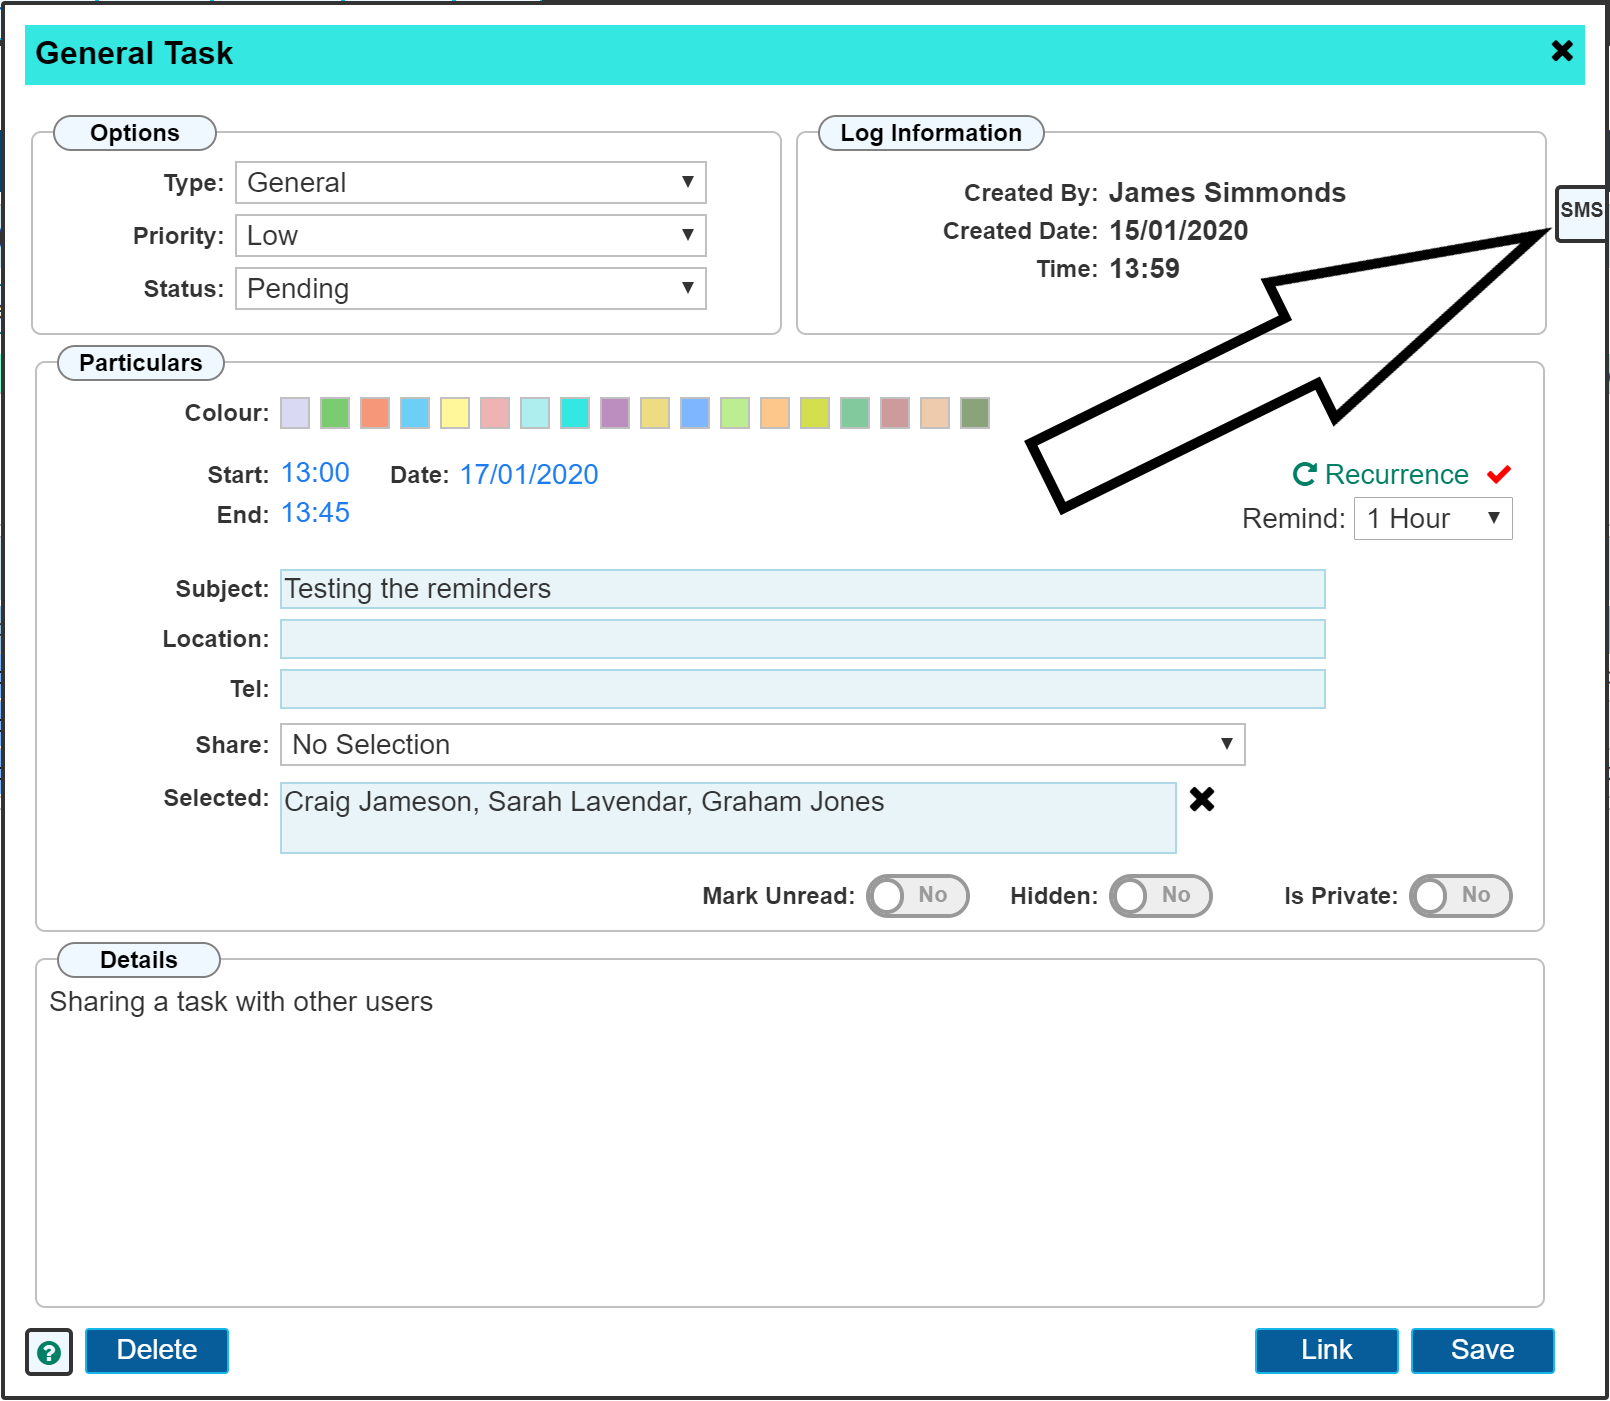
To create a task, click the 'Add New Task' button as shown on the diary page LH menu.
The following dialogue will open;
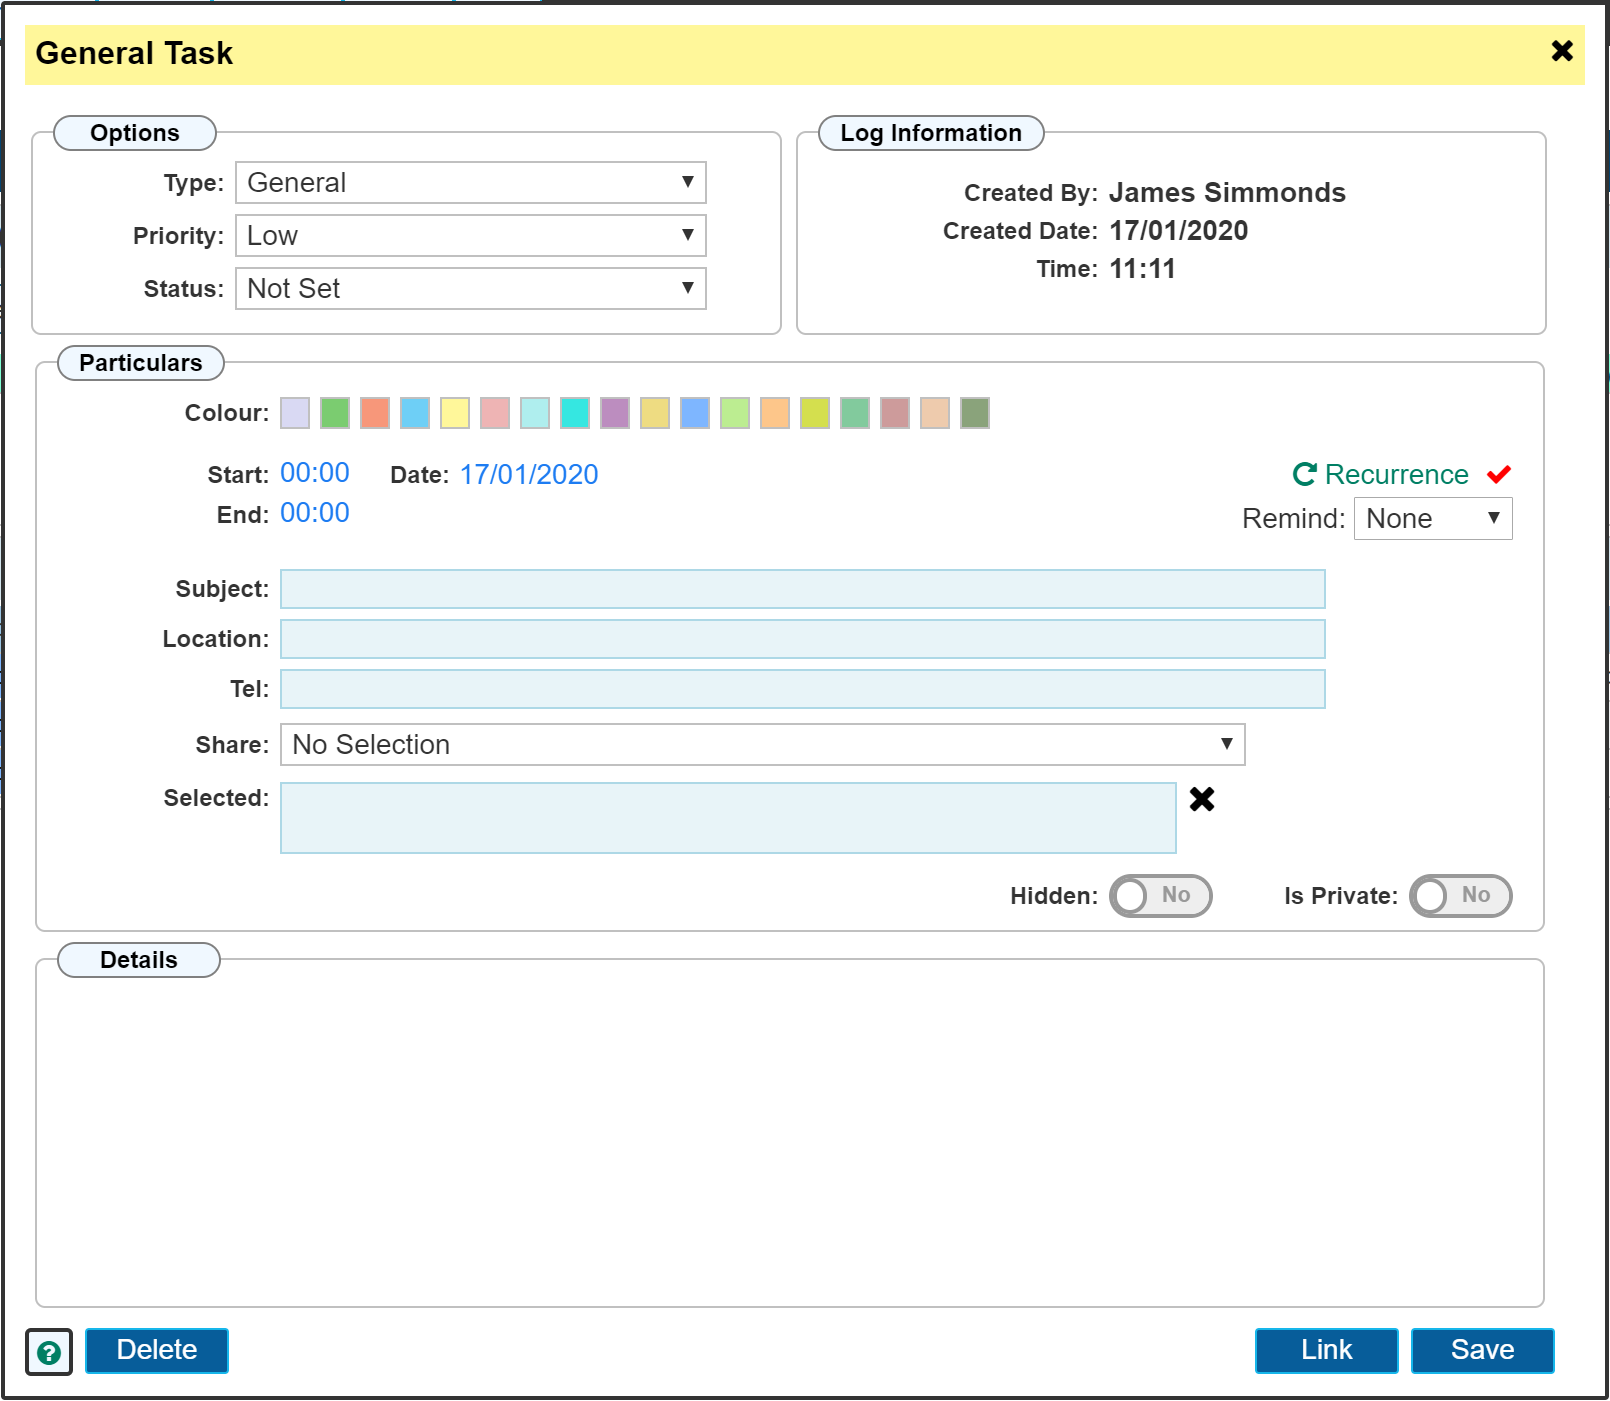
Options Panel
Type
The type drop down list shows predefined task types. Once a type has been selected, it will show on the diary in day view. The task type can be set so that filters can be applied when reporting on tasks to filter on a given task type.
Types: Holiday - Absent - On Call
The 3 task types 'Holiday', 'Absent' and 'On Call' have special functions within the system. Selecting these task types allow the system to accrue the number of days booked within a 12 month period. These figures are shown within the user account that the task type applies to. These type of tasks cannot be set to recur or remind. The 'Is Private', 'Priority' and 'Status' options are also disabled on these task types.
See the 'How To' guides on user accounts to find out more about 'Holiday', 'Absent' and 'On Call' task types.
Priority
Select from 'Low', 'Medium', 'High' and 'Urgent'. the selected value will show on the day diary.
Status
A predefined list of stages that the task could be at. Select from 'Pending', 'Call Back', 'Await Reply', 'Confirmed', 'Cancelled' or 'Complete'.
Particulars Panel
Colour
The colour picker allows you to change the colour of the header for the task dialogue. The colour of the task will also show on the diary.
Start / End / Date
The date and time that the task is to be set.
Subject
This field must contain some text. The subject forms the title of your task.
Location
Depending on what the task is about, it may include a destination. The details of this can be recorded here.
Tel
If applicable, any telephone / mobile numbers that apply to the task.
Share
The share drop down list allows you to select one or more people to share the task with. Select a name from the list to insert it into the 'Selected' panel. Select another name to add that to the list. To remove a user from the list, click the 'Cross' at the right hand side of the 'Selected' panel to clear all the names then re-add the ones you require.
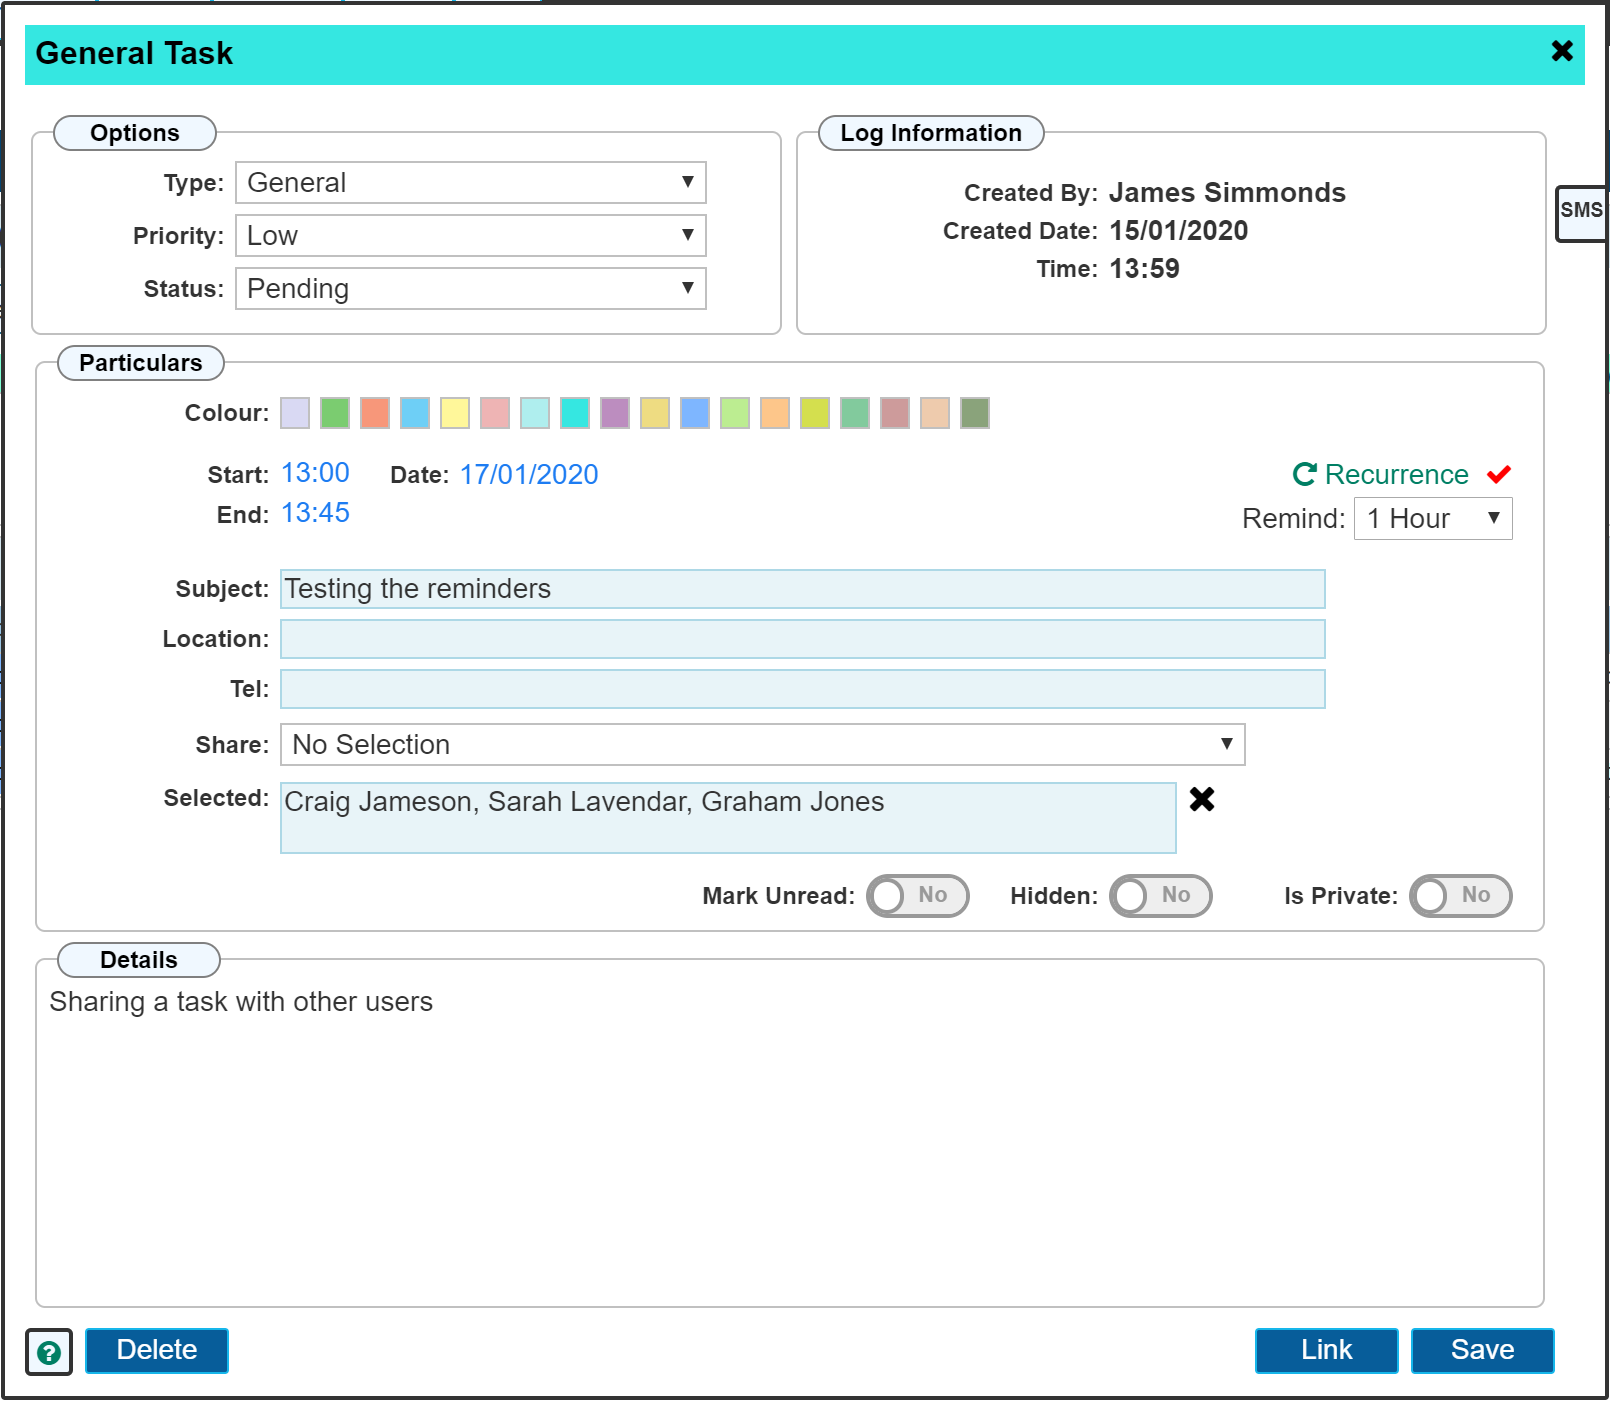
Once another user has been selected in the share panel, the initials of each user will be shown in the task panel list when viewing the details from the main diary page on the day the task is booked. The image below shows several tasks set up including one where other users have been selected in the 'Share'

Looking at our demo task subject 'Testing the reminders', you can see that the initials CJ, SL, GJ are showing at the beginning of the 'Description' column. These are here because those users were 'Shared' into the task.
When the initials are in green, this means that the selected user has an active user account on AutoVu. I.E. they can either log onto the app to see tasks they have been shared into or can log into the web UI using their web access account if they have one to view there.
When the initials are red, it means the user does not have a login account on AutoVu but has been marked as 'Active Employment' within their user account. I.E. you have created an account for them in order to select them as a rep but they do not have a 'Paid' subscription account to log into the system.
Basically, users that show in red do not have the ability to see that they have been shared into a task. It is for your information that they show in the list.
Hidden
Toggling the 'Hidden' switch to 'YES' prevents the task from showing on the diary. It is still visible in the 'Task List' when clicking the 'View Task List' button within the RH diary menu.
Is Private
These tasks are limited in view to the creator of the task and anyone that the task has been shared with. No other user will see this task on the diary or within the 'Task List'
Recurrence
The recurrence option allows you to recur this task for a given number of times or until you delete it. See the How To guide 'Diary - Add New Task (Recurring)' for details on how to set a recurring pattern for your task.
Remind
Setting the remind function allows the tasks to create a screen alert a given time in advance of the task becoming due. Each user that has been shared into the task will also receive a screen notification. Below is an example of a screen notification. These animated popup reminders appear in the bottom right hand corner of the screen while on the diary page. They scroll up from the bottom every time the page is visited or refreshed creating visual movement on the page that your eyes are drawn to.
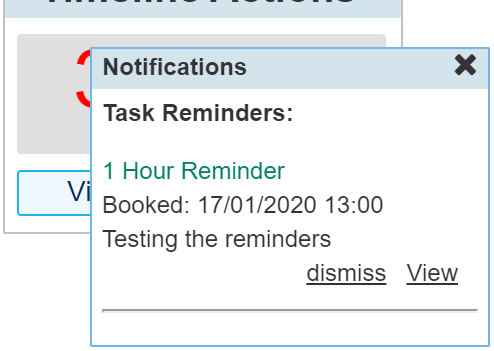
This popup will continue to show for a period of up to 8 hours (for tasks set a day or more in the future) or until you click 'Dismiss', at which point that reminder will no longer show. Once the time arrives that the task has lapsed its date and time, the following reminder will pop up alerting you that the task is now overdue.
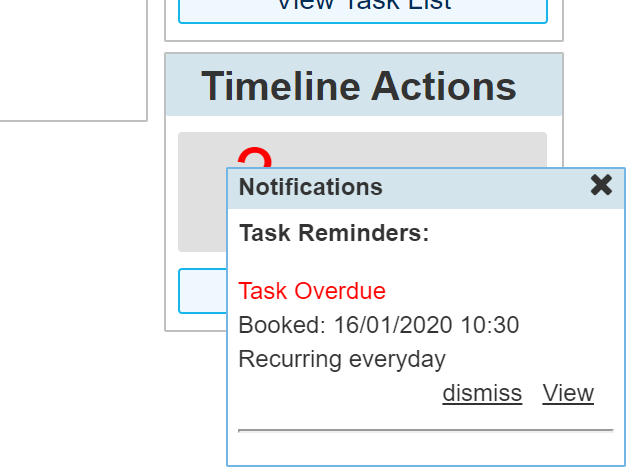
Again, clicking dismiss will remove the screen notification. If dismiss is not clicked, the popup will continue to show for up to 8 hours but will be removed the next day. I.E. screen notifications only show for the day that they apply.
Email Reminders
A further option that can be set in conjunction with task reminders is the ability to have the task reminders send an automated email to you that contains the details of the task. This option is set up by visiting 'My Profile', selecting the 'Notifications' tab from the LH menu and toggling 'Task Remind Me' toggle switch to 'YES'
Details Panel
Enter the details of the task here. It is optional to include anything here as in many cases, the title of the task is all that is required.
Save the Task
Once a task has been saved and re-opened, several more controls are available. The below image shows our demo task re-opened now that it has been saved.
Mark Unread
Within the 'Task List' shown by clicking the RH menu button 'View Task List' you can see which tasks have been read or not.This is useful to determine if you have missed a task while being away for a period of time.
By toggling the switch 'Mark Unread' you can force a task that has previously been viewed back into this state. The toggle does not remember its state. I.E. each time you open the task, it will automatically be 'read' you will have to re-select the 'Mark Unread' each time if you wish it to remain this way.
Delete the Task
To delete the task, click the delete button at the bottom left of the dialogue. You will be required to confirm this by clicking the 'Confirm' button that will appear.
Please note: Depending on the settings of your subscription account, you may or may not have the ability to delete tasks, particularly those created by others. This option can be set by a system administrator having contacted us through the Help console to request the feature on or off for a given user.
Link to a Site or Company
Tasks can be linked to either a Site or Company by clicking the 'Link' button. (This may or may not be visible depending on your subscription level). Clicking the 'Link' button will open the dialogue shown below.
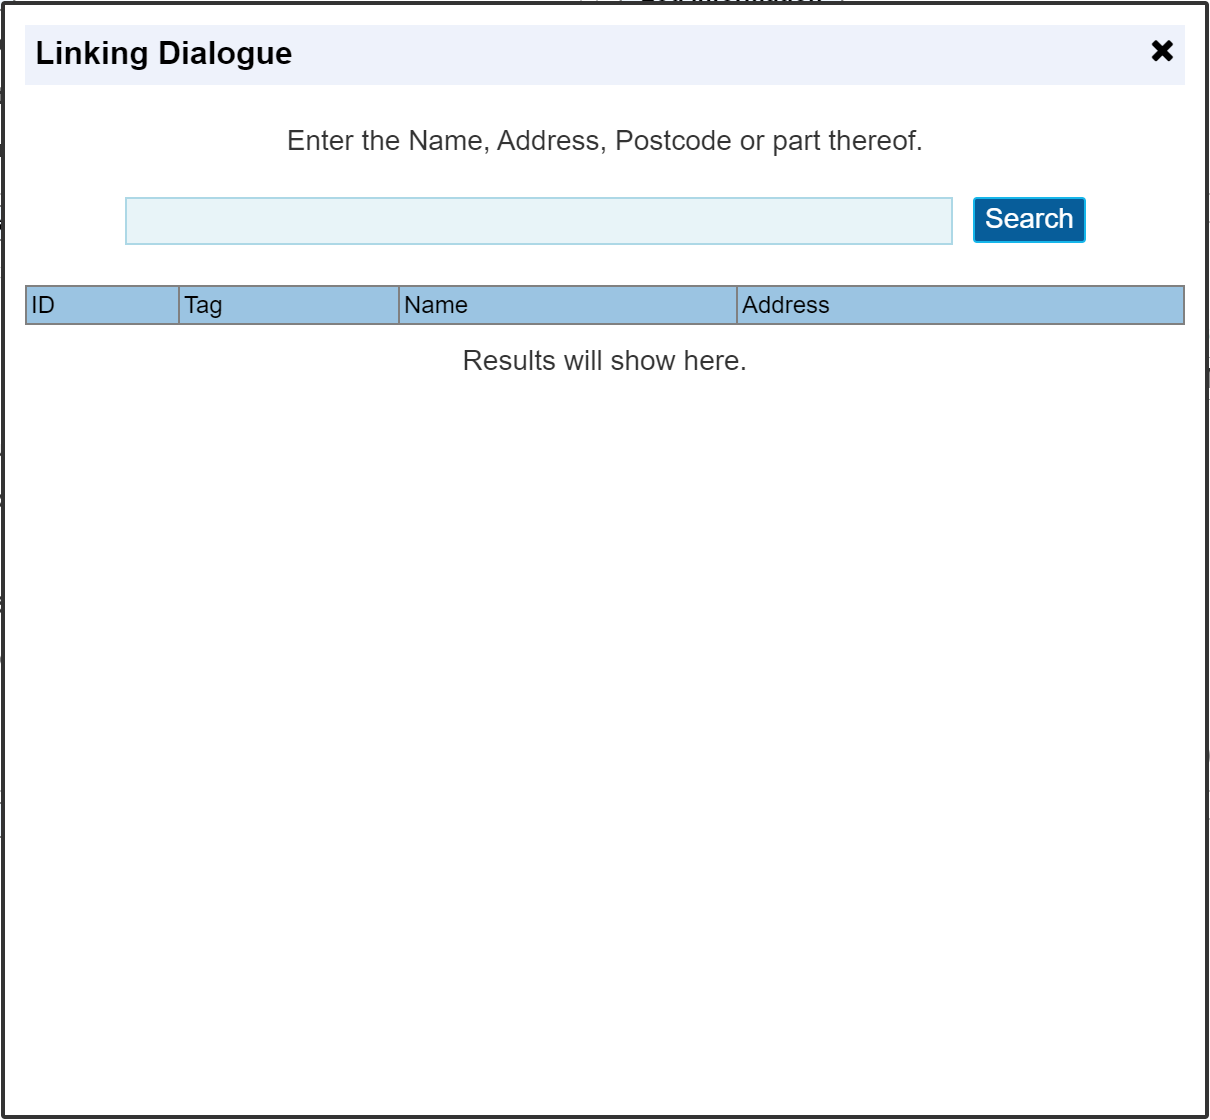
Enter a search criteria for either a site or company that you would like to link the task to;
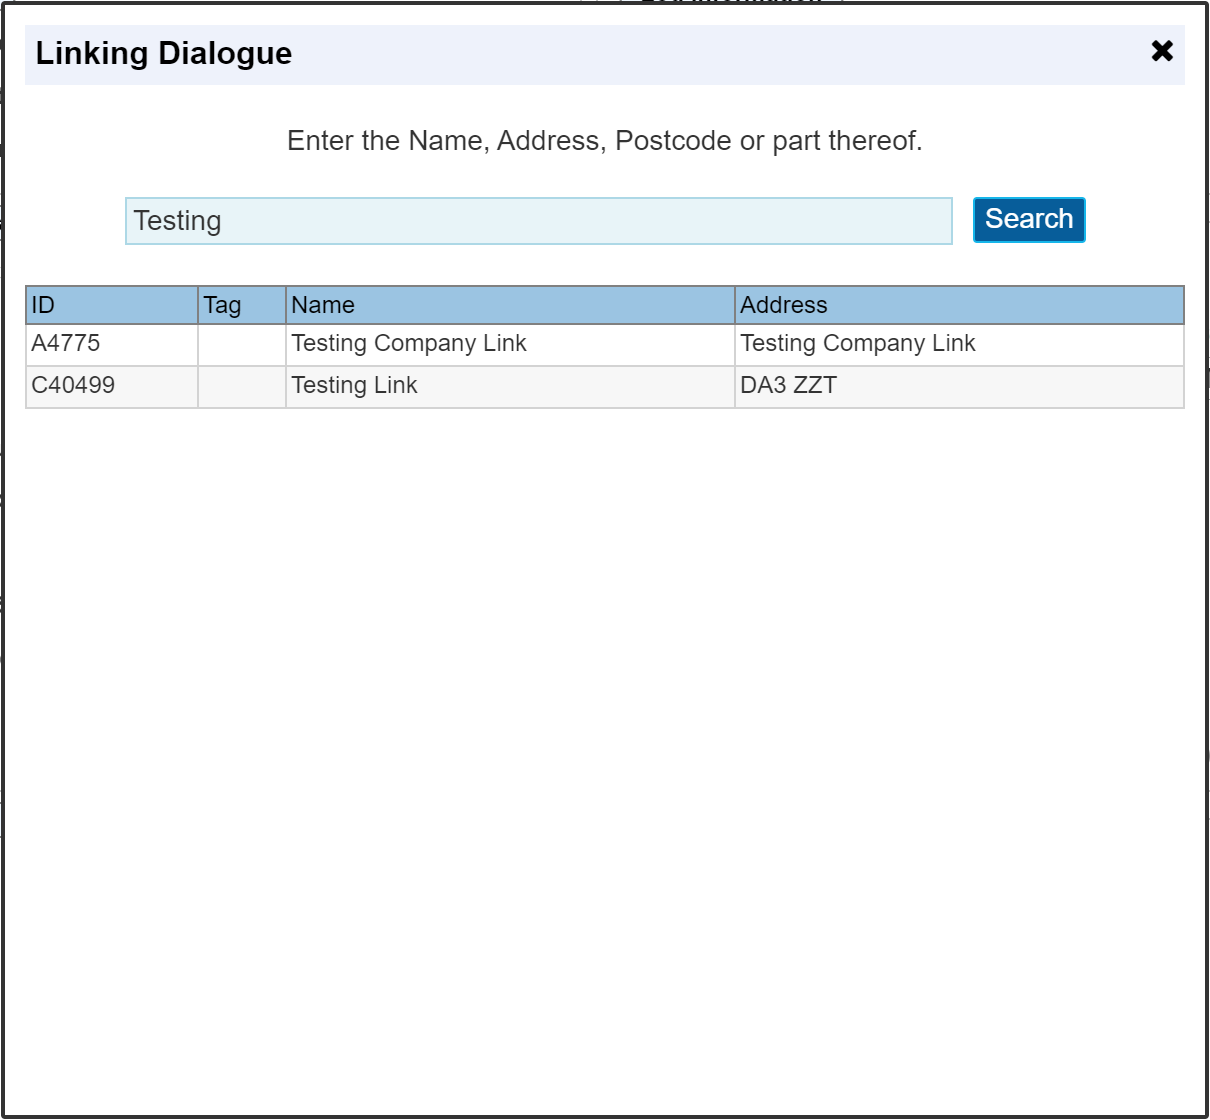
In our demonstration search as show above, we have found 2 records. In the ID column, we can see the record numbers of each. Those prefixed with 'A' are 'Company' records, and those prefixed with 'C' are site records.
Clicking either of these will link that record to this task, which will in turn be visible when visiting that Site or Company record.
If a mistake is made when linking, the 'Link' button on the Task dialogue will be replaced with an 'UnLink' button to 'Undo' the linking process.
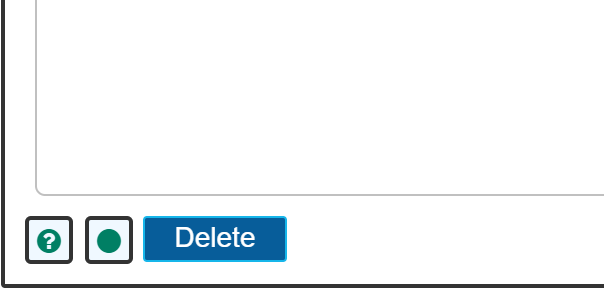
Navigation to the site or company record is possible from the task dialogue once the form has been closed and re-opened. Any task that is linked to a site or company will have a green or orange marker in the bottom LH corner of the task dialogue that once clicked, will navigate to the site or company it is linked to. See the image below showing the bottom LH corner of a task that has been linked to a Site.
Send an SMS Text Message
Text messages can be sent directly from a task. Click the button as shown below to open the SMS dialogue. Texting from a task is a simple way to record messages sent that day to a particular person. If you simply wish to send the SMS without recording it on the diary, toggle the 'Hidden' switch to hide it from view.
The SMS dialogue box will open.
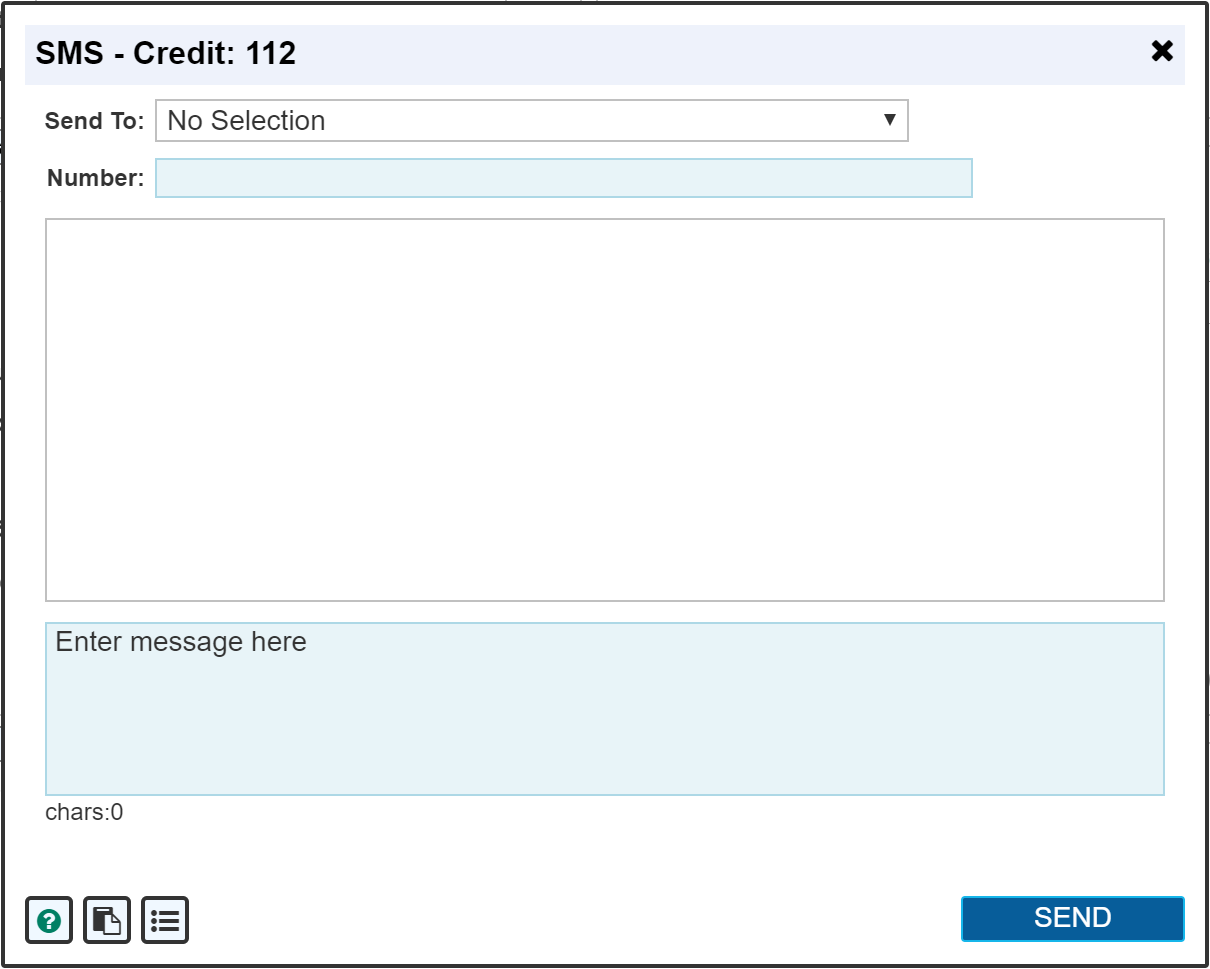
On first opening, the dialogue is blank allowing you to enter details of the mobile device to send the message to, and the message to be sent.
SMS - Credit
The figure recorded here shows how many text messages you have on your account. These can be topped up. Contact support through the help console to add additional text message credits. These are supplied in blocks of 1000.
Send To
The 'Send To' drop down box lists all the Reps / AutoVu users in your company. If they have a mobile number recorded within their profile, after selecting the rep, their number will appear in the 'Number' field. Alternatively, simply type in a mobile number.
Message Dialogue
The white panel records all the messages sent from this 'Task'.
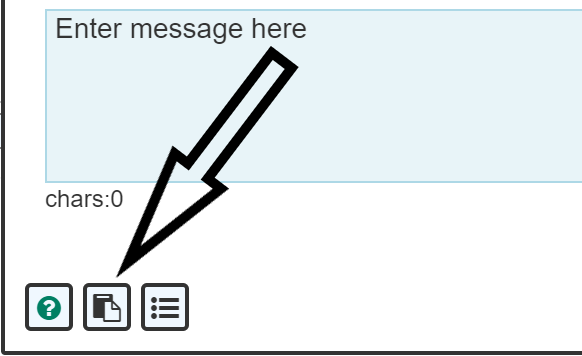
Enter Message Here
Type your message into this 'Pale Blue' panel.
The actual task Title and Details can automatically be pasted into the message body. Clicking as shown below will paste in the task detail.
The standard phrases
Clicking the other button will open up a series of standard phrases.
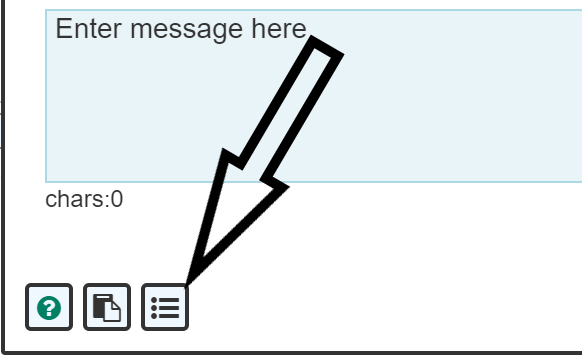
An example of 2 standard phrases set up here for our Demo
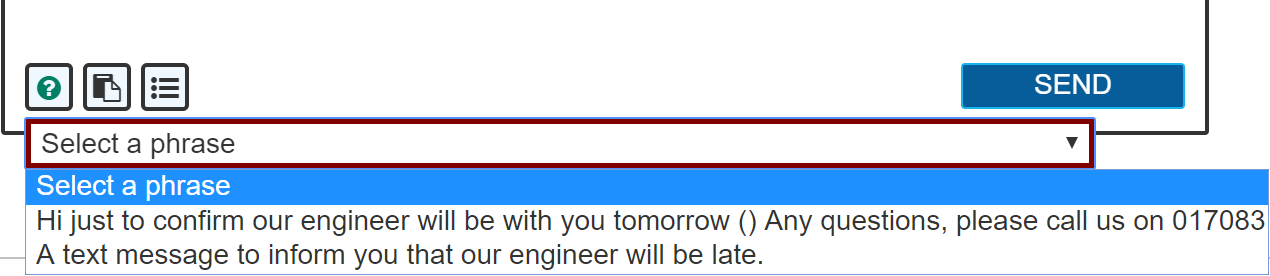
Selecting one of these will insert that text into the message dialogue box. The standard phrase list can be set up in Settings > Custom Values > SMS - Standard Phrases.
Sending the Message
Once the message has been created, clicking the send button will immediately send that message directly to the number selected.
