When first using the system, there are several Job Type's pre set in order to get started. You will see these within the diary page LH menu column within the Service Section. You may edit these accordingly by visiting Settings > Company Settings > Job Ticket Types
Careful consideration must be made when defining Job Types.
Do not use Job Type Names that will typically go out of date, E.G. the name of a Service Contract, a Service Contract name would be defined within the Service Contract Manager.
Additionally, do not create multiple Job Types that typically mean the same thing. E.G. All Service / Planned Maintenance must be limited to, and contained within the reserved Job Type that is specifically designed for this purpose (Planned Maintenance / Service). It is a common mistake to define additional 'Custom' Job Types for 'Company A Service', 'Company B Service' and 'Company C Service' etc. This would occur when you are attending site to service a product on behalf of several different companies. Use Job Categories to define each sub division where each category can have its own Job Ticket design. This is particularly useful if you are required to submit each visit on the companies own stationary which you can design within the Document Designer; Settings > Document Designer.
The image below shows the Job Ticket Types dialogue.
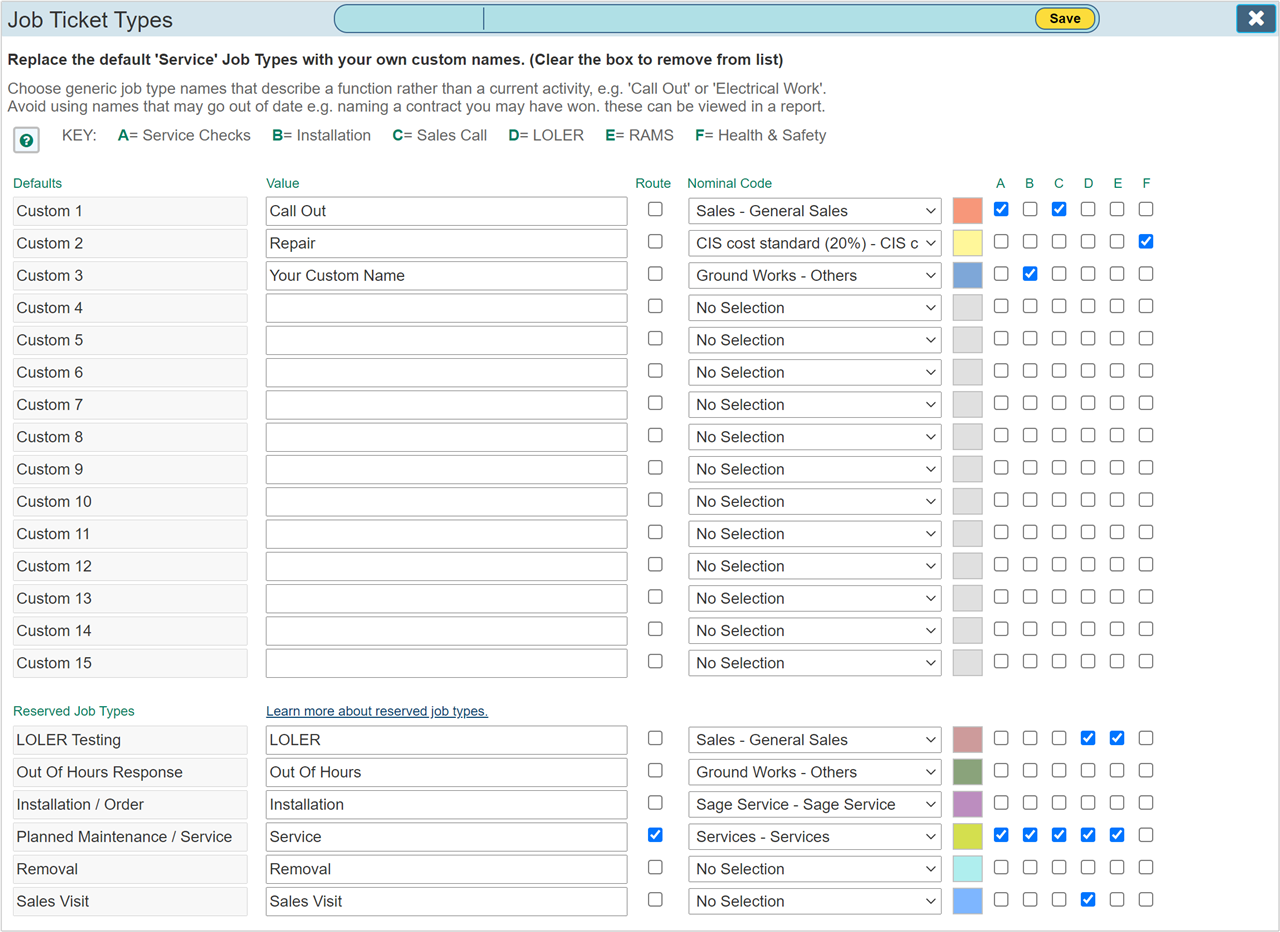
KEY
The 'KEY' legend indicates the current names for each service check list that has been defined within the system. A Service Check List is a custom defined list that allows detailed questions / toggle selections within the Workforce Manager Mobile App that the site operative must complete wile attending the job. Initially these Check Lists will be named, Check List A,B,C,D and Questions E,F. You may change the Service Check List Names by visiting Settings > Custom Values > Rename Check Lists
|
Please Note: Setting up the Service Check Lists with your own questions / details has to be completed before the check lists will be sent to the App.
|
Job Types
There are 15 custom Job Types and 6 Reserved Job Types. The difference between Custom and Reserved Job Types is that Custom Job Types can be named what ever you want them to be, whereas the reserved Job Types, although you may re-word the actual names, the meaning of the Job Type within the system remains the same.
Reserved Job Types have special meanings within the system.
| LOLER Testing: |
LOLER testing is particularly used in industries such at the Lift Industry. Within Workforce Manager, the LOLER tab as shown within each Site Record is linked to this Job Ticket Type. This Job Type can be set to automatically recur site visits at a pre set duration.
|
| Out Of Hours Response: |
Out of hours response Job Types are automatically used within the engineer account and those accounts that are defined as 'Call Centre Access'
|
| Installation / Order: |
This Job Type can only be selected once for each customer product. Its usage indicates to the system that an Installation, or Order has been placed for the product. Use this Job Type to indicate installation, delivery or any function that suggests the product will be made available to your customer.
|
| Planned Maintenance / Service: |
This Job Type is particularly important. Any regular service visit or planned maintenance visit that may for part of a Service Contract will use this job type. Service Visits Job Types are automatically created when defining Service Contracts.
|
| Removal: |
Using the Removal Job Type will automatically indicate a removal date on completion of the job.
|
| Sales Visit: |
Creating a 'Sales Visit' from the 'Site Record' will automatically use this Job Type. Sales Visit Job Types are only listed within the Sales Section of the Site Record.
|
Add a Job Type
To add a Job Ticket to the system, simply enter a name within the 'Value' column and save the form. Empty value Job Ticket types are hidden throughout the system.
Column Headings Explained
Defaults
This column is not editable, it is there to indicate the initial Job Type name / definition.
Value
Enter the name of your Job Type within the Value Column. Empty value Job Ticket types are hidden throughout the system.
Route
Entering a tick for any Job Type within the Route column will include that Job Type within the Service Route section on the Mobile App. It is important to read the How To guide on Service Routes before checking this box. Undesirable results may occur by sending Jobs to Reps that are not necessarily for them if careful consideration is not made regarding this selection.
Nominal Code
When creating a sales invoice on completion of the work, the correct Nominal Code can be automatically selected for this Job Type when the invoice is created. Nominal codes are set up within Settings > Custom Values > Chart of Accounts.
Colour Picker
Click the colour Picker 'Square Box' to set a colour for your Job Type. This will be indicated within the Diary Page.
A, B, C, D, E, F
These check boxes indicate to the system the corresponding Service Check List for the selected Job Type. Service Check Lists are set up within the Settings > Custom Values > Site Check section.
|
It is important to note that a check list will only appear on the Mobile App if a selection is made here for the Job Ticket type it refers to. This process allows you to target specific lists to only the Job Type names that they refer to rather than show all the lists on every job.
|
Things to Consider
- A total of 21 'Job Types' can be defined within Workforce Manager. Choose generic job type names that describe a function rather than a current activity that may go out of date.
- If you set a Job Type, then later change it to something else, all jobs within your database will be updated to reflect the new name, this makes it important to choose your job types carefully and leave them 'As Is' once you have begun to use them in your site visit Job Tickets.
- Setting the colour of your Job Type will show this within your diary for easy identification. Select a colour that allows the text within to be easily read, the 'Strong' colours at the bottom of the colour picker are unsuitable as Job Type backgrounds and should be avoided.
- It's a common mistake to feel the requirement to use up all the Job Types. Work on the basis that 'less is more' Start with a few job types and add them over time as you notice the 'real' requirement that an additional Job Type would be a benefit.
- Avoid adding Job Types that typically mean the same thing, this becomes confusing to users in that there is always the element of 'Grey Area' where it may be difficult to determine which Job Type to use. If you can see this may occur, it's a clear indication of where one job type would suffice instead of adding two or three similar ones. Add a Job Category in this instance.