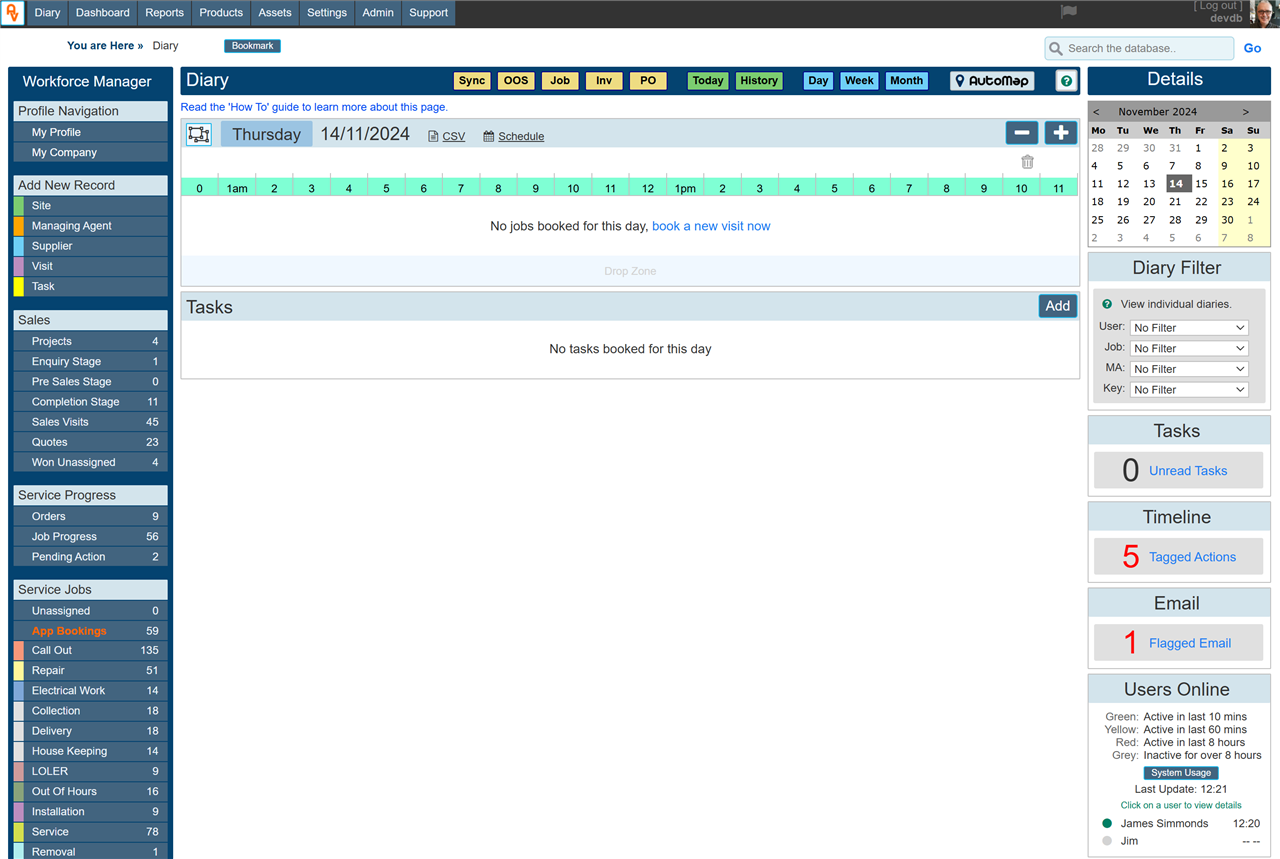
Some or all of the options shown on the image below will be available to you based on your subscription level and settings chosen by your manager.
Search
This dialogue box allows you to search and locate any record within the system. You may search on name, address, postcode and telephone number (or parts of these combined) to locate a site or company record.
.png?v=771287122)
Once job tickets, purchase orders or invoices have been created, you can also search on their unique reference numbers to locate the document.
Workforce Manager search is intelligent, I.E. it remembers the records that are frequently visited. So for example, if you have a large number of records with the same name, E.G. 'Smith', there will only be a certain number of them that you often visit. Workforce Manager will ensure that these are at the top of your search as they are more relevant. See the separate guide Diary - Search
Bookmark
Clicking the bookmark button allows you to 'Remember' the current page. This is most useful when working on a particular page within the system and you wish to quickly get back to that page without having to navigate through the system each time. E.G. you could be working on a particular 'Job Ticket' and require to navigate to other pages while completing the job report. By bookmarking the 'Job Ticket' page for the required record will allow you 'One Click' navigation back to the required Job Ticket.
Below is an example of a Job Ticket having been 'Bookmarked'. Clicking 'Go' will navigate directly to the Job Ticket.

Page view buttons

Sync
Navigate the accounts sync page. Accounts sync allows you to sync Invoices, Purchase Orders etc. See the separate guide: Financial - Sync in use.
OOS (Out Of Service)
Open the Out Of Service Panel. Track all products where the 'Out Of Service' option was toggled on the app (or manually on the Product Manager). See the separate guide: Diary - Out Of Service.
Job
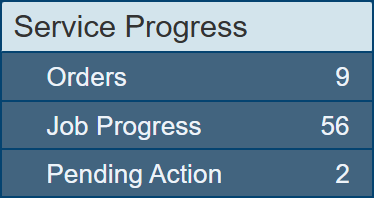
Open the Job Progress panel. All open jobs that require action will be listed in the job progress panel until they are marked 'Job Complete'
Inv
Open the Invoicing Panel. Track all Jobs where an invoice has / has not been produced. This panel can greatly help make sure an invoice is never missed. See the separate guide: Diary - Invoicing
PO
Open the Purchase Order panel. Track all purchase orders that have not been marked 'Order Complete'
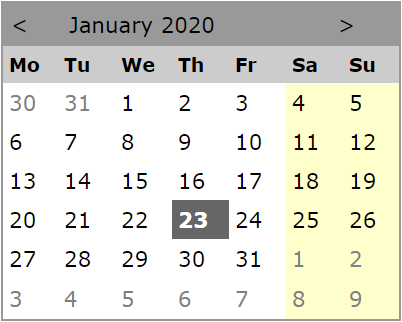
Today
Clicking the green button labelled 'Today' brings the diary back to the current date, rather than having to select it from the calendar.
History
Lists the latest 30 site or company records that you have recently visited, with the last one visited being at the top. This is a very useful button saving you time searching for the same few records you may be working on during the course of the day.
Day, Week, Month
These 3 buttons toggle the main display to show booked jobs in different formats,
Day: Shows a detailed grid view of all current jobs for the current day.
Week: Shows the jobs booked for an entire week with the days listed across the top.
Month: Similar to week view but including every week of the month listed beneath each other.

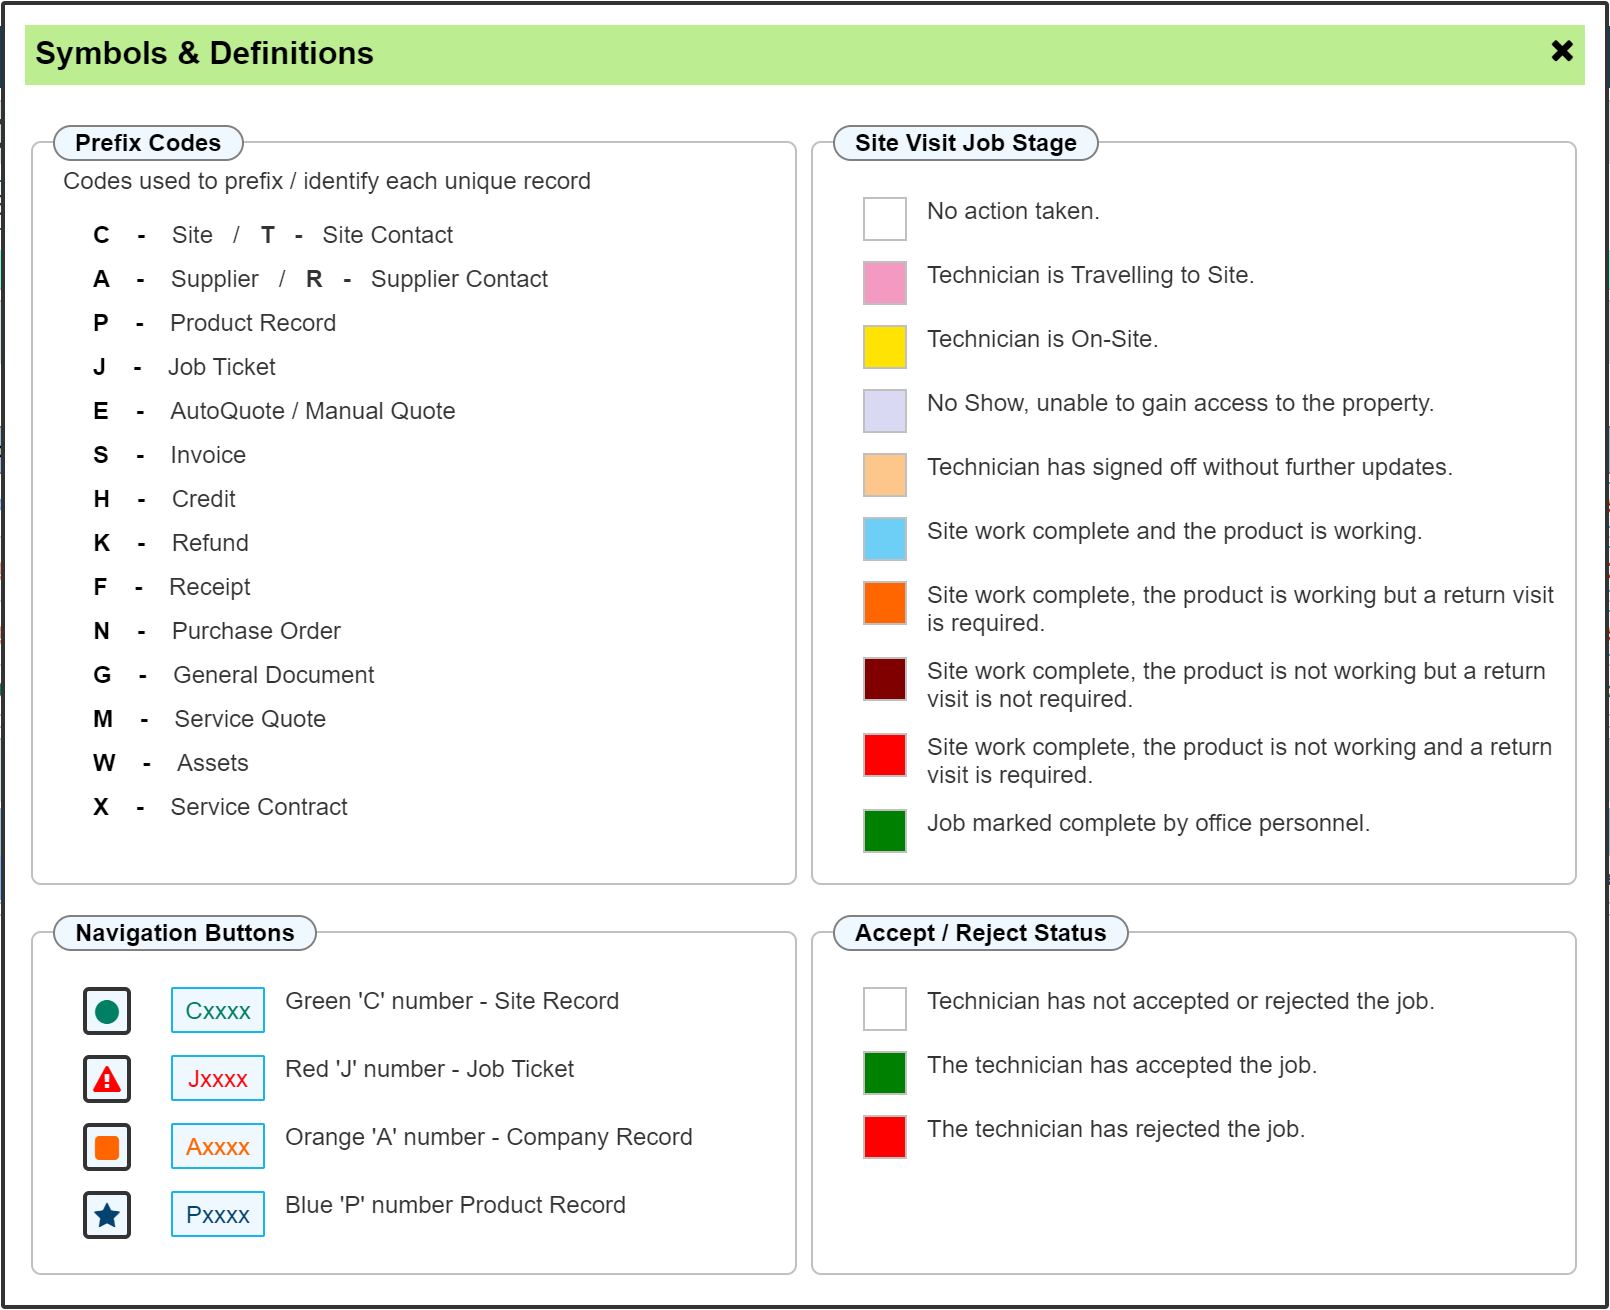
Clicking on this will open up the 'Symbols & definitions' dialogue giving you details of what each colour means. Look at the two right hand panels 'Site Visit Job Stage' and 'Accept / Reject Status'. Below is an image showing the Symbols & Definitions' dialogue.

View all of the current day bookings on a map, this can also include the location of your vehicles if you have a tracker fitted, or the location of the Mobile Device (smartphone) should your site operatives be using our app. See details within the section 'AutoMap' for further details.
Plus / Minus Buttons

Depending which view you have set, the plus and minus buttons toggle one day, week or month at a time. You may also use the calendar shown on the right to go directly to the desired date.
Expand / CSV / Schedule


Expand the view to show the diary grid full width of the screen eliminating the left and right menu's, click again to revert back.
CSV
If the CSV button is visible, this allows you to create a spreadsheet ready for download of the currently displayed grid / view.
Schedule
This allows you to send automated emails and or text messages to your clients based on your diary. See the separate guide: Diary - Scheduled SMS/Email.
The Bookings
The upper section in the centre dialogue is where the days bookings are shown. To start off with, there will be nothing to show here. Once you begin adding bookings, this section will show the jobs as they are added.

Once bookings are added, they will show as per the example below. NB. These are just test jobs so the detail will be relevant to your booking rather than simply 'Test' jobs.
The grid markers / Information
Accept Reject Status
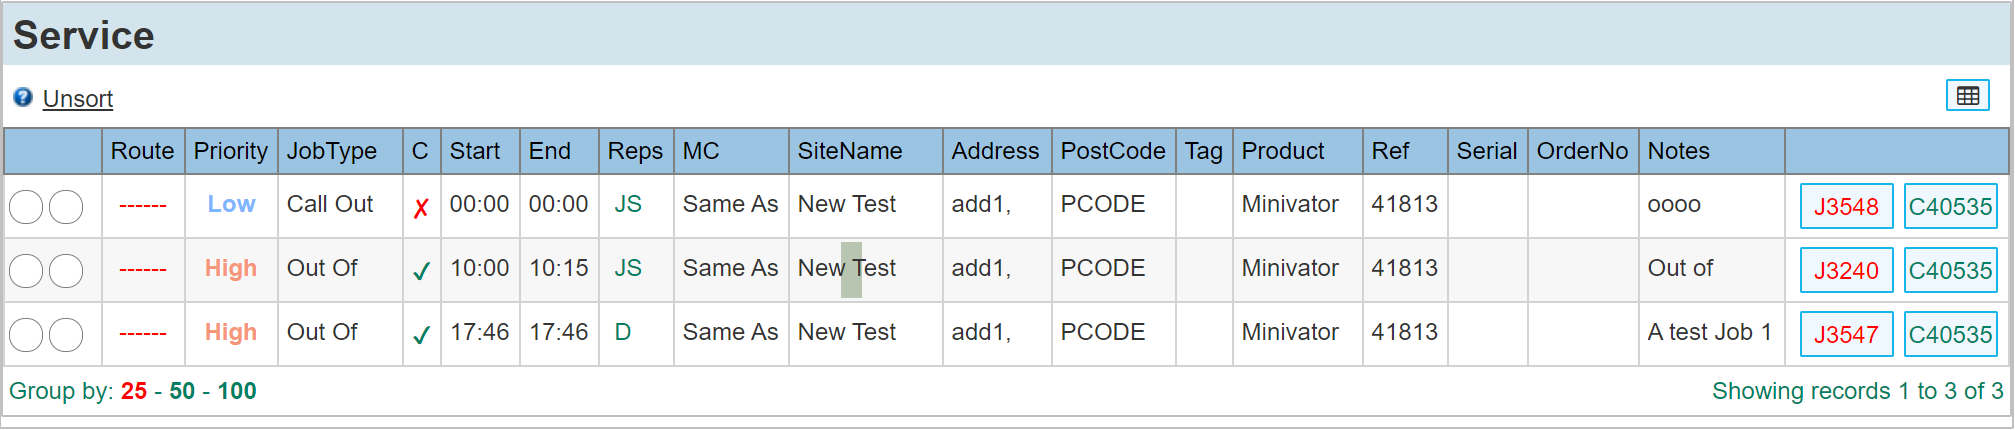
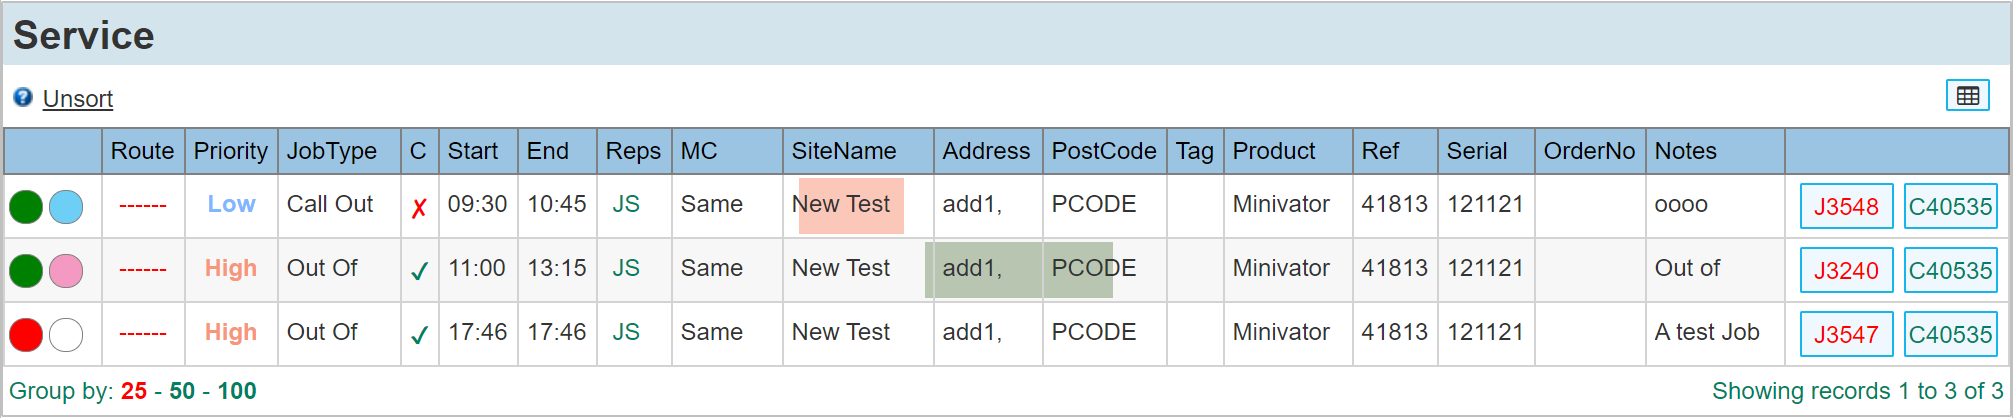
Within the grid above, the circles to the left are shown empty. These markers populate with different colours depending on what stage the job is currently at. Below shows the same grid after the engineer using the app as updated his jobs.
These indicators are sent automatically by the app as the engineer goes about his work. To see a list of what these indicators / colours mean, click the help button as shown below;
For full details how the 'App' integrates with the diary, view the separate guide: Mobile App - General Use
The Diary Grid Columns
The columns in the 'Day Diary' that show you all the bookings for that day includes a number of columns that may or may not be relevant to your business type. Each column (Except the accept / reject circles) can be switched on or off. Click the columns edit button as per the below image;
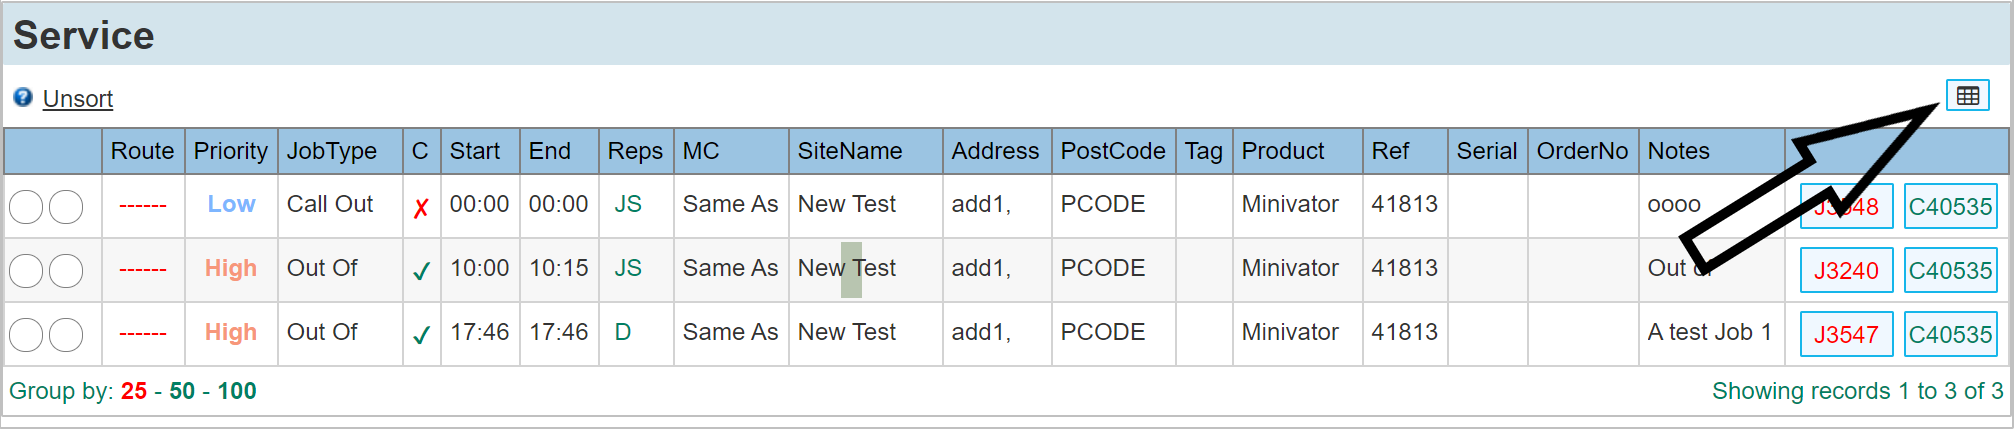
Clicking this opens the following dialogue;

This allows you to switch off any columns that are not deemed necessary. It is worth reviewing this list from time to time as some columns become more relevant the more of the system that you use. You may note that this option is available for many of the grid results throughout the system allowing you to tailor what you want to see for each view.
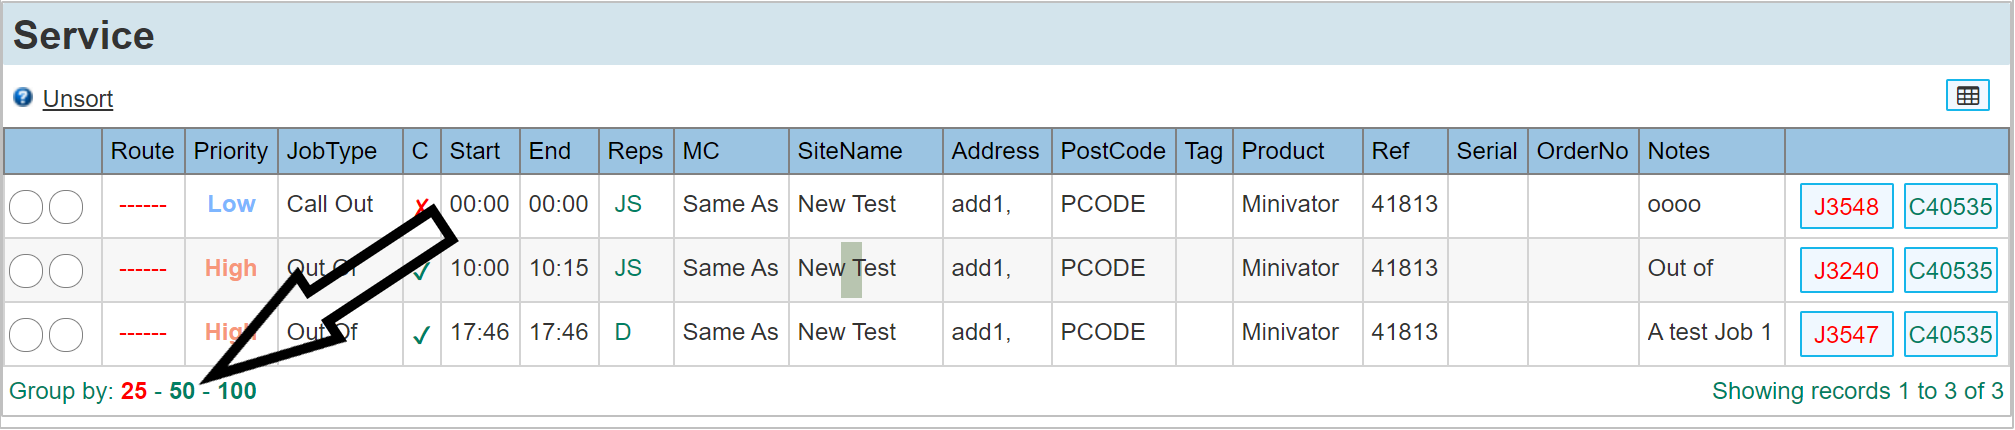
Group By Option
By default, the page will group results in to pages of 25. With our demo page shown above, there are only a few lines so additional pages are not available. Should there be more diary entries than 25, each page can be viewed by toggling the page number or 'Next' button that will appear to the left of the 'Column Selector' button.
See below image for paging options;

If you require the list to contain more rows before paging, you can choose between 25 / 50 / 100 as shown below by clicking the appropriate 'Group By' value.
Tasks
All tasks booked for the day being viewed are shown below the booking grid. The image below shows an example of one task showing for the current day. Tasks are used primarily for all things that are not Job Booking related. I.E. in the example we have a subject 'Engineers Meeting'. A task such as this would not be considered a Job Booking. See the separate guide: Diary - Add New Task.
.png?v=538302083)
Clicking an entry in this grid will open the task dialogue allowing you to edit the current task (permissions dependant). Clicking the 'Add' button will create a new task.
The Left Hand Menu
The menu to the left is grouped into six sections detailed below.
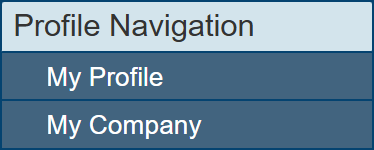
My Profile
Navigate to your own profile on AutoVu. this section allows you to set preferences, notification settings and various other details about yourself or how you want to use the system. See the How To guide 'User Accounts - My Profile' for further information about this section.
My Company
Navigates to your own company profile where your company address is edited, user accounts created and general company settings are made. See the How To guide 'My Company' for further information about this section.
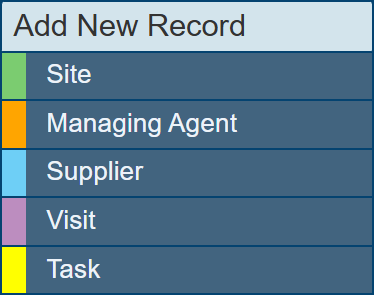
Site / Managing Agent / Supplier
A new account is either a Site, Managing Agent or a Supplier. These 3 buttons open the same dialogue, but with the account type pre selected. See the separate guide 'Diary - Add New Account' for further information about this section.
Visit
A site visit can be created with as little as a date the visit will occur, and the person who is attending. See the separate guide 'Diary - Book a New Visit' for further information about this section.
Task
A task is used to record any non site visit related activity, I.E. you may wish to record an employees holiday. See the separate guide 'Diary - Add New Task' for further information about this section.
.png?v=788032516)
See the How To guide 'Diary - Sales Menu' for further information about this section.
See the How To guide 'Diary - Service Menu' for further information about this section.
See the How To guide 'Diary - Service Menu' for further information about this section.

See the How To guide 'Diary - Activity Menu' for further information about this section.
The Right Hand Menu
The Calendar
Select any date to view within the main display.
Diary Filter
.png?v=650103345)
User
Select from either a single user name or a diary job type I.E. 'All Sales', 'All Service' or 'All Tasks'
Job
Limit the diary to a single Job Type
MA
Limit the diary to jobs that are linked to a single Managing Agent
Key
Limit the diary to a single Key Account holder
Please Note: The system remembers your filter settings until you reset them. Your user permissions may limit what you can see within this filter. The filters can also be used in conjunction with each other.
Tasks

Tasks are generally there to record all 'Non Site' related activity. E.G. to alert several people that there will be an engineers meeting at a certain point in the future. Or maybe that someone is visiting you today at your office.
The large number tells you how many Tasks that have not yet been read. The number will increase depending on how many tasks remain unread. Clicking either the 'Tasks' heading or the number will open the 'Tasks Panel'
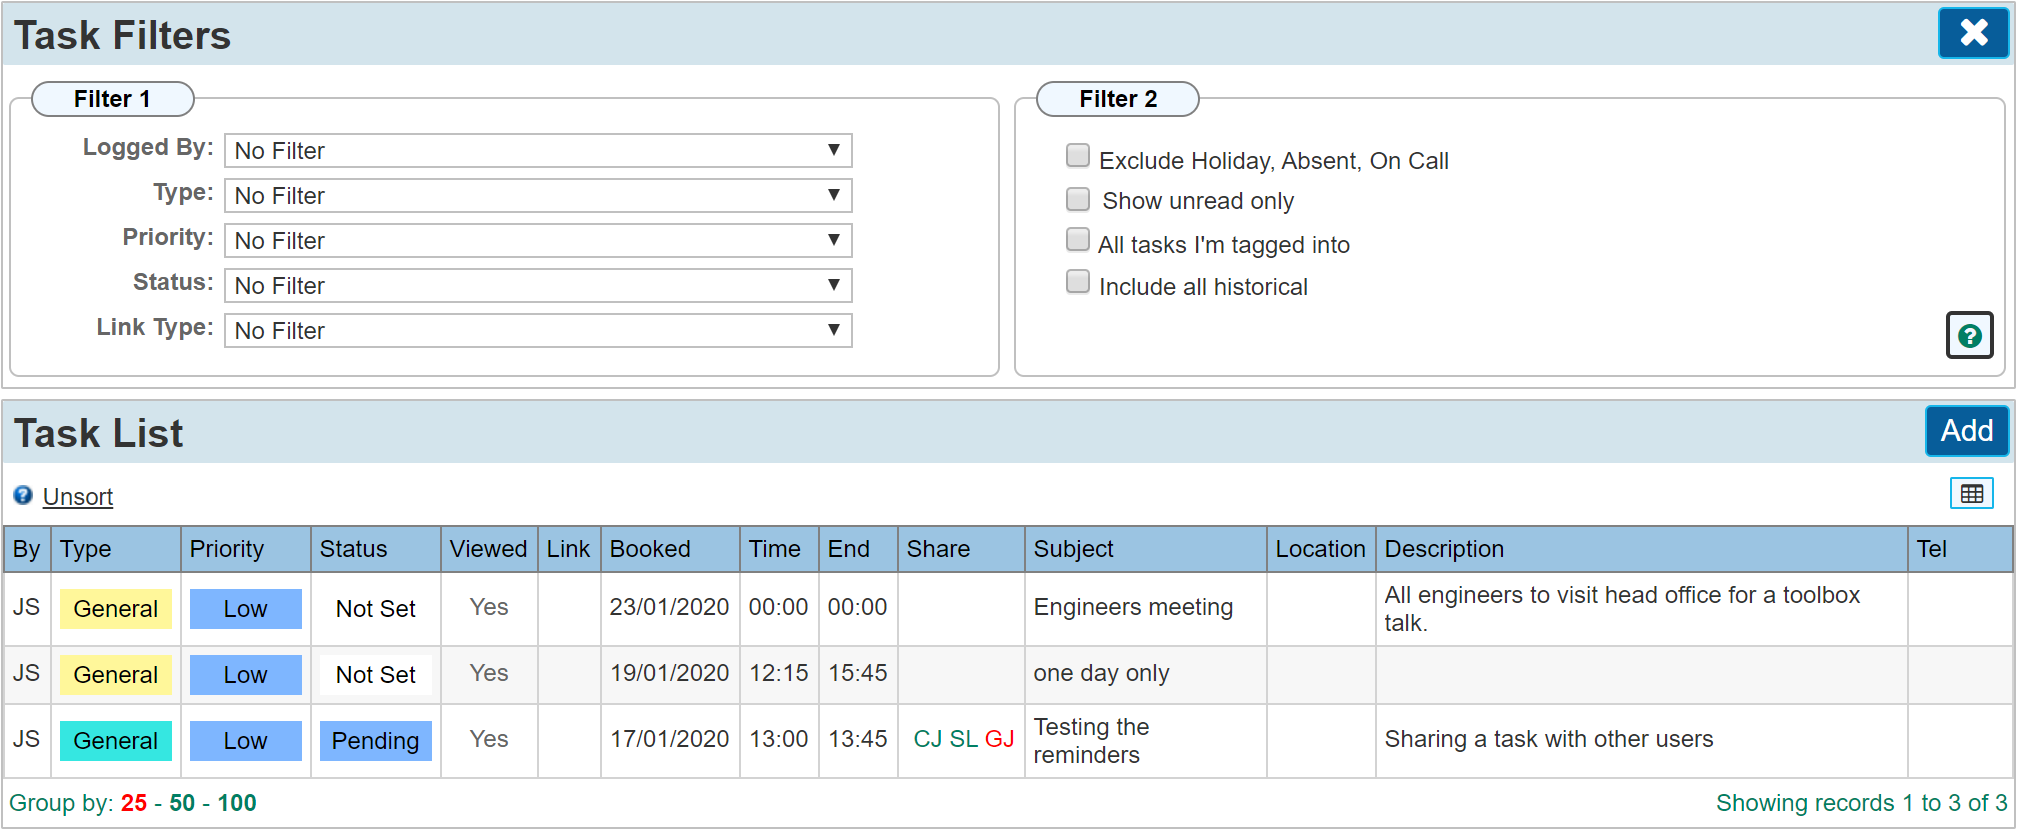
Task Panel
Clicking 'View Task List' will take you to the 'Task Manager' to see all current tasks. There are a number of filters available within the Task Manager to help you find particular tasks. Below is an image of the Task Manager showing the available filters and the list of current tasks.
Timeline
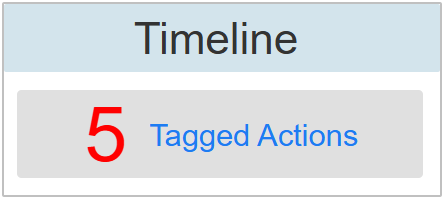
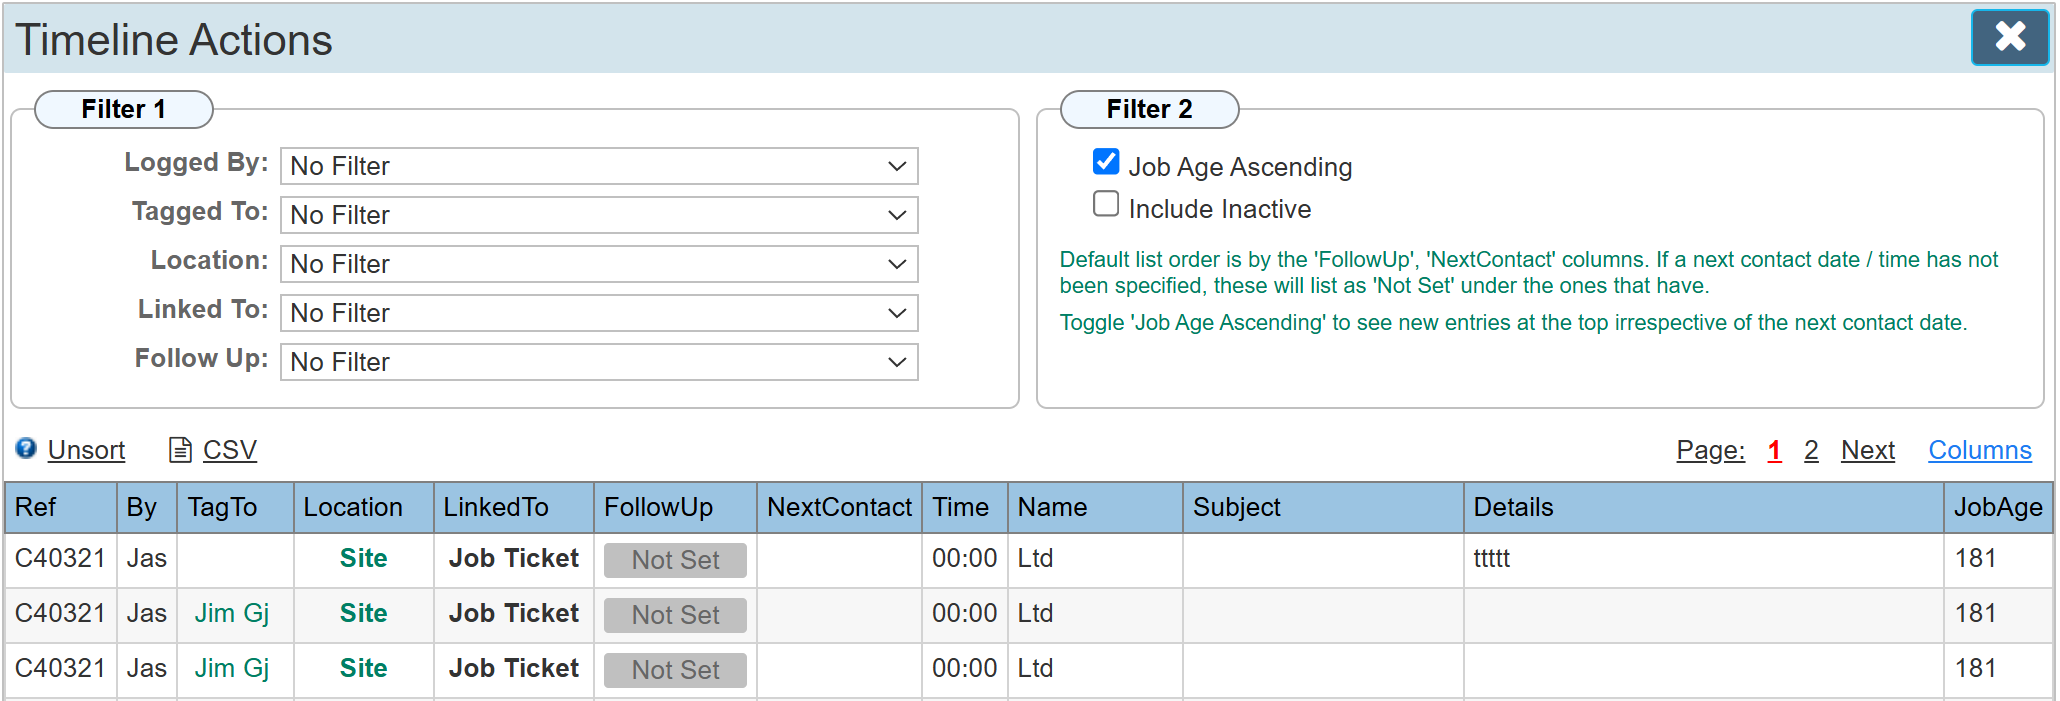
The timeline is available within any Site or Company Record. Timeline is used to record all interactions between you and your customer. They can be created as stand alone items or linked to a job ticket. Clicking on the Timeline heading or the large number will open the Timeline Actions panel allowing you to perform many filter options on all timeline entries made on the system.
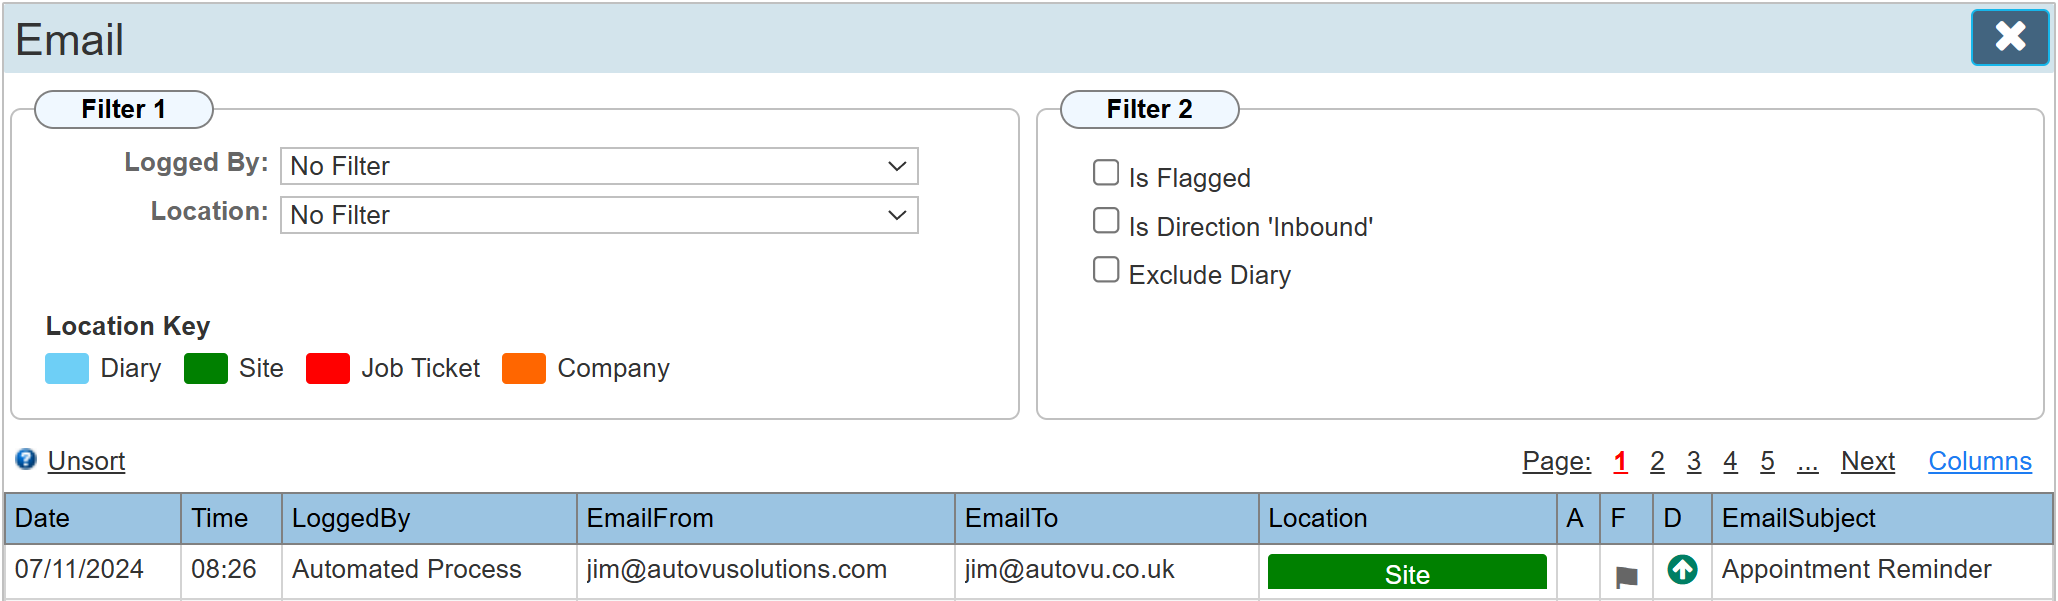
Email
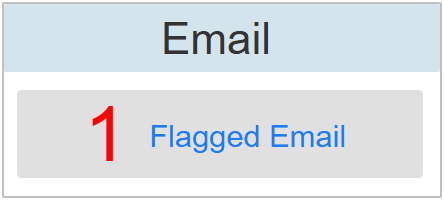
All email created on the system can be viewed in the Email panel. the large number tells you how many have been flagged. Click either the Email heading or the large number to open the Email panel where various filtering options are available.
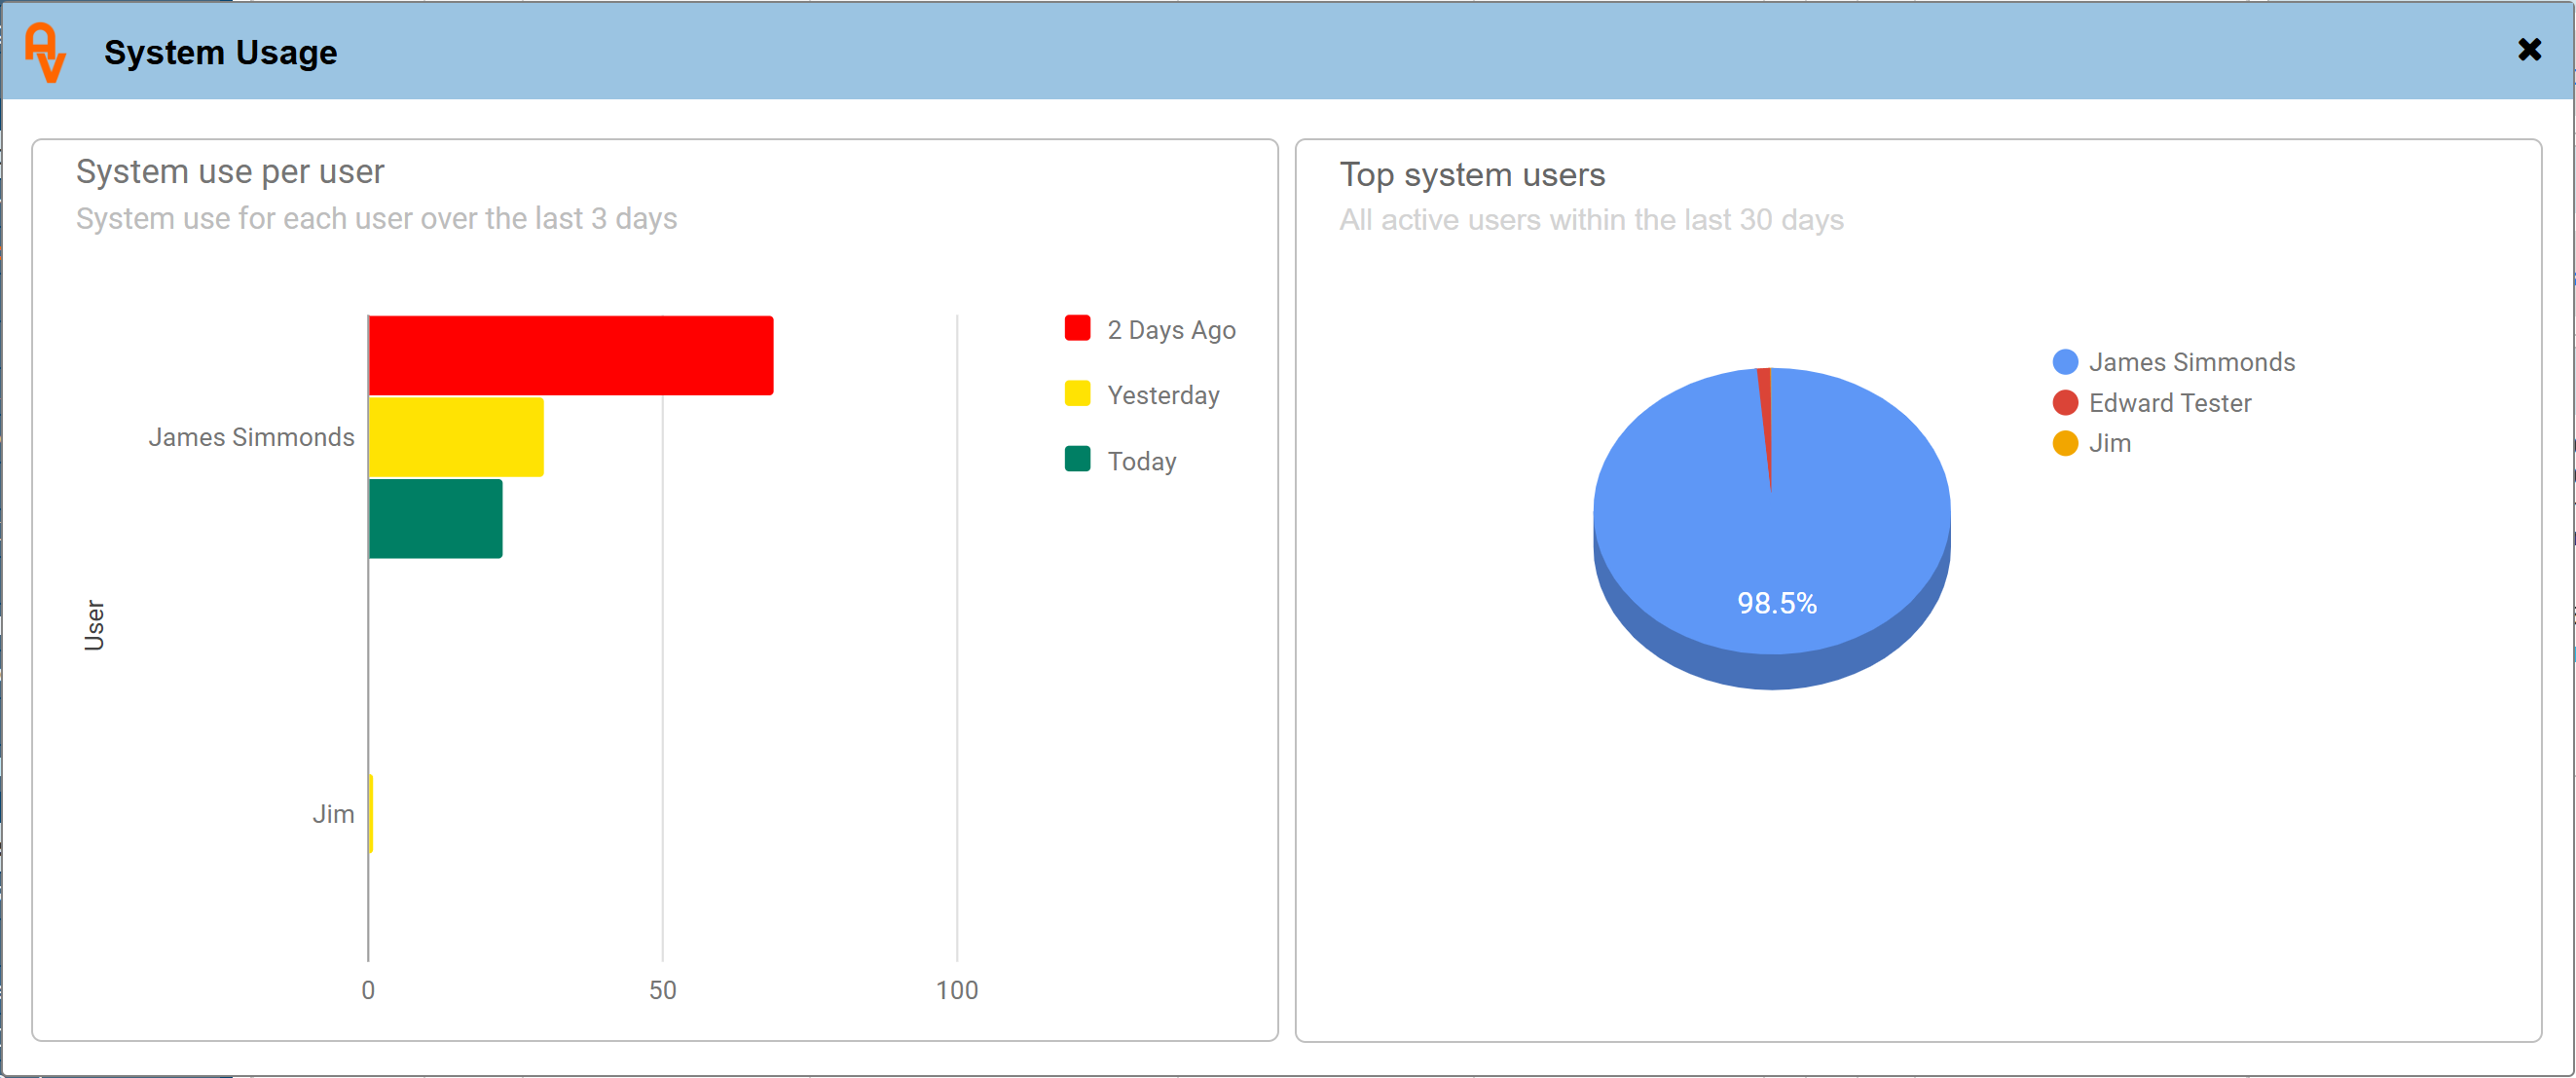
Users Online
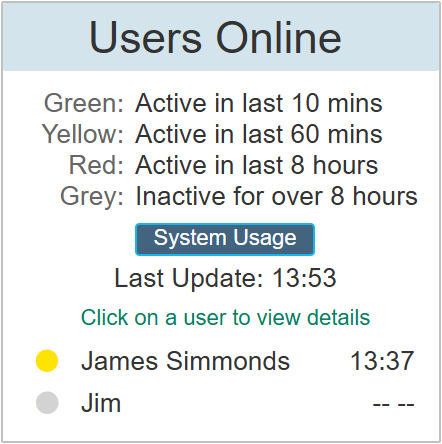
See when users were last active on the system. The colour codes give a visual indication of when someone last made an update.
Click 'System Usage' to see a details dialogue of all current users. Useful to see who accesses the system the most.
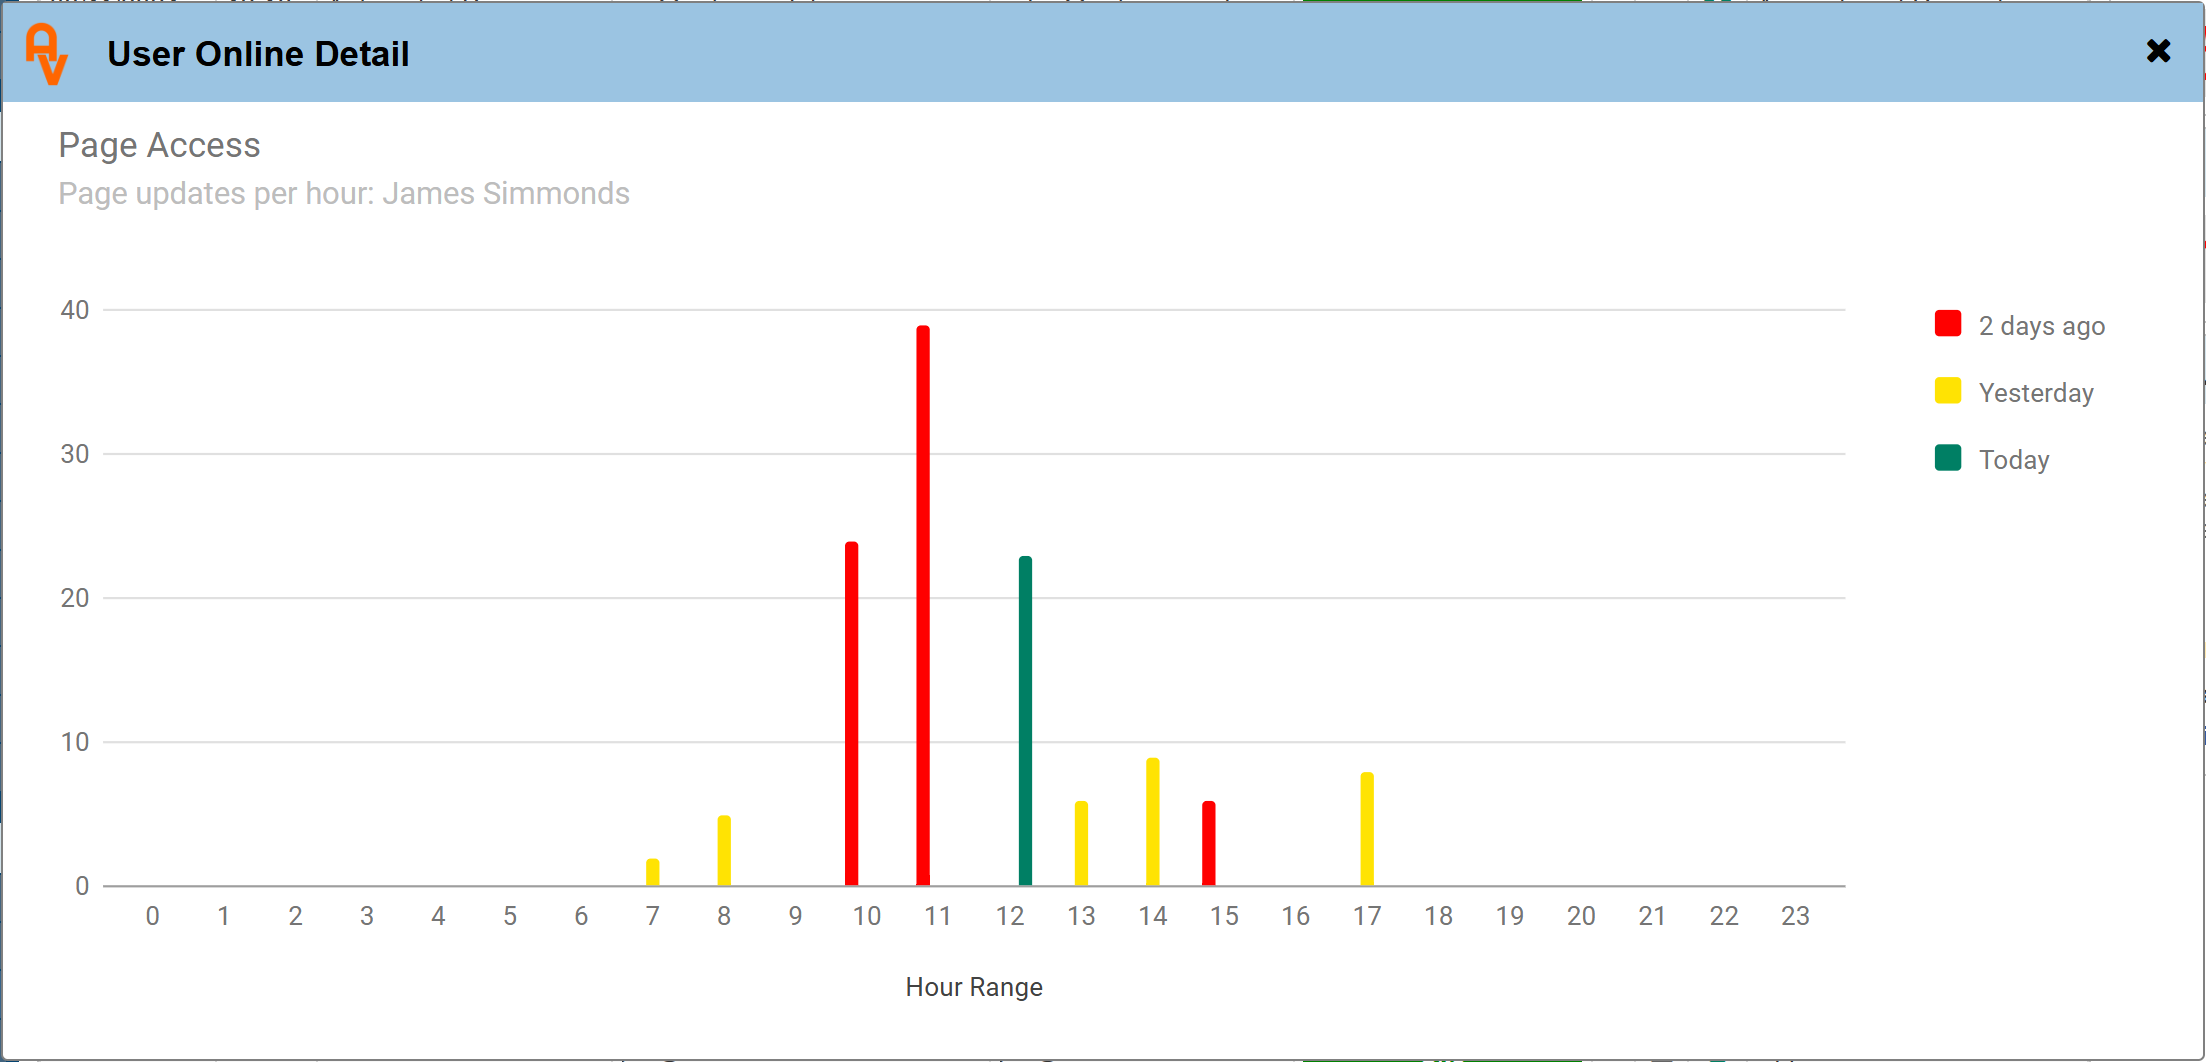
Click on an individual user name to open a dialogue showing an hour by hour view of their activity on the system.
Diary Columns Explained
The table below helps to explain what each of the columns can identify and the meaning for their differing information.
| Route: |
The name of the route that this bookings engineer has been assigned to. Routes can be set to group jobs together that are in a certain area or, depending on what is involved with each job on that route it may require a certain expertise for these particular job types.
|
| Priority: |
Priority of the job is set within the booking form, there are 4 different levels, Low, Medium, High and Urgent. These show on the diary page as a visual indication as to how important the job is.
|
| JobType: |
There are 21 possible job types to choose from. You may have them all active or just a few based on your Company Preferences. These are named based on your business type and form the basis of what your engineers / reps are attending site to do.
|
| JobStage: |
If you have set up Job Stages for your Job Tickets, this will show here. Otherwise, 'Not Set' will show.
|
| C: |
Indicates if the customer has confirmed the job or not. A red cross means the job has not been confirmed, a green tick means the job has been confirmed. This option is set whilst entering details on the booking form.
|
| F: |
If a green tick exists in this column, this indicated that the site rep has uploaded at least one File / Image using the app. Please note: This does not include manually uploaded files. The idea is to let you know if the site rep uploaded anything.
|
| O: |
If the 'Job Order' drop down list is used on the booking form to indicate the order in which each job is done has been selected, the 'Job Order' number will be shown in this column.
|
| Start: |
The time that the job is booked.
|
| End: |
The end time can either mean the job is booked between the start time and the end time, or it can mean that the end time is when the job was completed. Initially it can mean booked between the two times, from your customers perspective of when you will arrive. Once the job is complete, it can then indicate the time the job was finished. In practice, the system automatically does things on the basis if you have things set up so that the app automatically adjusts the start and end times to those actually attended.
|
| Reps: |
All the reps that are attending on this visit. If more than one rep is selected, only the first one in the list (the lead rep) is able to update the app. Other reps listed in this column can see the job on their app but cannot edit. This prevents several people trying to update the same job at the same time. Select which reps are attending on the booking form.
|
| Key: |
The Account Manager assigned to the site / Managing Agent.
|
| MA: |
The Managing Agent as set in the site record. If you have not selected a Managing Agent, this will say 'Same as Site'
|
| SiteName: |
The name of the site this job booking is assigned to.
|
| Address: |
The address of the site this job booking is assigned to.
|
| PostCode: |
The post code of the site this job booking is assigned to.
|
| Tag: |
The tag is used to indicate where in the building your product is. I.E. it is a 'Location Tag' for you to state which of several similar pieces of equipment that this job ticket refers to. It allows your engineer to know which one of many items on site to attend.
|
| Product: |
The make and model of the product.
|
| Ref: |
Your ref. If you use the ref field when setting up a product, the details of this are shown here.
|
| Serial: |
The serial number of the product.
|
| OrderNo: |
If you were given an order number to carry out this work, this can be recorded on the job ticket and subsequently shown here.
|
| Notes: |
General notes about the job booking. There are some rules about what is displayed in this field.
When the job booking is first added, the booking description is shown.
If a timeline entry is subsequently added directly from the job ticket or the booking form I.E. a timeline entry linked to a job ticket, the details of that timeline entry will replace the job booking notes. See the below image snippet for an example.

This now indicates that a timeline entry was made against this booking to further update / inform the user that there has been additional information received about the job.
The red number tells us how many days ago this timeline entry was made. In this instance it says zero, but tomorrow that will say 1 and so on. The green numbers are the time the timeline entry was made, so for this entry we know that the timeline entry was made today at 15:50
You may wish to turn this feature off so that only the job details show. You can do this by navigating to: My Profile > Preference and toggle the switch 'Suppress Timeline Updates' to 'YES'.
|
| Nav Buttons: |
These two buttons allow you to navigate directly to the 'Job Ticket' record or the 'Site Record'. The button in RED starting with a 'J' is the Job Ticket Button, the one in GREEN starting with a 'C' is the site record. More information about number prefixes and the colour codes can be found by opening the 'Symbols & Definitions' dialogue as shown further up this topic.
By default, clicking anywhere within the grid line will also take you directly to the job ticket record, however we would recommend setting your preferences: My Profile > Preferences and toggling the switch 'Quick View Popup' to 'YES' so that instead of navigating to the job ticket, the booking form is shown. This allows you to perform booking actions without leaving the diary page.
|
| Compact Rows: |
Not actually a column, but toggling this switch 'ON' limits the height of all rows to a single line. This is useful when there are a large number of bookings on the diary and allows you to view more of them on a page.
All the views on this help topic have this option switched on. The difference by having it switched 'OFF' is that each row of the grid will display up to 3 lines of information before limiting the height.
|