The Invoice Schedule is a guided setup process where all calculations are performed automatically based on the parameters defined in the settings. This automates the typically manual process of setting up invoicing, ensuring accuracy and efficiency.
The system guides you step-by-step through configuring the necessary details, such as billing cycles, payment terms, and client-specific rates. Once these parameters are established, the system takes over, generating and scheduling invoices precisely as required, without the need for manual data entry or calculation.
Invoice Schedule
This image represents the service invoice schedule. The LOLER schedule is identical but is set up as a separate invoice template.
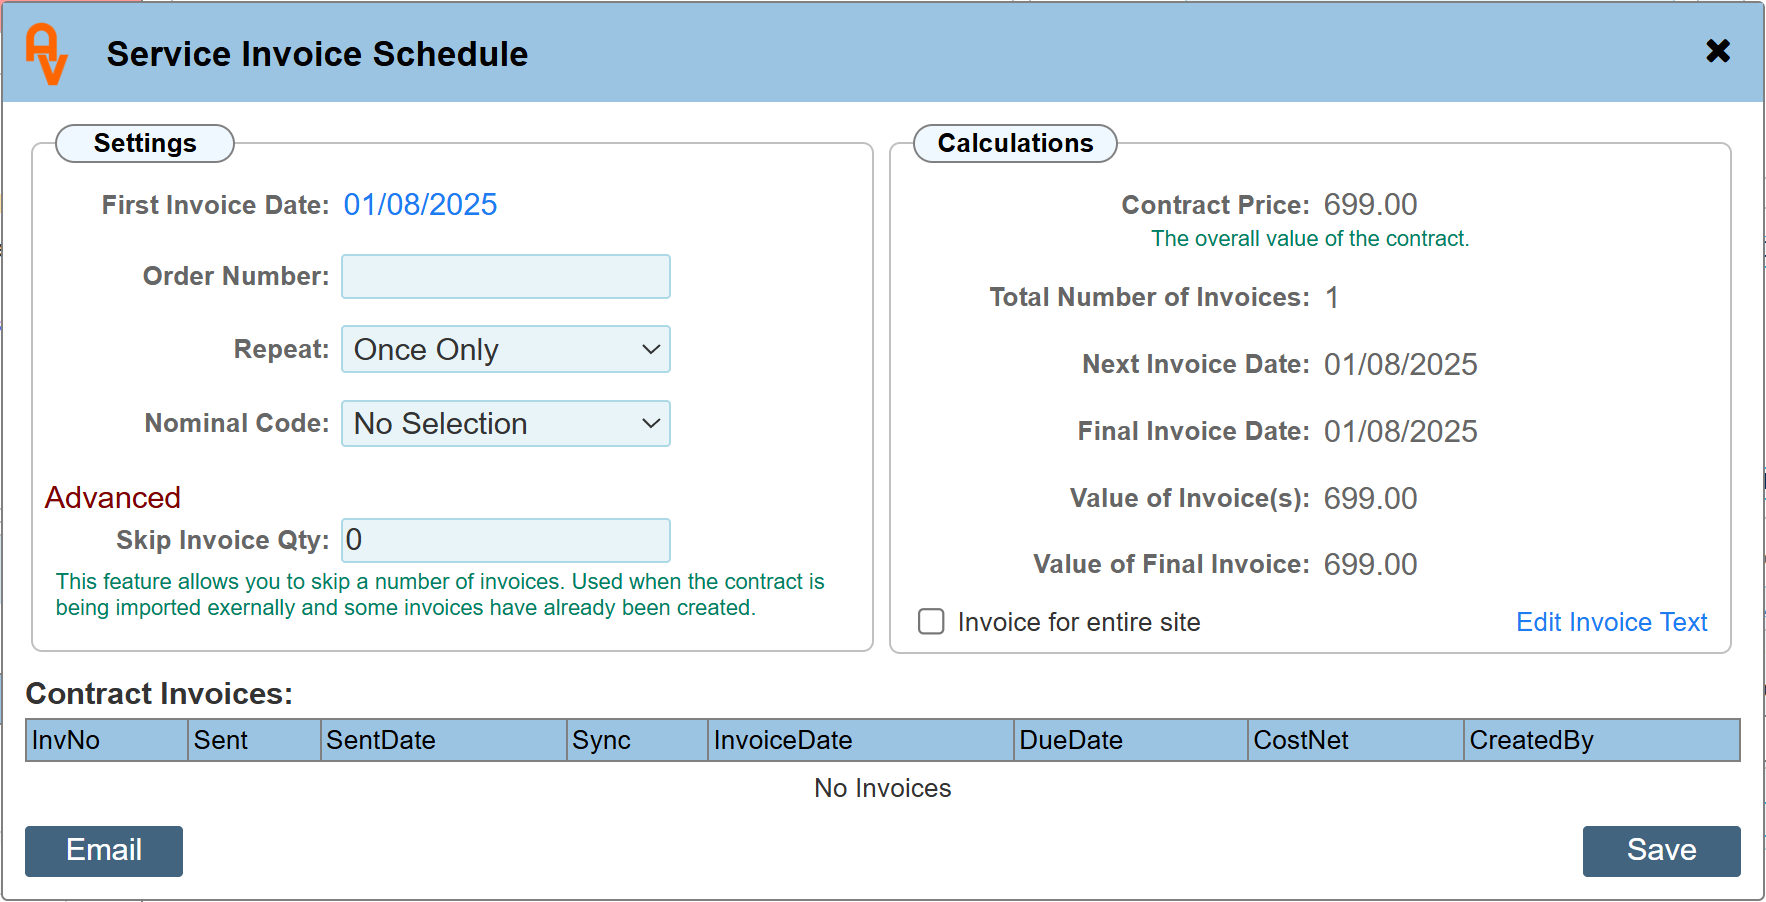
First Invoice Date
The initial invoice date is automatically populated with the contract's start date but can be modified. For contracts that commenced more than 28 days ago, the first invoice date must be adjusted to fall within the current billing period, specifically within 28 days of the present date. This ensures the initial invoice aligns with your company's active billing cycle. Invoices must strictly correspond to the scope and period of the contract under which they are generated.
|
Please note: Contract Invoices must align with the currently active contract period.
|
Order Number
Enter the client's order number in this field. This number will be displayed on the final invoice for reference.
Repeat
Specify the frequency at which new invoices will be generated. The system operates on an annual cycle, allowing you to select common intervals such as monthly or quarterly.
Nominal Code
A Nominal Code is mandatory for the creation of an invoice. If these codes have not been established in your system, they must be configured before an invoice schedule can be set up.
Skip Invoice Qty (advanced Option)
This advanced feature is useful when setting up a contract that is already underway. It allows you to omit invoices that have already been generated and paid within the current payment cycle, ensuring that the total amount due on this new schedule accurately reflects the remaining balance.
Calculations Panel
These values are used by the system to automatically generate invoices. They are derived from the selections made within the settings panel and cannot be modified directly. Any changes to these values must be made by updating the corresponding selections in the settings.
Contract Price
This value reflects the total contract amount as defined in the main contract manager dialogue.
Total Number of Invoices
This represents the total quantity of invoices that will be automatically generated by the system over the duration of the contract.
Next Invoice Date
This field displays the date of the next scheduled invoice, following the initial one.
Final Invoice Date
This indicates the date on which the last invoice of the contract will be generated.
Value of Invoice(s)
When multiple invoices are created, each will have an equal value, as shown here.
Value of Final Invoice
For multi-invoice schedules, if the total contract value is not equally divisible by the number of invoices, the system will automatically adjust the final invoice's value to align with the remaining balance due.
Invoicing for the Entire Site
While invoice schedules can be set up for each product individually, selecting the 'Invoice for entire site' option configures the system to generate a single invoice that covers all products on the same site.
|
Please note: The primary product must be used for invoicing the entire site.
|
Even with a site-wide invoice in place, you still have the flexibility to create separate schedules for any other products. However, a notification will be displayed on those individual product pages, confirming that they are already included under a site-wide invoice.
This ensures you can maintain separate billing if needed, while the system provides a clear visual reminder to prevent duplicate invoicing.
Below is an example of the notice that appears on the invoice schedule for other products on the site.

Edit Invoice Text
This dialogue presents the default text used for invoices, which you can customise. The system uses a series of hashtags as placeholders, which are automatically replaced with the corresponding data when the invoice is generated. You have the flexibility to remove any unnecessary placeholders or use only the ones you require.
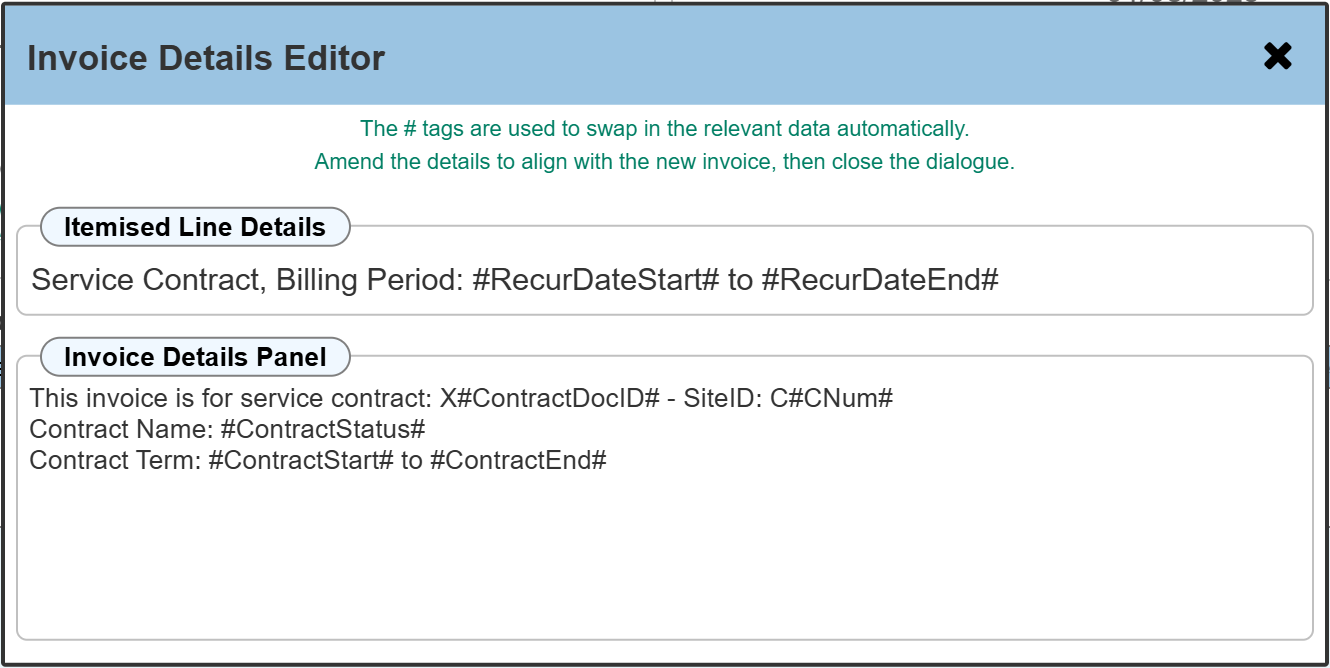
Itemised Line Details
This is a single-line description that will appear in the itemised section of your invoice alongside the pricing. By default, it will display the dates of the current billing cycle, which is particularly useful for monthly or other recurring billing periods that do not cover the entire contract term. This text should be concise.
Invoice Details Panel
Use this panel to provide more comprehensive information about the invoice. It is pre-populated with essential contract details such as the contract number, name, and overall term, but you can add further context here to elaborate on the nature of the invoice.
Hashtag Reference
-
#RecurDateStart#: The start date of the invoice's current billing cycle.
-
#RecurDateEnd#: The end date of the current billing cycle.
-
#ContractDocID#: The unique ID of the overall contract.
-
#CNum#: The 'C' number of the site where the invoice schedule was created.
-
#ContractStatus#: The name of the contract being invoiced.
-
#ContractStart#: The start date of the overall contract term.
-
#ContractEnd#: The end date of the overall contract term.
Creating invoices
Once you have verified that all details are correct, you can proceed with invoice creation by clicking 'Save'.
You will then see a confirmation prompt.
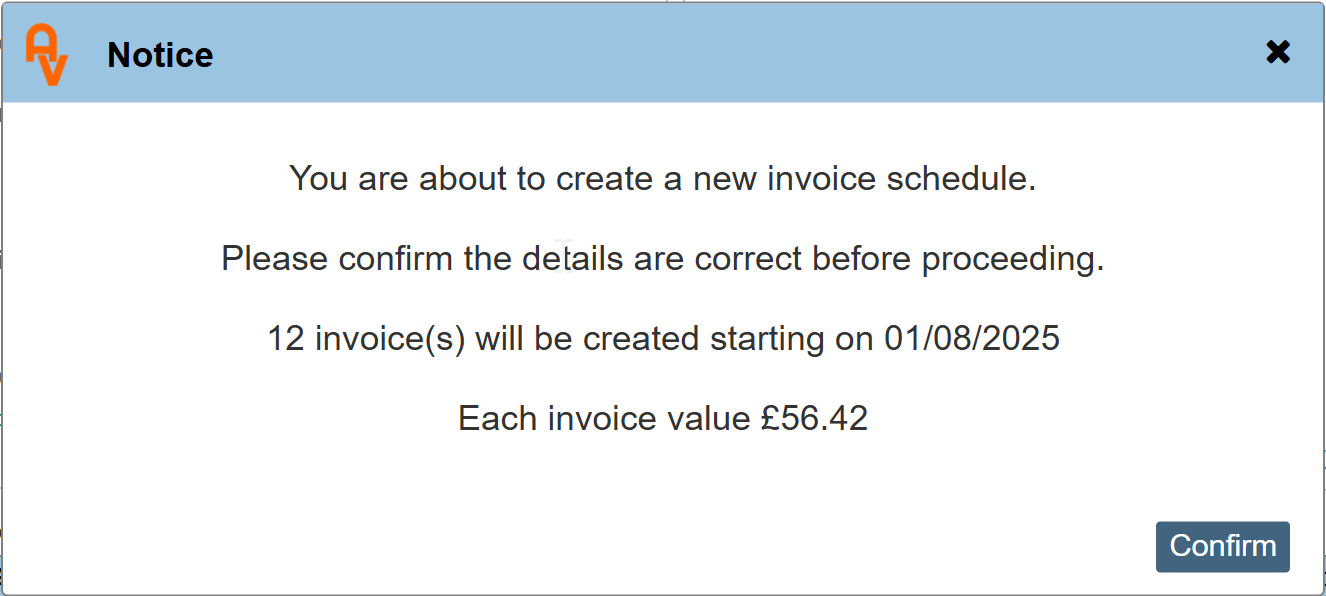
Clicking 'Confirm' will generate the initial invoice.
Viewing Invoices
After an invoice is created, it will appear in the grid at the bottom of this dialogue. All subsequent invoices will also be logged here automatically as they are generated. N.B. where a recurring schedule has been set up, the invoices will be automatically generated as and when they are due.
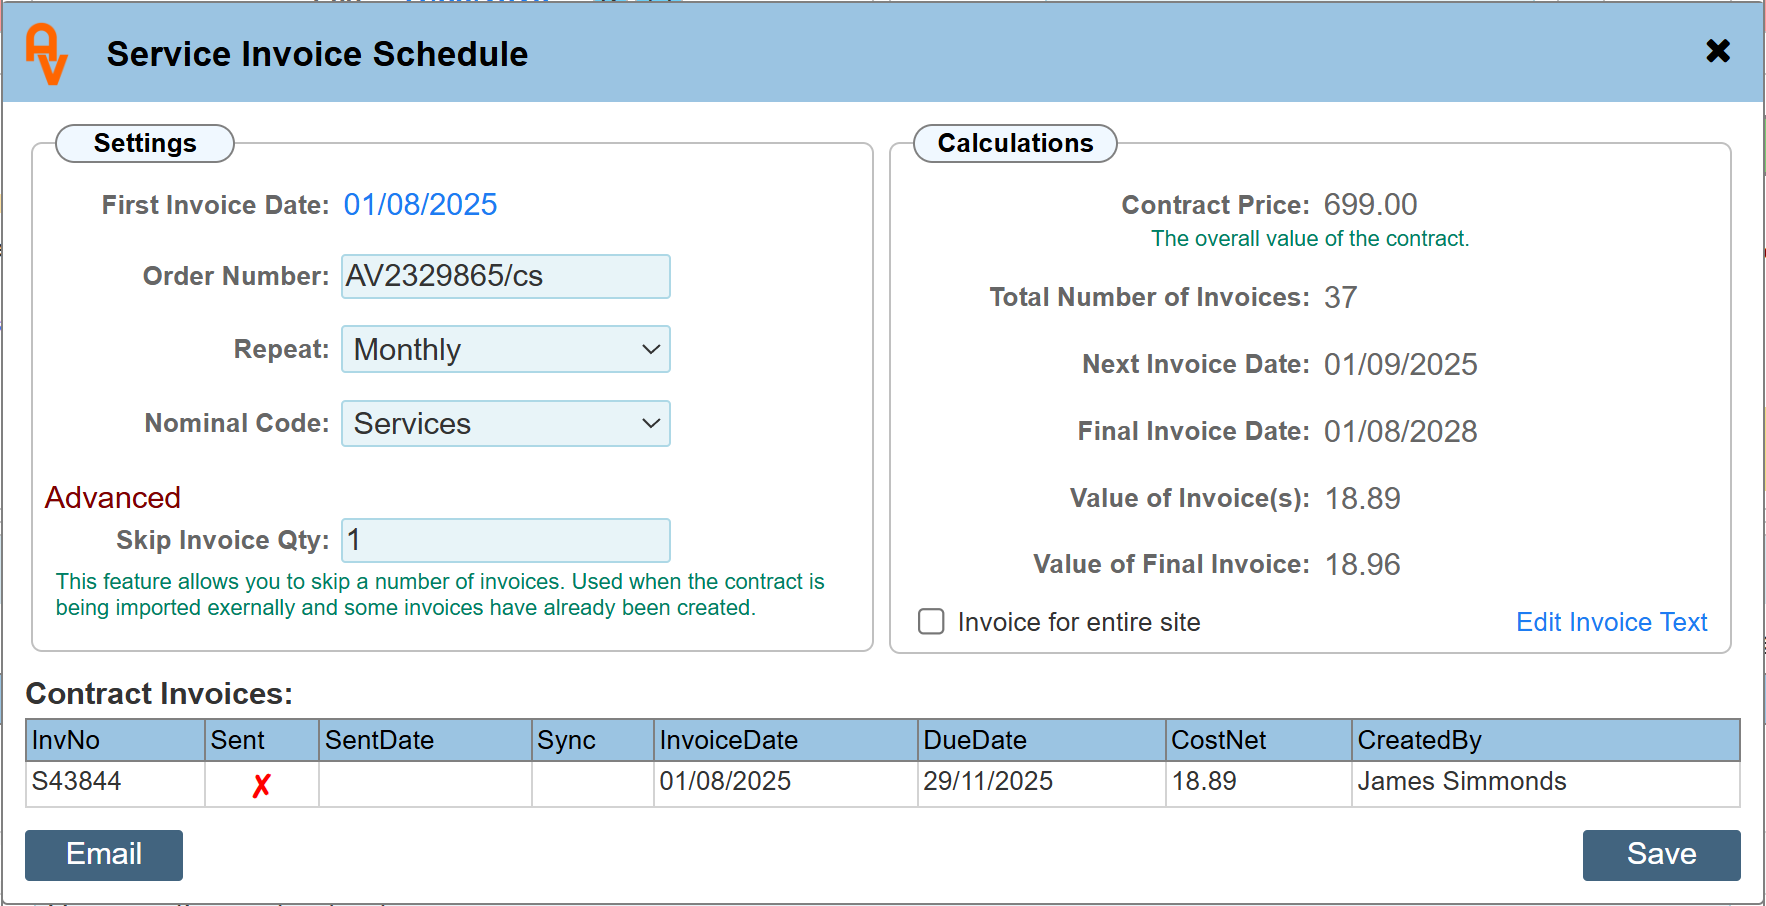
Sending Invoices
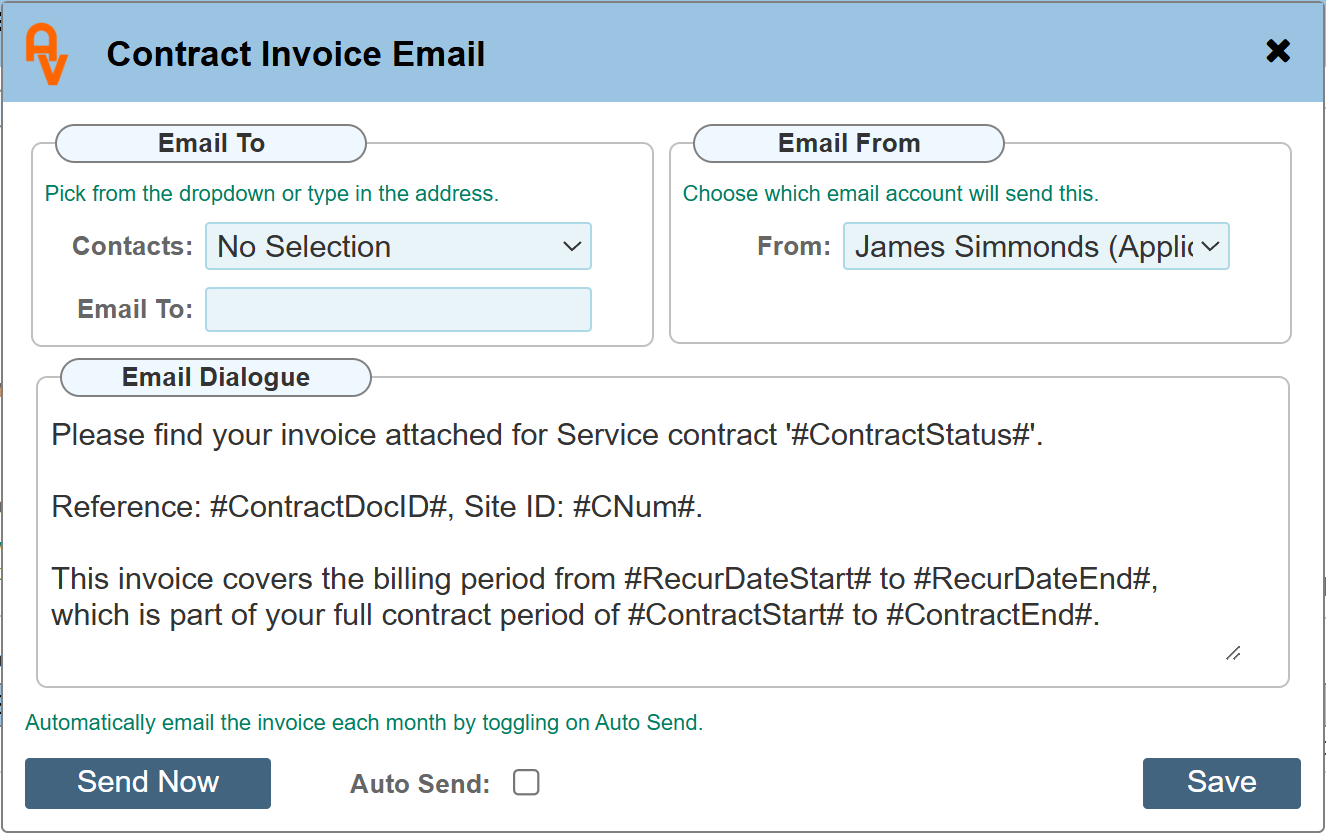
When an invoice is first created, its status will be 'Unsent'. You have two options to send it: you can click the invoice in the grid to navigate to its details page and send it manually, or you can click the 'Email Button' located to the left of the dialogue to open the email automation options.
Contacts / Email To
If you have set up any contacts for this site or its associated managing agent, they'll appear in the Contacts dropdown list. Contacts highlighted in green are active; selecting one will automatically populate the 'Email To' field with their email address. Alternatively, you can manually type in one or more email addresses, separated by a semicolon.
Email From
This field defaults to your email address as the logged-in user. However, company policy might require these emails to be sent from another person or a specific company-wide email address designated for invoices. You can adjust this setting as needed.
Email Dialogue
The default text here provides essential details about the invoice, including its source and purpose. You can edit this text to suit your specific needs. Similar to the invoice text, this area uses hashtags as placeholders for dynamic data. While you can remove or edit these, please remember that this text will be used for all subsequent recurring invoices.
Hash Tags
-
#RecurDateStart#: The start date of the invoice's current billing cycle.
-
#RecurDateEnd#: The end date of the current billing cycle.
-
#ContractDocID#: The unique ID of the overall contract.
-
#CNum#: The 'C' number of the site where the invoice schedule was created.
-
#ContractStatus#: The name of the contract being invoiced.
-
#ContractStart#: The start date of the overall contract term.
-
#ContractEnd#: The end date of the overall contract term.
Auto Send
Selecting this checkbox instructs the system to automatically send the invoice to the recipient as soon as it's created.
Send Now
Clicking 'Send Now' will immediately place the current invoice into the email scheduler. The email will be sent to the recipient within 10 minutes.
Validation and Data Integrity
To ensure the accuracy and integrity of your Service and LOLER contracts, the system employs several validation checks that limit the ability to edit a contract once it is active. These measures prevent discrepancies between the contract details and related documents, such as invoices.
Contract Renewal and Invoicing
-
A renewal contract can only be created within 28 days of the existing contract's expiry date. This restriction ensures that the contract aligns with billing cycles and prevents the creation of invoices with distant future dates.
-
Once a contract's Start Date and the First Invoice Date are set and saved, the initial invoice will be automatically generated. While this invoice remains editable before it is sent, it becomes locked once it has been issued to the client. This is crucial to maintain consistency between your records and the copy held by the client. You can manually override this lock by unchecking the 'Sent' toggle in the invoice's PDF panel, but this is not recommended.
Editing Limitations
-
After a contract's start date has passed by 28 days, the ability to edit the renewal details is automatically locked. If you need to make changes after this period, you must terminate the existing contract and create a new one to reflect the updated terms.
-
Similarly, the main contract's Start and End Dates and the Contract Price will also be locked 28 days after the first invoice has been created. For contracts with multiple invoice types (e.g., Service and LOLER), the price for each component is locked independently once its respective first invoice has been raised and 28 days have passed.
-
Invoice details cannot be edited or deleted once the invoice has been marked as sent or after 28 days have passed. This measure ensures the integrity of the invoice and its associated contract.
To override this feature, you must first unlink the invoice from its contract. You can do this by clicking the 'X' next to the associated contract number in the right-hand menu of the invoice. Once the link is removed, the invoice can be deleted.