Mastering Job Costing & Financial Setup
The Job Costing and Pricing Module operates a Dual-Pipeline Engine, meaning it simultaneously calculates two completely separate financial streams for every job ticket:
- The Global Rate Card: Dictates the Sale Price (what you charge your customer).
- The Rep Rate Card: Dictates the Internal Cost (what it costs you to pay your engineers).
This guide focuses on configuring the Global Rate Card and its Advanced Settings to automate your sales pricing.
Phase 1: The Cascading Hierarchy
The system utilises an intelligent "Cascading Fallback" architecture. It searches for the most granular, specific price first (e.g., a Site-Specific Rate). If one does not exist, it safely falls back up the chain to the Managing Agent, and finally to your Master Company rates.
💡 Pro-Tip: Identifying Fallback Values
If a specific Managing Agent rate has not been explicitly set, the system will display your global 'My Company' value as an italicised placeholder. To apply a custom rate, simply overtype the italicised text.
Phase 2: Advanced Setup & Live Scenarios
Click the Advanced Setup button to configure the underlying mathematical rules the module uses. Misunderstanding these settings—particularly regarding travel—is the most common cause of pricing confusion. The system calculates finals strictly in a specific order of operations.
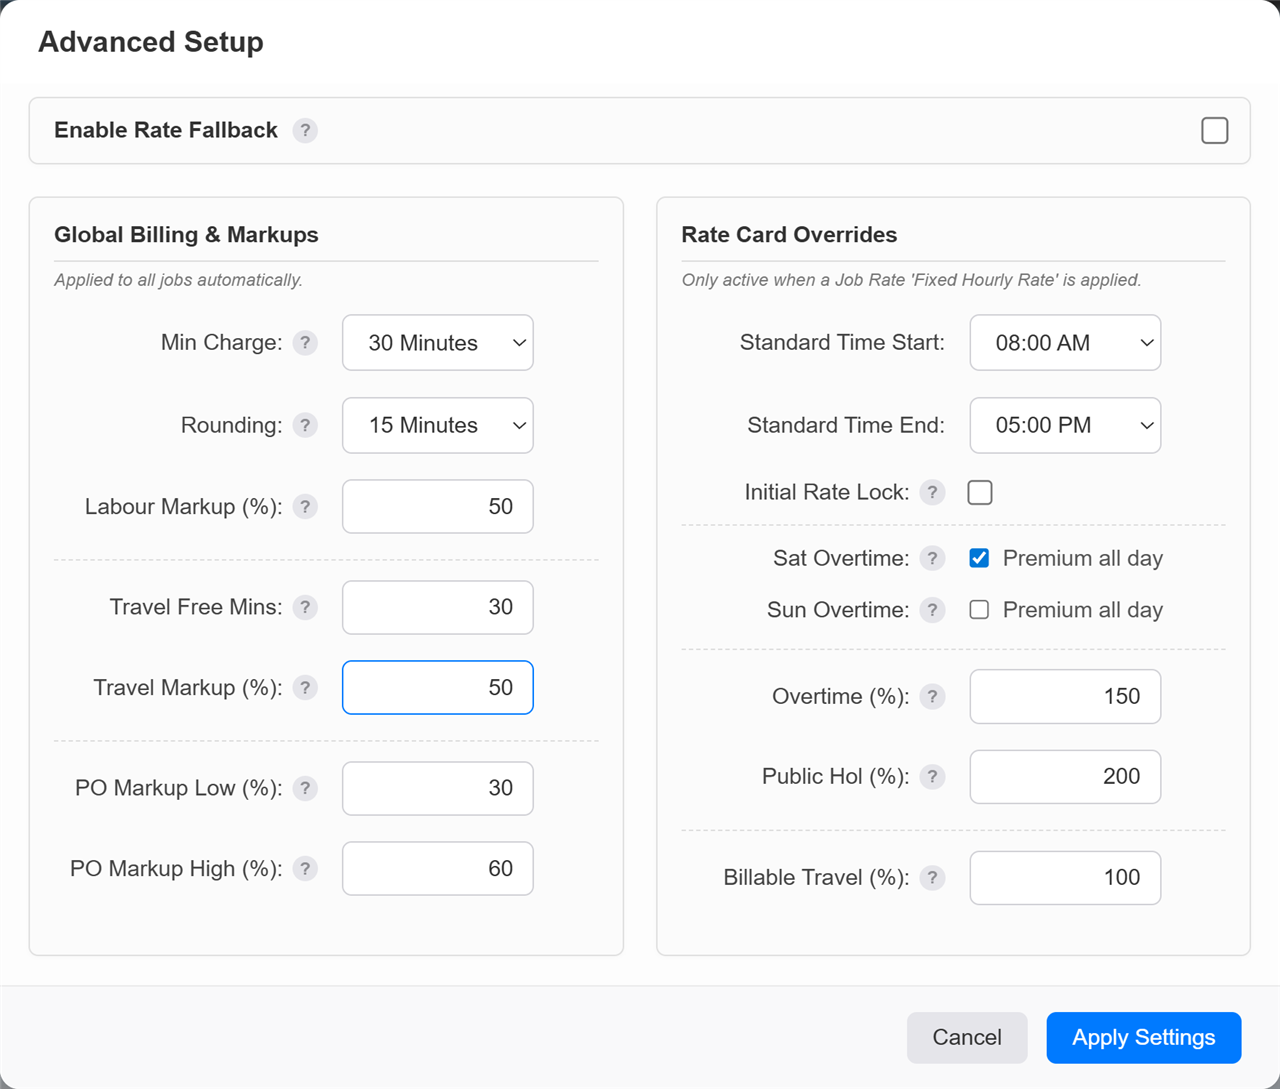
1. The Travel Sequence (Crucial)
Travel calculations generate the most questions because they involve three separate settings interacting in sequence: Travel Free Mins, Billable Travel (%), and Travel Markup (%).
- Travel Free Mins: A grace period deducted from the engineer's raw travel time before any costs are calculated.
- Billable Travel (%): The percentage of the remaining travel time that you actually charge for. This dictates the Cost Base.
- Travel Markup (%): The profit margin added on top of the calculated Cost Base to generate the final Sale Price to the customer.
📊 Live Scenario: The Travel Pipeline
An engineer travels for 90 minutes to reach a site. His hourly rate is £60/hr (£1 per minute). Your Advanced Settings are:
- Travel Free Mins:
30
- Billable Travel (%):
50
- Travel Markup (%):
20
The Calculation:
- Deduct Free Time: 90 mins total - 30 free mins = 60 Net Minutes.
- Apply Billable %: 60 mins x 50% = 30 Billable Minutes. (The Cost Base is now 30 mins x £1 = £30).
- Apply Markup: £30 Cost Base x 1.20 (20% markup) = £36 Final Travel Sale Price.
2. Standard Time & Initial Rate Lock
- Standard Time Start / End: Defines your company's normal operating window (e.g., 08:00 to 17:00).
- Overtime (%): The multiplier used for work outside standard hours (e.g., entering
150 applies Time-and-a-Half).
- Initial Rate Lock: If enabled, this locks the entire duration of the job to the rate that was active when the engineer first clocked in.
📊 Live Scenario: Crossing the Overtime Threshold
Your Standard Time ends at 17:00. An engineer works on-site from 16:30 to 18:00 (90 minutes total). Hourly rate is £100, Overtime is 150% (£150/hr).
- If Initial Rate Lock is OFF: The system mathematically splits the time. 30 mins at Standard (£50) + 60 mins at Overtime (£150). Total = £200.
- If Initial Rate Lock is ON: Because the job started during Standard Time (16:30), the entire 90 minutes is locked to the standard £100/hr rate. Total = £150.
3. Billing Safeguards (Minimums & Rounding)
- Min Charge: The absolute minimum duration billed, regardless of how fast the rep finishes.
- Rounding: Forces the final billed time to snap up to a specific increment. Note: Rounding occurs AFTER the Minimum Charge is evaluated.
📊 Live Scenario: Short Callouts
An engineer fixes a fault in just 25 minutes. Your Advanced Settings are:
- Min Charge:
60 Minutes
- Rounding:
15 Minutes
The Calculation: The system sees 25 minutes. It immediately bumps this to the 60-minute Minimum Charge. Because 60 is already a perfect multiple of 15, no further rounding is needed. The client is billed for exactly 1 hour.
4. Global Rules: Enable Rate Fallback (The Safety Net)
Sitting at the top of your Advanced Settings is the Enable Rate Fallback toggle. This is a master override that dictates how the system behaves when it encounters missing data.
- When Enabled (ON): If a specific Managing Agent or Site rate is missing, the system will automatically "fall back" up the chain, ultimately using your Master Company rates to ensure a price is always generated.
- When Disabled (OFF): The system strictly obeys the exact tier it is instructed to look at. If a specific rate is missing, it will not guess; it will simply output £0.00.
⚠️ Architectural Best Practice: Strict Data Governance
We highly recommend keeping Rate Fallback DISABLED for a stricter, more predictable pricing structure. While fallbacks prevent zero-value invoices, they also silently mask data-entry errors. Disabling the fallback ensures missing data is caught immediately as a £0.00 value before the invoice is sent.
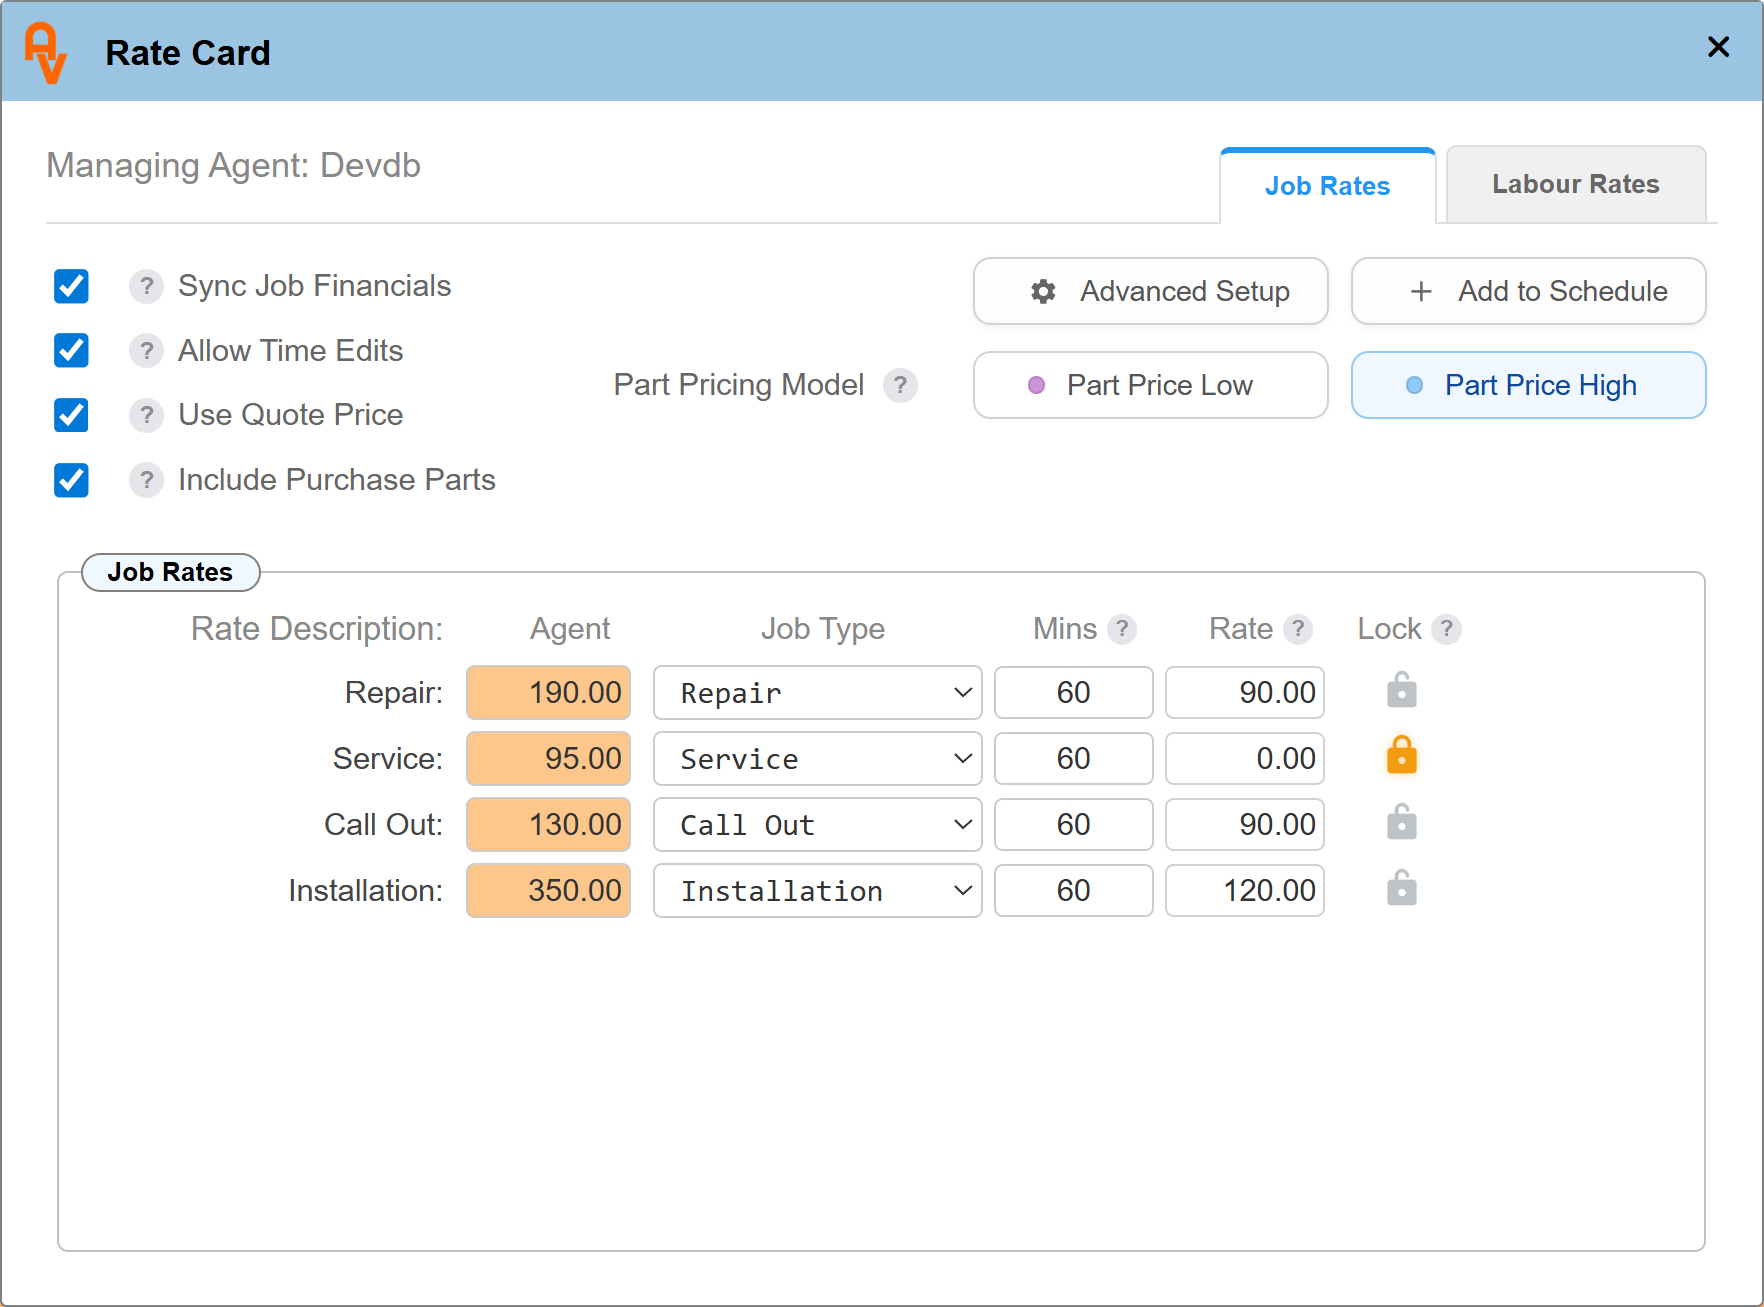
Phase 3: Pipeline Interception (Job Rates & Overages)
By default, the system calculates invoices using a "Time & Materials" (T&M) pipeline based on the engineer's active hours. However, the Job Rates tab allows you to configure specific flat-rate services.
Crucial Concept: When the system detects a matching Job Rate on a ticket, it aborts the standard T&M pipeline and explicitly intercepts the calculation, routing it through your fixed-price rules instead.
The Job Type & Category Matrix
To tell the system when to intercept the calculation, you must map the rate to a Job Type via the dropdown menu. This dropdown is not just a list of job types; it is a combined matrix of your Job Types AND your Job Categories.
This allows for hyper-refined, granular billing. The system looks at the completed Job Ticket, mashes the Type and Category together, and searches for an exact match to apply the correct pricing structure.
📊 Live Scenario: Granular Matrix Billing
You offer different pricing for servicing standard residential boilers versus heavy commercial boilers.
- Rate 1: You map £100 to the combination: Type: "Service" ~ Category: "Standard Boiler".
- Rate 2: You map £250 to the combination: Type: "Service" ~ Category: "Commercial Boiler".
When an engineer completes a ticket, the engine automatically checks both fields. Even though both jobs are a "Service", the system intercepts the calculation and applies the exact price based on the specific asset category being worked on.
Configuring the Interception Rules
Once you have mapped your Job Type/Category, you dictate exactly how the engine calculates the bill:
- Agent / Site Price: The base financial value of the service (e.g., £150).
- Mins: The amount of time included in that base price. Enter
60 to cover the first hour. Enter 0 to make the base price cover the entire duration of the job infinitely.
- Rate (Overage): The hourly rate that activates only after the "Mins" allowance has expired. If left at £0.00, it safely falls back to the engineer's standard hourly rate for the overage.
- Lock (The Padlock): Checking this box forces a strict Fixed Price contract. It overrides all time, travel, and overage mathematics, charging the customer exactly the base price regardless of the time spent.